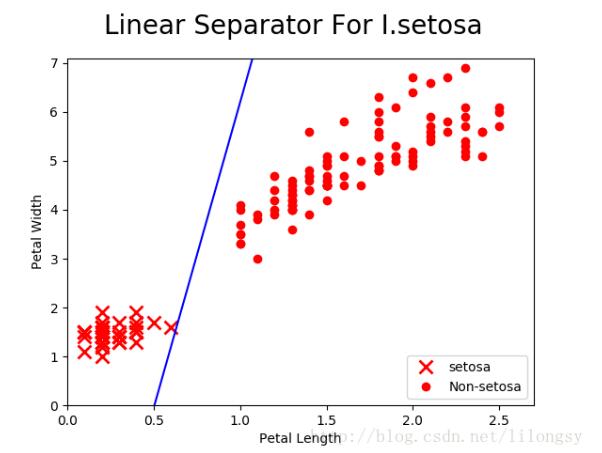
本文实例为大家分享了TensorFlow实现创建分类器的具体代码,供大家参考,具体内容如下
创建一个iris数据集的分类器。
加载样本数据集,实现一个简单的二值分类器来预测一朵花是否为山鸢尾。iris数据集有三类花,但这里仅预测是否是山鸢尾。导入iris数据集和工具库,相应地对原数据集进行转换。
# Combining Everything Together
#----------------------------------
# This file will perform binary classification on the
# iris dataset. We will only predict if a flower is
# I.setosa or not.
#
# We will create a simple binary classifier by creating a line
# and running everything through a sigmoid to get a binary predictor.
# The two features we will use are pedal length and pedal width.
#
# We will use batch training, but this can be easily
# adapted to stochastic training.

import matplotlib.pyplot as plt
import numpy as np
from sklearn import datasets
import tensorflow as tf
from tensorflow.python.framework import ops
ops.reset_default_graph()

# 导入iris数据集
# 根据目标数据是否为山鸢尾将其转换成1或者0。
# 由于iris数据集将山鸢尾标记为0,我们将其从0置为1,同时把其他物种标记为0。
# 本次训练只使用两种特征:花瓣长度和花瓣宽度,这两个特征在x-value的第三列和第四列
# iris.target = {0, 1, 2}, where '0' is setosa
# iris.data ~ [sepal.width, sepal.length, pedal.width, pedal.length]
iris = datasets.load_iris()
binary_target = np.array([1. if x==0 else 0. for x in iris.target])
iris_2d = np.array([[x[2], x[3]] for x in iris.data])

# 声明批量训练大小
batch_size = 20

# 初始化计算图
sess = tf.Session()

# 声明数据占位符
x1_data = tf.placeholder(shape=[None, 1], dtype=tf.float32)
x2_data = tf.placeholder(shape=[None, 1], dtype=tf.float32)
y_target = tf.placeholder(shape=[None, 1], dtype=tf.float32)

# 声明模型变量
# Create variables A and b (0 = x1 - A*x2 + b)
A = tf.Variable(tf.random_normal(shape=[1, 1]))
b = tf.Variable(tf.random_normal(shape=[1, 1]))

# 定义线性模型:
# 如果找到的数据点在直线以上,则将数据点代入x2-x1*A-b计算出的结果大于0;
# 同理找到的数据点在直线以下,则将数据点代入x2-x1*A-b计算出的结果小于0。
# x1 - A*x2 + b
my_mult = tf.matmul(x2_data, A)
my_add = tf.add(my_mult, b)
my_output = tf.subtract(x1_data, my_add)

# 增加TensorFlow的sigmoid交叉熵损失函数(cross entropy)
xentropy = tf.nn.sigmoid_cross_entropy_with_logits(logits=my_output, labels=y_target)

# 声明优化器方法
my_opt = tf.train.GradientDescentOptimizer(0.05)
train_step = my_opt.minimize(xentropy)

# 创建一个变量初始化操作
init = tf.global_variables_initializer()
sess.run(init)

# 运行迭代1000次
for i in range(1000):
  rand_index = np.random.choice(len(iris_2d), size=batch_size)
  # rand_x = np.transpose([iris_2d[rand_index]])
  # 传入三种数据:花瓣长度、花瓣宽度和目标变量
  rand_x = iris_2d[rand_index]
  rand_x1 = np.array([[x[0]] for x in rand_x])
  rand_x2 = np.array([[x[1]] for x in rand_x])
  #rand_y = np.transpose([binary_target[rand_index]])
  rand_y = np.array([[y] for y in binary_target[rand_index]])
  sess.run(train_step, feed_dict={x1_data: rand_x1, x2_data: rand_x2, y_target: rand_y})
  if (i+1)%200==0:
    print('Step #' + str(i+1) + ' A = ' + str(sess.run(A)) + ', b = ' + str(sess.run(b)))


# 绘图
# 获取斜率/截距
# Pull out slope/intercept
[[slope]] = sess.run(A)
[[intercept]] = sess.run(b)

# 创建拟合线
x = np.linspace(0, 3, num=50)
ablineValues = []
for i in x:
 ablineValues.append(slope*i+intercept)

# 绘制拟合曲线
setosa_x = [a[1] for i,a in enumerate(iris_2d) if binary_target[i]==1]
setosa_y = [a[0] for i,a in enumerate(iris_2d) if binary_target[i]==1]
non_setosa_x = [a[1] for i,a in enumerate(iris_2d) if binary_target[i]==0]
non_setosa_y = [a[0] for i,a in enumerate(iris_2d) if binary_target[i]==0]
plt.plot(setosa_x, setosa_y, 'rx', ms=10, mew=2, label='setosa')
plt.plot(non_setosa_x, non_setosa_y, 'ro', label='Non-setosa')
plt.plot(x, ablineValues, 'b-')
plt.xlim([0.0, 2.7])
plt.ylim([0.0, 7.1])
plt.suptitle('Linear Separator For I.setosa', fontsize=20)
plt.xlabel('Petal Length')
plt.ylabel('Petal Width')
plt.legend(loc='lower right')
plt.show()
输出:
Step #200 A = [[ 8.70572948]], b = [[-3.46638322]]
Step #400 A = [[ 10.21302414]], b = [[-4.720438]]
Step #600 A = [[ 11.11844635]], b = [[-5.53361702]]
Step #800 A = [[ 11.86427212]], b = [[-6.0110755]]
Step #1000 A = [[ 12.49524498]], b = [[-6.29990339]]
以上就是本文的全部内容,希望对大家的学习有所帮助,也希望大家多多支持亿速云。
亿速云「云服务器」,即开即用、新一代英特尔至强铂金CPU、三副本存储NVMe SSD云盘,价格低至29元/月。点击查看>>
免责声明:本站发布的内容(图片、视频和文字)以原创、转载和分享为主,文章观点不代表本网站立场,如果涉及侵权请联系站长邮箱:is@yisu.com进行举报,并提供相关证据,一经查实,将立刻删除涉嫌侵权内容。