这篇文章主要讲解了Unity3D如何实现扭动挤压浏览效果,内容清晰明了,对此有兴趣的小伙伴可以学习一下,相信大家阅读完之后会有帮助。
最近的项目中,想做到一种能够吸引眼球的一种角色选择浏览效果
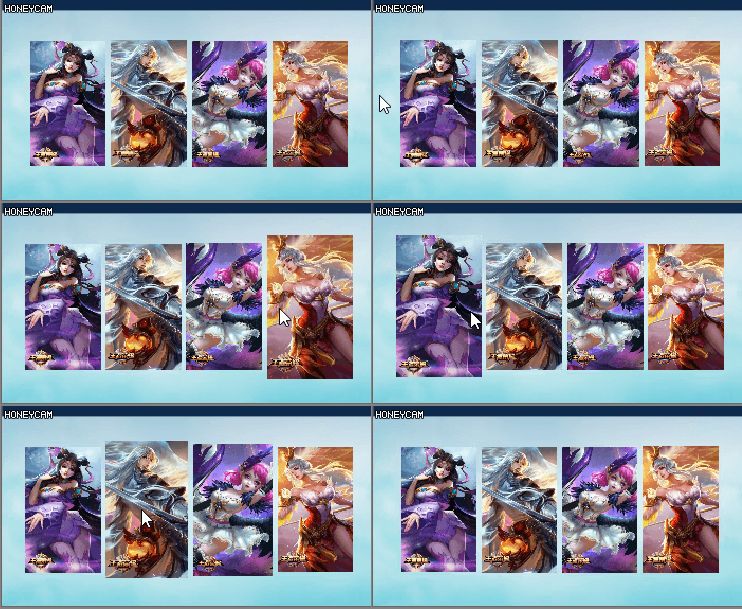
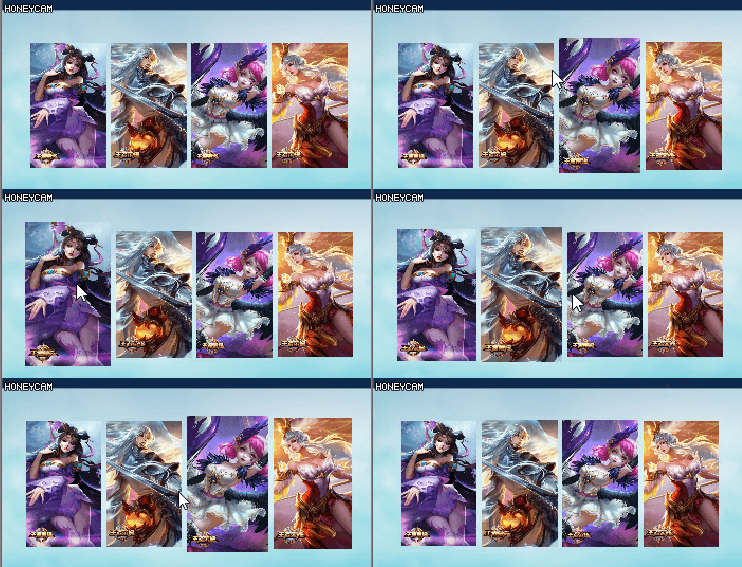
最终实现了下按如下图这么一种浏览效果:

效果图一

效果图二
可能要实现这么一种效果用动画插件会很快,但总感觉有点大材小用
这里我向大家分享一个极简方式来实现这么一种效果
目录结构如下
其中Items有4个Image子节点

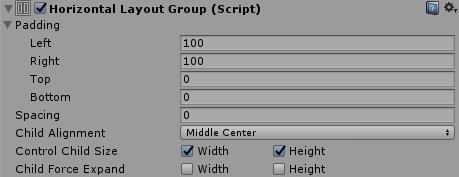
在父节点Items下添加如下图横向布局组件

在其4个Image子节点下添加如下图布局元素组件

完成这些步骤后接下来就是代码实现了
在Items添加如下脚本组件
using System.Collections;
using System.Collections.Generic;
using UnityEngine;
using UnityEngine.UI;

public class Items : MonoBehaviour
{
 public List<GameObject> items = new List<GameObject>();

 //缩放时间
 public float time = 1.3f;

 //原先大小
 public Vector2 oldSize;

 //放大缩小速度
 public float speed;

 private void Start()
 {
 for (int i = 0; i < items.Count; i++)
 {
 EventTriggerListener.GetComponent(items[i]).onEnter = OnMouseEnter;
 EventTriggerListener.GetComponent(items[i]).onExit = OnMouseExit;
 }
 }


 void OnMouseEnter(GameObject go)
 {
 EventTriggerListener.GetComponent(go).UpdateSize(oldSize * time, speed);
 }

 void OnMouseExit(GameObject go)
 {
 EventTriggerListener.GetComponent(go).UpdateSize(oldSize, speed);
 }
}
在其4个子节点下添加如下脚本组件
using System.Collections;
using System.Collections.Generic;
using UnityEngine;
using UnityEngine.EventSystems;
using UnityEngine.UI;

[RequireComponent(typeof(LayoutElement))]
public class EventTriggerListener : EventTrigger
{
 public delegate void VoidDelegate(GameObject obj);
 //点击
 public VoidDelegate onClick;
 //鼠标按下
 public VoidDelegate onDown;
 //鼠标抬起
 public VoidDelegate onUp;
 //鼠标移入
 public VoidDelegate onEnter;
 //鼠标移出
 public VoidDelegate onExit;

 private Vector2 currentSize;
 private Vector2 targetSize;
 private float speed = 4.0f;

 public static EventTriggerListener GetComponent(GameObject obj)
 {
 EventTriggerListener listener = obj.GetComponent<EventTriggerListener>();
 if (listener == null)
 {
 listener = obj.AddComponent<EventTriggerListener>();
 }

 return listener;
 }


 public override void OnPointerClick(PointerEventData eventData)
 {
 if (onClick != null)
 {
 onClick(gameObject);
 }
 }
 public override void OnPointerDown(PointerEventData eventData)
 {
 if (onDown != null) onDown(gameObject);
 }
 public override void OnPointerUp(PointerEventData eventData)
 {
 if (onUp != null) onUp(gameObject);
 }
 public override void OnPointerEnter(PointerEventData eventData)
 {
 if (onEnter != null) onEnter(gameObject);
 }
 public override void OnPointerExit(PointerEventData eventData)
 {
 if (onExit != null) onExit(gameObject);
 }


 private void Start()
 {
 targetSize = currentSize = new Vector2(this.GetComponent<LayoutElement>().preferredWidth, this.GetComponent<LayoutElement>().preferredHeight);
 }

 private void Update()
 {
 if (currentSize != targetSize)
 {
 currentSize = Vector2.Lerp(currentSize, targetSize, Time.deltaTime * speed);
 if (Vector2.Distance(currentSize, targetSize) <= 0.01)
 {
 currentSize = targetSize;
 }

 this.GetComponent<LayoutElement>().preferredWidth = currentSize.x;
 this.GetComponent<LayoutElement>().preferredHeight = currentSize.y;
 }
 }

 public void UpdateSize(Vector2 size,float speed)
 {
 this.targetSize = size;
 this.speed = speed;
 }
}
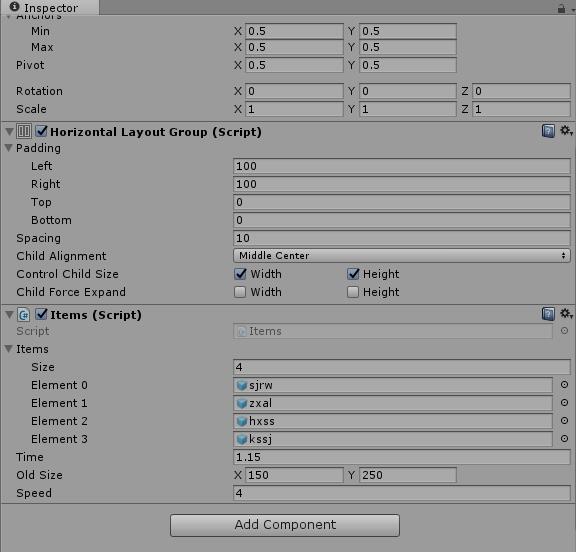
脚本挂载上去后,在Item下按如下图方式设值

可以按自己喜好调整数值。
看完上述内容,是不是对Unity3D如何实现扭动挤压浏览效果有进一步的了解,如果还想学习更多内容,欢迎关注亿速云行业资讯频道。
免责声明:本站发布的内容(图片、视频和文字)以原创、转载和分享为主,文章观点不代表本网站立场,如果涉及侵权请联系站长邮箱:is@yisu.com进行举报,并提供相关证据,一经查实,将立刻删除涉嫌侵权内容。