这篇文章将为大家详细讲解有关js如何实现图片轮播特效,小编觉得挺实用的,因此分享给大家做个参考,希望大家阅读完这篇文章后可以有所收获。
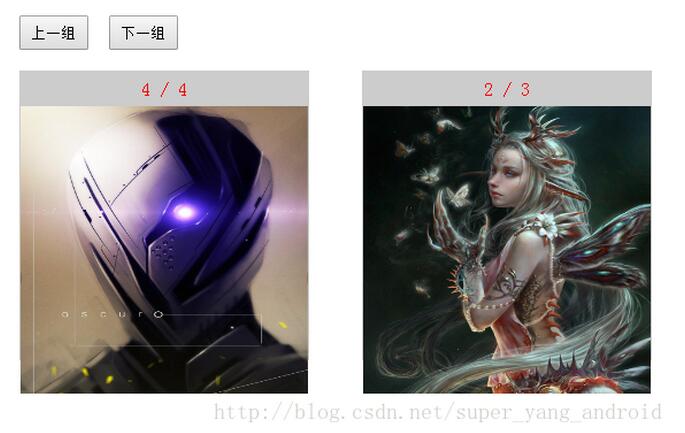
先看一眼效果图:

代码:
<html>
<head>
<meta http-equiv="Content-Type" content="text/html; charset=utf-8" />
<style>
*{padding:0;margin:0;}
#content{width:550px;height:300px;margin:50px auto;position:relative;}
#content input{width:60px;height:30px;margin-right:10px;}
#content div{diplay:inline-block;position:absolute;bottom:0;;border:1px solid #ccc;width:250px;height:250px;background:url(img/loader_ico.gif) no-repeat center #f1f1f1;}
#content div.left{left:0;}
#content div.right{right:0;}
#content div span{display:inline-block;width:250px;height:30px;line-height:30px;background:#ccc;color:red;text-align:center;}
#content div img {height:250px;width:250px;}
</style>
<script>
window.onload = function () {
 var content = $('content'),prev = $('prev'),next = $('next'),
 left = $('left'),right = $('right');
 var aSpan = content.getElementsByTagName('span');
 var aImg = content.getElementsByTagName('img');

 var arr = [
 ['img/1.png','img/2.png','img/3.png','img/4.png'],
 ['img/2.png','img/3.png','img/4.png']
 ];
 var num = [0, 0];


 // 初始化
 for ( var i = 0; i < aSpan.length; i++ ) {
 carousel(i);
 aImg[i].index = i;
 aImg[i].onclick = function () {
 if (num[this.index] === arr[this.index].length - 1) num[this.index] = -1;
 num[this.index]++;
 carousel(this.index);
 }
 }

 // 下一组
 next.onclick = function () {
 for ( var i = 0; i < aSpan.length; i++ ) {
 if (num[i] === arr[i].length - 1) num[i] = -1;
 num[i]++;
 carousel(i);
 }
 }
 // 上一组
 prev.onclick = function () {
 for ( var i = 0; i < aSpan.length; i++ ) {
 if (num[i] === 0) num[i] = arr[i].length;
 num[i]--;
 carousel(i);
 }
 }
 function carousel(index) {
 aSpan[index].innerHTML = num[index] + 1 + ' / ' + arr[index].length;
 aImg[index].src = arr[index][num[index]];
 }

 function $(id) {return document.getElementById(id);}
}
</script>
</head>
<body>
<div id="content">
 <input type="button" value="上一组" id="prev" />
 <input type="button" value="下一组" id="next" />
 <div class="left">
 <span>图片数量加载中</span>
 <img />
 </div>
 <div class="right">
 <span>图片数量加载中</span>
 <img />
 </div>
</div>
</body>
</html>关于“js如何实现图片轮播特效”这篇文章就分享到这里了,希望以上内容可以对大家有一定的帮助,使各位可以学到更多知识,如果觉得文章不错,请把它分享出去让更多的人看到。
亿速云「云服务器」,即开即用、新一代英特尔至强铂金CPU、三副本存储NVMe SSD云盘,价格低至29元/月。点击查看>>
免责声明:本站发布的内容(图片、视频和文字)以原创、转载和分享为主,文章观点不代表本网站立场,如果涉及侵权请联系站长邮箱:is@yisu.com进行举报,并提供相关证据,一经查实,将立刻删除涉嫌侵权内容。