这篇文章主要介绍iOS中各种颜色设置的示例分析,文中介绍的非常详细,具有一定的参考价值,感兴趣的小伙伴们一定要看完!
导航栏
/* 全局设置 */

// 标题颜色
// 如果需要设置字体就在字典中加入 [UIFont fontWithName:@"Hiragino Sans GB" size:14]
[[UINavigationBar appearance] setTitleTextAttributes:
  @{NSForegroundColorAttributeName:[UIColor whiteColor]}];

// 导航栏背景颜色
[[UINavigationBar appearance] setBarTintColor:[UIColor whiteColor]];

// 导航栏返回按钮、自定义UIBarButtonItem颜色
[[UINavigationBar appearance] setTintColor:[UIColor blackColor]];/* 单独设置 */
// 导航栏标题颜色
self.navigationController.navigationBar.titleTextAttributes = @{NSForegroundColorAttributeName:[UIColor whiteColor]};
// 导航栏背景颜色
self.navigationController.navigationBar.barTintColor = [UIColor whiteColor];
// 导航栏返回按钮、自定义UIBarButtonItem颜色
self.navigationController.navigationBar.tintColor = [UIColor blackColor];状态栏
进入 Targets -> General -> Status Bar Style,可以设置 黑色(默认) 和 白色。
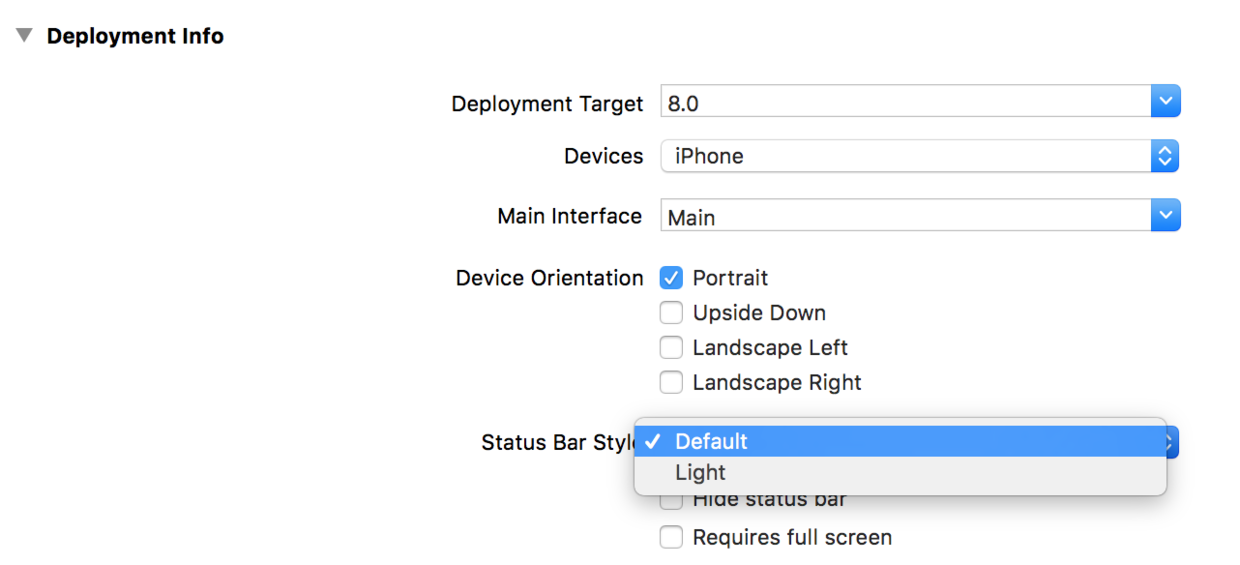
如果需要精确控制不同页面的颜色,还是需要代码设置。
首先给 info.plist 加上这句话

// View controller-based status bar appearance
// 加入这个参数,我们前面方法的设置就会失效
// 接下来就可以使用代码进行设置了

/* 全局设置 */

[UIApplication sharedApplication].statusBarStyle = UIStatusBarStyleLightContent;

/* 单独设置 */

- (UIStatusBarStyle)preferredStatusBarStyle {
 return UIStatusBarStyleLightContent;
}

// 细心的朋友读者可能会疑问,为什么这次不能用
self.navigationController.preferredStatusBarStyle = UIStatusBarStyleLightContent;
答案很简单,仔细看报错就知道这是一个 readonly 的属性,所有我们直接重写他的 set 方法。
TabBar
/* 全局设置 */
// TabBar背景颜色
[UITabBar appearance].barTintColor = [UIColor whiteColor];

/* 单独设置 */
// TabBar背景颜色
self.tabBarController.tabBar.barTintColor = [UIColor whiteColor];TabBar图标颜色
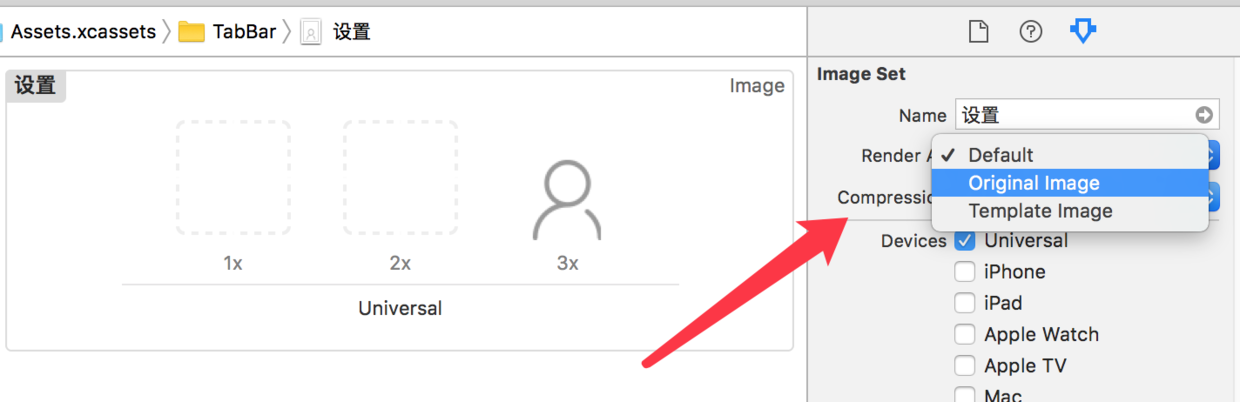
不用写乱七八糟的代码,直接到 Assets.xcassets 里把图片的属性 Render 设置为 Original Image 就可以让颜色按照图片的来,而不会选中变蓝了。
Button
// 字体颜色
// 有人可能会误用这两个错误的方法
// 错误1:[button.titleLabel setTextColor:[UIColorblackColor]];
// 错误2:button.titleLabel.textColor = [UIColor redColor];
// 正确
[button setTitleColor:[UIColor blackColor]
 forState:UIControlStateNormal];

// 边框颜色
// 默认没有边框,第一行是设置线条,第二行重点在于layer的颜色要用CGColor
button.layer.borderWidth = 2.0;
button.layer.borderColor = [UIColor blackColor].CGColor;TextField
// placeholder颜色设置
textField.attributedPlaceholder = [[NSAttributedString alloc] initWithString:@"placeHoldtext" attributes:@{NSForegroundColorAttributeName: [UIColor redColor]}];AttributedString
// 初始化NSMutableAttributedString
NSMutableAttributedString *str = [[NSMutableAttributedString alloc] initWithString:@"Using NSAttributed String"];
// 颜色设置
[str addAttribute:NSForegroundColorAttributeName
 value:[UIColor blueColor]
 range:NSMakeRange(0,5)];
[str addAttribute:NSForegroundColorAttributeName
 value:[UIColor redColor]
 range:NSMakeRange(6,12)];
[str addAttribute:NSForegroundColorAttributeName
 value:[UIColor greenColor]
 range:NSMakeRange(19,6)];
// 字体设置
[str addAttribute:NSFontAttributeName
 value:[UIFont fontWithName:@"Arial-BoldItalicMT" size:30.0]
 range:NSMakeRange(0, 5)];
[str addAttribute:NSFontAttributeName
 value:[UIFont fontWithName:@"HelveticaNeue-Bold" size:30.0]
 range:NSMakeRange(6, 12)];
[str addAttribute:NSFontAttributeName
 value:[UIFont fontWithName:@"Courier-BoldOblique" size:30.0]
 range:NSMakeRange(19, 6)];
// 把AttributedString赋值给Label
attrLabel.attributedText = str;通用部分
// 字体颜色 适用于Label、TextField、TextView等
label.textColor = [UIColor whiteColor];
textField.textColor = [UIColor yellowColor];
textView.textColor = [UIColor yellowColor];

// 背景颜色 基本都使用
someView.backgroundColor = [UIColor whiteColor];工具
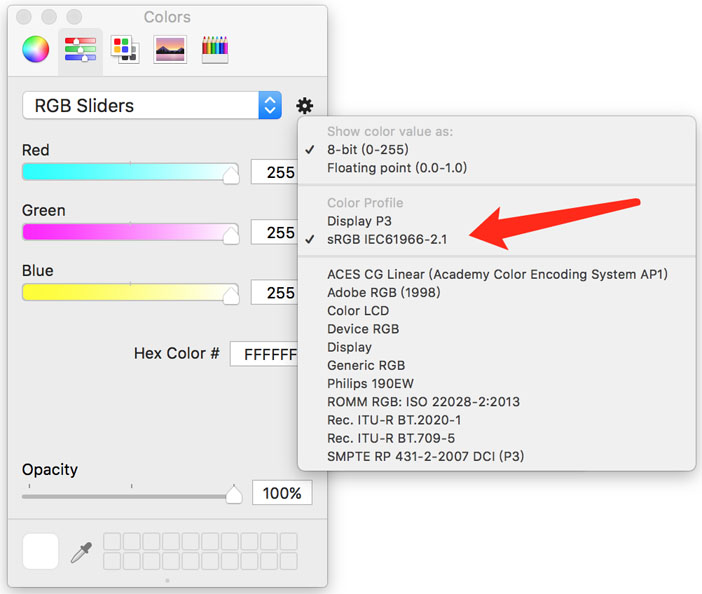
系统自带的测色工具,位置在 应用程序 -> 实用工具( Launchpad 里叫其他) -> 数码测色计
使用方法:
打开后指向你想测色的地方即可显示他的 RGB 色,以这个 Switch 举个例子。

我们设置完rgb色后和你想要的略有差别。这里提供一个解决办法。设置颜色的时候,点击右边的小齿轮,选择 sRGB。
以上是“iOS中各种颜色设置的示例分析”这篇文章的所有内容,感谢各位的阅读!希望分享的内容对大家有帮助,更多相关知识,欢迎关注亿速云行业资讯频道!
亿速云「云服务器」,即开即用、新一代英特尔至强铂金CPU、三副本存储NVMe SSD云盘,价格低至29元/月。点击查看>>
免责声明:本站发布的内容(图片、视频和文字)以原创、转载和分享为主,文章观点不代表本网站立场,如果涉及侵权请联系站长邮箱:is@yisu.com进行举报,并提供相关证据,一经查实,将立刻删除涉嫌侵权内容。


 计算
计算 安全
安全 数据库
数据库 网络和加速
网络和加速 企业服务
企业服务


