这篇文章将为大家详细讲解有关使用Flutter怎么实现底部导航栏效果,文章内容质量较高,因此小编分享给大家做个参考,希望大家阅读完这篇文章后对相关知识有一定的了解。
一.在main.dart文件中
定义APP的基本信息
class MyApp extends StatelessWidget {
 // This widget is the root of your application.
 @override
 Widget build(BuildContext context) {
  return new MaterialApp(
   title: 'Flutter Demo',
   theme: new ThemeData(

    primarySwatch: themeColor(),

   ),
   home: new MyHomePage(title: 'Flutter Demo Home Page'),
  );
 }
}其中主要代码部分
class _MyHomePageState extends State<MyHomePage> {


 PageController pageController;
 int page = 0;

 @override
 Widget build(BuildContext context) {

  return new Scaffold(

   backgroundColor: Colors.grey,

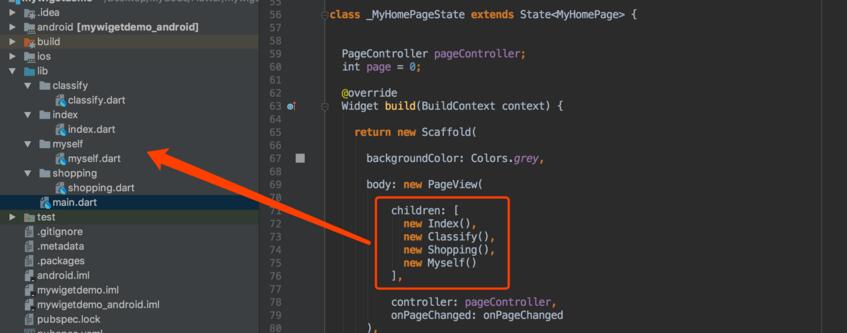
   body: new PageView(

     children: [
      new Index(),
      new Classify(),
      new Shopping(),
      new Myself()
     ],

     controller: pageController,
     onPageChanged: onPageChanged
   ),

   bottomNavigationBar: new BottomNavigationBar(items: [
    new BottomNavigationBarItem(
     icon: new Icon(Icons.laptop_chromebook),
     title: new Text("主页"),
     backgroundColor: Colors.grey
    ),
    new BottomNavigationBarItem(
      icon: new Icon(Icons.list), title: new Text("分类"),backgroundColor: Colors.grey),
    new BottomNavigationBarItem(
      icon: new Icon(Icons.local_grocery_store), title: new Text("购物车")),
    new BottomNavigationBarItem(icon: new Icon(Icons.person), title: new Text("我的"))
   ],
     onTap: onTap,
     currentIndex: page
   ),
  );
 }

 @override
 void initState() {
  super.initState();
  pageController = new PageController(initialPage: this.page);
 }


 void onTap(int index) {
  pageController.animateToPage(
    index, duration: const Duration(milliseconds: 300),
    curve: Curves.ease);
 }


 void onPageChanged(int page) {
  setState(() {
   this.page = page;
  });
 }


}其中,各个页面的主要声明

底部导航栏的内容填充

二.其他四个页面的主要代码
import 'package:flutter/material.dart';
class Classify extends StatelessWidget {


 @override
 Widget build(BuildContext context) {
  // TODO: implement build

  return new Scaffold(
   body: new Center(
    child:
    new Text("分类"),
   ),
  );
 }
}关于使用Flutter怎么实现底部导航栏效果就分享到这里了,希望以上内容可以对大家有一定的帮助,可以学到更多知识。如果觉得文章不错,可以把它分享出去让更多的人看到。
亿速云「云服务器」,即开即用、新一代英特尔至强铂金CPU、三副本存储NVMe SSD云盘,价格低至29元/月。点击查看>>
免责声明:本站发布的内容(图片、视频和文字)以原创、转载和分享为主,文章观点不代表本网站立场,如果涉及侵权请联系站长邮箱:is@yisu.com进行举报,并提供相关证据,一经查实,将立刻删除涉嫌侵权内容。