这篇文章将为大家详细讲解有关如何在Android中实现BottomSheet效果,文章内容质量较高,因此小编分享给大家做个参考,希望大家阅读完这篇文章后对相关知识有一定的了解。
首先引入依赖包:
compile 'com.android.support:design:27.1.1'
页面布局如下:
<?xml version="1.0" encoding="utf-8"?>
<android.support.design.widget.CoordinatorLayout xmlns:android="http://schemas.android.com/apk/res/android"
  xmlns:app="http://schemas.android.com/apk/res-auto"
  android:orientation="vertical"
  android:layout_width="match_parent"
  android:layout_height="match_parent">

  <LinearLayout
    android:id="@+id/customActionWebView"
    android:orientation="vertical"
    android:layout_width="match_parent"
    android:layout_height="match_parent">
    <TextView
      android:layout_width="wrap_content"
      android:layout_height="wrap_content"
      android:text="文本一"/>

    <TextView
      android:layout_width="wrap_content"
      android:layout_height="wrap_content"
      android:text="文本二"/>
  </LinearLayout>

  <android.support.v4.widget.NestedScrollView
    android:id="@+id/nested_scroll_view"
    android:layout_width="match_parent"
    android:layout_height="match_parent"
    app:behavior_hideable="true"
    app:behavior_peekHeight="150dp"
    android:layout_gravity="bottom"
    app:layout_behavior="@string/bottom_sheet_behavior">

    <WebView
      android:id="@+id/web_view"
      android:layout_width="match_parent"
      android:layout_height="match_parent">

    </WebView>
  </android.support.v4.widget.NestedScrollView>
</android.support.design.widget.CoordinatorLayout>
根布局需要使用CoordinatorLayout,同时在其直接子布局——这里是NestedScrollView——里添加behavior app:layout_behavior = "@string/bottom_sheet_behavior" 。很多文章说指定behavior的控件必须是NestedScrollView,这是错误的,实际上任何view或viewgroup都可以。该behavior配合CoordinateLayout就可以实现behavior所在控件的上滑效果。如果需要上滑的布局展示的时候先漏出一部分,如上面视频所示,可以通过设置 app:behavior_peekHeight 实现,它用来指定漏出的高度。
在代码部分,首先获取NestedScrollView的behavior,然后通过behavior控制底部卡片什么时候弹出,同时会有一些状态回调函数可供调用。
public class BrowserActivity extends AppCompatActivity {
  private NestedScrollView nestedScrollView;
  private BottomSheetBehavior behavior;

  @Override
  protected void onCreate(Bundle savedInstanceState) {
    super.onCreate(savedInstanceState);

    setContentView(R.layout.browser_layout);

    nestedScrollView = (NestedScrollView) findViewById(R.id.nested_scroll_view);
    behavior = BottomSheetBehavior.from(nestedScrollView);
    behavior.setBottomSheetCallback(new BottomSheetBehavior.BottomSheetCallback() {
      @Override
      public void onStateChanged(@NonNull View bottomSheet, int newState) {
        //这里是bottomSheet 状态的改变
      }

      @Override
      public void onSlide(@NonNull View bottomSheet, float slideOffset) {
        //这里是拖拽中的回调,根据slideOffset可以做一些动画
      }
    });
  }

  public void showBottomSheet() {
    behavior.setState(BottomSheetBehavior.STATE_EXPANDED);
  }
}
通过这种方式可以在特定的页面添加底部上滑的效果。
BottomSheetDialog实现通用效果
BottomSheetDialog是BottomSheet效果实现的一种更加通用的方法,比如我们需要在不同的页面实现长按文本弹出卡片列表效果,下面给出实现。
我们集成BottomSheetDialog实现自定义的Dialog,其布局如下:
<?xml version="1.0" encoding="utf-8"?>
<android.support.v4.widget.NestedScrollView xmlns:android="http://schemas.android.com/apk/res/android"
  xmlns:app="http://schemas.android.com/apk/res-auto"
  android:layout_width="match_parent"
  android:layout_height="match_parent">

  <LinearLayout
    android:layout_width="match_parent"
    android:layout_height="match_parent"
    android:orientation="vertical">

    <view class="com.example.trio.tensordemo.CustomBottomSheetDialogForWebView$NestViewEmbeddedListView"
      android:id="@+id/card_list_view"
      android:layout_width="match_parent"
      android:layout_height="match_parent"
      android:divider="@color/transparent"
      android:scrollbars="none"
      android:dividerHeight="15dp"
      android:layout_margin="20dp">
    </view>
  </LinearLayout>

</android.support.v4.widget.NestedScrollView>
注意,这里最外层布局需要是 NestedScrollView ,而 不能是CoordinateLayout ,因为BottomSheetDialog本身已经有个CoordinateLayout根布局,它会把你的布局文件包裹起来,如果你在自己的布局里把最外层布局写成CoordinateLayout,会导致底部上滑的卡片,在下滑消失后屏幕依旧变暗的问题,这是因为整个布局变成了两个CoordinateLayout嵌套,下滑的时候里面的CoordinateLayout滑出屏幕,但外层的CoordinateLayout仍然在展示。通过查阅BottomSheetDialog源码可以看出,它是这样包裹你的布局文件的:
public class BottomSheetDialog extends AppCompatDialog {
  ...
  @Override
  public void setContentView(@LayoutRes int layoutResId) {
    super.setContentView(wrapInBottomSheet(layoutResId, null, null));
  }

  private View wrapInBottomSheet(int layoutResId, View view, ViewGroup.LayoutParams params) {
    final FrameLayout container = (FrameLayout) View.inflate(getContext(),
        R.layout.design_bottom_sheet_dialog, null);
    final CoordinatorLayout coordinator =
        (CoordinatorLayout) container.findViewById(R.id.coordinator);
    if (layoutResId != 0 && view == null) {
      view = getLayoutInflater().inflate(layoutResId, coordinator, false);
    }
    FrameLayout bottomSheet = (FrameLayout) coordinator.findViewById(R.id.design_bottom_sheet);
    mBehavior = BottomSheetBehavior.from(bottomSheet);
    mBehavior.setBottomSheetCallback(mBottomSheetCallback);
    mBehavior.setHideable(mCancelable);
    if (params == null) {
      bottomSheet.addView(view);
    } else {
      bottomSheet.addView(view, params);
    }
    // We treat the CoordinatorLayout as outside the dialog though it is technically inside
    coordinator.findViewById(R.id.touch_outside).setOnClickListener(new View.OnClickListener() {
      @Override
      public void onClick(View view) {
        if (mCancelable && isShowing() && shouldWindowCloseOnTouchOutside()) {
          cancel();
        }
      }
    });
    ...
    return container;
  }
  ...
}
所以,BottomSheetDialog本身的布局实际如下:
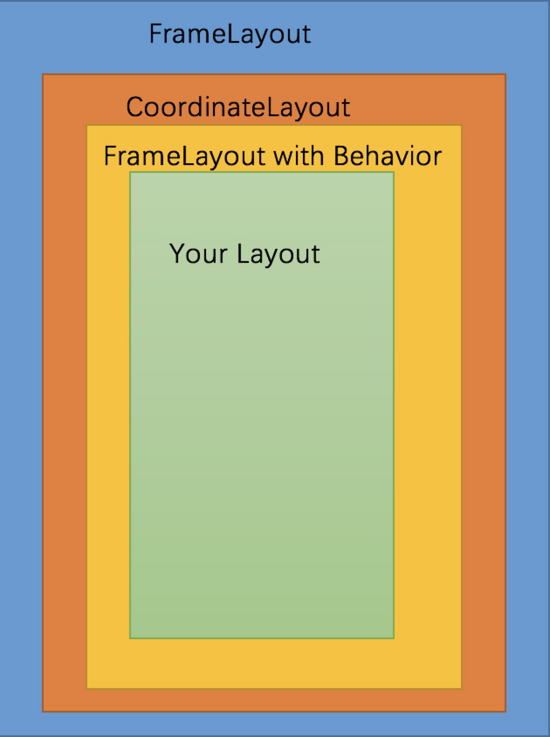
BottomSheetDialog页面布局
我们可以看到最外层是FrameLayout,里面有个CoordinateLayout,CoordinateLayout里面有个直接子布局FrameLayout,该CoordinateLayout指定了Behavior,最里面才是用户自定义的布局,所以不应该在自定义布局里再添加CoordinateLayout,也不应该再次指定Behavior,直接摆放你的内容就行。
我们的自定义布局如下:
<?xml version="1.0" encoding="utf-8"?>
<android.support.v4.widget.NestedScrollView xmlns:android="http://schemas.android.com/apk/res/android"
  xmlns:app="http://schemas.android.com/apk/res-auto"
  android:layout_width="match_parent"
  android:layout_height="match_parent">

  <LinearLayout
    android:layout_width="match_parent"
    android:layout_height="match_parent"
    android:orientation="vertical">

    <view class="com.example.trio.tensordemo.CustomBottomSheetDialogForWebView$NestViewEmbeddedListView"
      android:id="@+id/card_list_view"
      android:layout_width="match_parent"
      android:layout_height="match_parent"
      android:divider="@color/transparent"
      android:scrollbars="none"
      android:dividerHeight="15dp"
      android:layout_margin="20dp">
    </view>
  </LinearLayout>

</android.support.v4.widget.NestedScrollView>
布局的核心是一个ListView,注意,由于ListView和behavior都需要处理滑动事件,所以直接使用ListView会导致滑动冲突,解决办法是采用ScrollView嵌套ListView实现,同时使用自定义的ListView将所有列表项展开。
自定义的NestViewEmbeddedListView如下:
public static class NestViewEmbeddedListView extends ListView {
    public NestViewEmbeddedListView(android.content.Context context, android.util.AttributeSet attrs){
      super(context, attrs);
    }
    /**
     * 设置不滚动
     */
    public void onMeasure(int widthMeasureSpec, int heightMeasureSpec)
    {
      int expandSpec = MeasureSpec.makeMeasureSpec(Integer.MAX_VALUE >> 2,
          MeasureSpec.AT_MOST);
      super.onMeasure(widthMeasureSpec, expandSpec);

    }
  }
自定义的BottomSheetDialog代码如下:
public class CustomBottomSheetDialogForWebView extends BottomSheetDialog {
  private Context context;
  private NestViewEmbeddedListView listView;
  private NerResult nerResult;
  private CardListAdapter cardListAdapter = new CardListAdapter();

  public CustomBottomSheetDialogForWebView(@NonNull Context context, NerResult nerResult) {
    super(context);
    this.context = context;
    this.nerResult = nerResult;
    createView();
  }

  public void createView() {
    View bottomSheetView = getLayoutInflater().inflate(R.layout.webview_bottom_sheet_layout, null);
    setContentView(bottomSheetView);

    // 注意:这里要给layout的parent设置peekHeight,而不是在layout里给layout本身设置,下面设置背景色同理,坑爹!!!
    BottomSheetBehavior bottomSheetBehavior = BottomSheetBehavior.from(((View) bottomSheetView.getParent()));
    bottomSheetBehavior.setPeekHeight(730);

    ((View) bottomSheetView.getParent()).setBackgroundColor(context.getResources().getColor(R.color.transparent));
    listView = bottomSheetView.findViewById(R.id.card_list_view);

    cardListAdapter.setNerItems(nerResult);
    listView.setAdapter(cardListAdapter);
  }
}Android是一种基于Linux内核的自由及开放源代码的操作系统,主要使用于移动设备,如智能手机和平板电脑,由美国Google公司和开放手机联盟领导及开发。
关于如何在Android中实现BottomSheet效果就分享到这里了,希望以上内容可以对大家有一定的帮助,可以学到更多知识。如果觉得文章不错,可以把它分享出去让更多的人看到。
免责声明:本站发布的内容(图片、视频和文字)以原创、转载和分享为主,文章观点不代表本网站立场,如果涉及侵权请联系站长邮箱:is@yisu.com进行举报,并提供相关证据,一经查实,将立刻删除涉嫌侵权内容。


