1.创建maven工程,在pom文件中添加依赖
<parent>
  <groupId>org.springframework.boot</groupId>
  <artifactId>spring-boot-starter-parent</artifactId>
  <version>1.5.9.RELEASE</version>
  </parent>
 <dependencies>
  <dependency>
    <groupId>org.springframework.boot</groupId>
    <artifactId>spring-boot-starter-web</artifactId>
  </dependency>
  <!-- 单元测试使用 -->
  <dependency>
    <groupId>org.springframework.boot</groupId>
    <artifactId>spring-boot-starter-test</artifactId>
  </dependency>
  <dependency>
   <groupId>junit</groupId>
   <artifactId>junit</artifactId>
   <scope>test</scope>
  </dependency>
</dependencies>2.创建项目启动类 StartApplication.java
package com.kelly.controller;
import org.springframework.boot.SpringApplication;
import org.springframework.boot.autoconfigure.EnableAutoConfiguration;
import org.springframework.context.annotation.ComponentScan;
import org.springframework.context.annotation.Configuration;
@Configuration
@EnableAutoConfiguration //自动加载配置信息
@ComponentScan("com.kelly")//使包路径下带有注解的类可以使用@Autowired自动注入
public class StartApplication {
  public static void main(String[] args) {
    SpringApplication.run(StartApplication.class, args);
  }
}
package com.kelly.controller;
import org.springframework.beans.factory.annotation.Value;
import org.springframework.stereotype.Controller;
import org.springframework.web.bind.annotation.RequestMapping;
import org.springframework.web.bind.annotation.ResponseBody;
@Controller
public class FirstController {
  @Value("${test.name}")
  private String name;
  @Value("${test.password}")
  private String password;
  @RequestMapping("/")
  @ResponseBody
  String home()
  {
    return "Hello Springboot!";
  }
  @RequestMapping("/hello")
  @ResponseBody
  String hello()
  {
    return "name: " + name + ", " + "password: " + password;
  }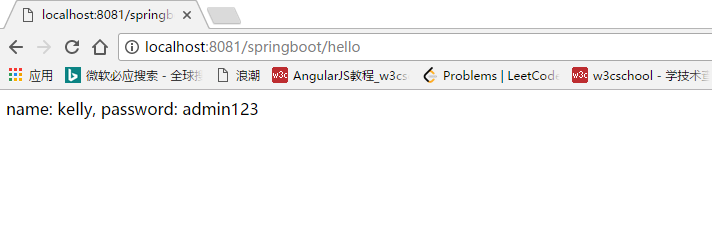
}5.打开浏览器,输入 http://localhost:8081/springboot/hello 即可看到结果
6.使用java bean的方式读取自定义配置文件 define.properties
DefineEntity.java
package com.kelly.entity;
import org.springframework.boot.context.properties.ConfigurationProperties;
import org.springframework.context.annotation.PropertySource;
import org.springframework.stereotype.Component;
@Component
@ConfigurationProperties(prefix="defineTest")
@PropertySource("classpath:define.properties")
public class DefineEntity {
  private String pname;
  private String password;
  public String getPname() {
    return pname;
  }
  public void setPname(String pname) {
    this.pname = pname;
  }
  public String getPassword() {
    return password;
  }
  public void setPassword(String password) {
    this.password = password;
  }
}

SecondController.java

package com.kelly.controller;
import org.springframework.beans.factory.annotation.Autowired;
import org.springframework.stereotype.Controller;
import org.springframework.web.bind.annotation.RequestMapping;
import org.springframework.web.bind.annotation.ResponseBody;
import com.kelly.entity.DefineEntity;
@Controller
public class SecondController {
  @Autowired
  DefineEntity defineEntity;
  @RequestMapping("/define")
  @ResponseBody
  String define()
  {
    return "test.name:" + defineEntity.getPname() + ", test.password:" + defineEntity.getPassword();
  }
}7.打开浏览器,访问 http://localhost:8081/springboot/define,可以看到输出结果

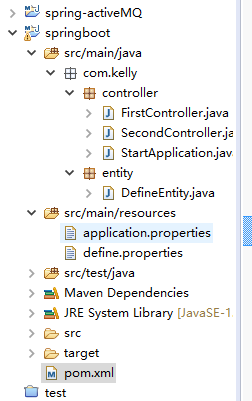
补充:我的项目的目录结构
总结
以上所述是小编给大家介绍的Springboot读取配置文件及自定义配置文件的方法,希望对大家有所帮助,如果大家有任何疑问请给我留言,小编会及时回复大家的。在此也非常感谢大家对亿速云网站的支持!
亿速云「云服务器」,即开即用、新一代英特尔至强铂金CPU、三副本存储NVMe SSD云盘,价格低至29元/月。点击查看>>
免责声明:本站发布的内容(图片、视频和文字)以原创、转载和分享为主,文章观点不代表本网站立场,如果涉及侵权请联系站长邮箱:is@yisu.com进行举报,并提供相关证据,一经查实,将立刻删除涉嫌侵权内容。


 计算
计算 安全
安全 数据库
数据库 网络和加速
网络和加速 企业服务
企业服务


