1.首先来看看Android:layout_gravity和android:gravity的使用区别。
android:gravity:
这个是针对控件里的元素来说的,用来控制元素在该控件里的显示位置。例如,在一个Button按钮控件中设置如下两个属性,
android:gravity="left"和android:text="提交",这时Button上的文字“提交”将会位于Button的左部。
android:layout_gravity:
这个是针对控件本身而言,用来控制该控件在包含该控件的父控件中的位置。同样,当我们在Button按钮控件中设置android:layout_gravity="left"属性时,表示该Button按钮将位于界面的左部。
2.属性值:
这两个属性可选的值有:top、bottom、left、right、center_vertical、fill_vertical、center_horizontal、fill_horizontal、center、fill、clip_vertical。
一个属性可以包含多个值,需用“|”分开。其含义如下:
| top | 将对象放在其容器的顶部,不改变其大小. |
| bottom | 将对象放在其容器的底部,不改变其大小. |
| left | 将对象放在其容器的左侧,不改变其大小. |
| right | 将对象放在其容器的右侧,不改变其大小. |
| center_vertical | 将对象纵向居中,不改变其大小. 垂直对齐方式:垂直方向上居中对齐。 |
| fill_vertical | 必要的时候增加对象的纵向大小,以完全充满其容器. 垂直方向填充 |
| center_horizontal | 将对象横向居中,不改变其大小. 水平对齐方式:水平方向上居中对齐 |
| fill_horizontal | 必要的时候增加对象的横向大小,以完全充满其容器. 水平方向填充 |
| center | 将对象横纵居中,不改变其大小. |
| fill | 必要的时候增加对象的横纵向大小,以完全充满其容器. |
| clip_vertical |
附加选项,用于按照容器的边来剪切对象的顶部和/或底部的内容. 剪切基于其纵向对齐设置:顶部对齐时,剪切底部;底部对齐时剪切顶部;除此之外剪切顶部和底部. 垂直方向裁剪 |
| clip_horizontal |
附加选项,用于按照容器的边来剪切对象的左侧和/或右侧的内容. 剪切基于其横向对齐设置:左侧对齐时,剪切右侧;右侧对齐时剪切左侧;除此之外剪切左侧和右侧. 水平方向裁剪 |
我们主要来看看center_vertical和center_horizontal两个属性值,
center_vertical是指将对象在垂直方向上居中对齐,即在从上到下的方向上选择中间的位置放好;center_horizontal是指将对象水平方向上居中对齐,即在从左到右的方向上选择中间的位置放好。
3.特殊情况
当我们采用LinearLayout布局时,有以下特殊情况需要我们注意:
(1)当 android:orientation="vertical" 时, android:layout_gravity只有水平方向的设置才起作用,垂直方向的设置不起作用。即:left,right,center_horizontal 是生效的。
(2)当 android:orientation="horizontal" 时, android:layout_gravity只有垂直方向的设置才起作用,水平方向的设置不起作用。即:top,bottom,center_vertical 是生效的。
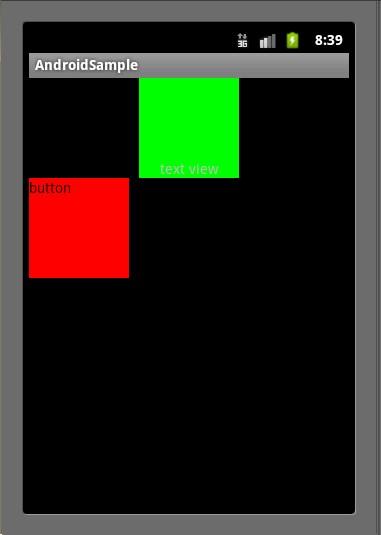
下面以一个例子说明:(本例来源于:http://blog.csdn.net/dekunchenivan/article/details/6718678)
<?xml version="1.0" encoding="utf-8"?>
<LinearLayout xmlns:android="http://schemas.android.com/apk/res/android"
 android:orientation="vertical"
 android:layout_width="fill_parent"
 android:layout_height="fill_parent"
 >
 <TextView
 android:layout_width="100dip"
 android:layout_height="100dip"
 android:layout_gravity="bottom|center_horizontal"
 android:gravity="center|bottom"
 android:background="#00FF00"
 android:text="@string/textview"
 />

 <Button
 android:layout_width="100dip"
 android:layout_height="100dip"
 android:layout_gravity="bottom|left"
 android:gravity="left|top"
 android:background="#FF0000"
 android:text="@string/button"
 />
</LinearLayout> 其效果如图:

在TextView中,我们设置了android:layout_gravity="bottom|center_horizontal" ,但该TextView并没有显示在屏幕的下方正中央,表明只有center_horizontal属性起了作用,这正是因为我们使用了LinearLayout布局,并且其android:orientation="vertical",只有水平方向的设置才会起作用,其他方向则会失效。同样,Button也一样。
以上就是本文的全部内容,希望本文的内容对大家的学习或者工作能带来一定的帮助,同时也希望多多支持亿速云!
亿速云「云服务器」,即开即用、新一代英特尔至强铂金CPU、三副本存储NVMe SSD云盘,价格低至29元/月。点击查看>>
免责声明:本站发布的内容(图片、视频和文字)以原创、转载和分享为主,文章观点不代表本网站立场,如果涉及侵权请联系站长邮箱:is@yisu.com进行举报,并提供相关证据,一经查实,将立刻删除涉嫌侵权内容。