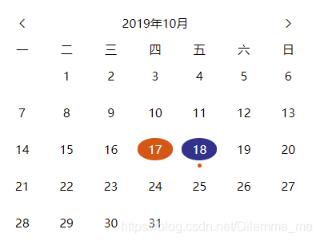
本篇文章给大家分享的是有关小程序开发中如何实现一个日历功能,小编觉得挺实用的,因此分享给大家学习,希望大家阅读完这篇文章后可以有所收获,话不多说,跟着小编一起来看看吧。
具体内容如下

代码
<!-- 日历 -->
<view class="gradient">
<view class="box">
<view class="spaceAroundCenter flex_align_justify_b">
<view class="flex-item">
<view class="item-content flex_align_justify_c" bindtap="doDay" data-key='left'>
<view class="glyphicon glyphicon-triangle-left">
<van-icon name="arrow-left" class="flex_align" />
</view>
</view>
</view>
<view class="flex-item item-content-current-day">
<view class="item-content flex_align_justify_c">{{currentDate}}</view>
</view>
<view class="flex-item">
<view class="item-content flex_align_justify_c" bindtap="doDay" data-key="right">
<view class="glyphicon glyphicon-triangle-right">
<van-icon name="arrow" class="flex_align" />
</view>
</view>
</view>
</view>
<view class="spaceAroundCenter">
<view class="spaceAroundCenter_date">一</view>
<view class="spaceAroundCenter_date">二</view>
<view class="spaceAroundCenter_date">三</view>
<view class="spaceAroundCenter_date">四</view>
<view class="spaceAroundCenter_date">五</view>
<view class="spaceAroundCenter_date">六</view>
<view class="spaceAroundCenter_date">日</view>
</view>
<view class="spaceAroundCenter">
<view class="flex-item day_item" wx:for="{{currentDayList}}" wx:for-index='key' wx:for-item="vo" wx:key="{{key}}">
<view id='{{vo}}' class="item-content flex_align_justify_c bk-color-day" wx:if="{{vo == currentDay}}" bindtap='onClickItem'>{{vo}}</view>
<view id='{{vo}}' class="item-content flex_align_justify_c bk-color-dayClick" wx:elif="{{vo == currentClickKey && currentClickKey != '' && vo != ''}}" bindtap='onClickItem'>{{vo}}</view>
<view id='{{vo}}' class="item-content flex_align_justify_c" bindtap='onClickItem' wx:else>{{vo}}</view>
<view class="day_item_circle" wx:if="{{currentClickKey!=''&¤tClickKey==vo&&remindlist.length>=1}}"></view>
</view>
</view>
</view>
</view>CSS:
/* 日历 */
.gradient{
 background: #fff;
 margin-bottom: 16rpx;
 overflow: hidden;
 border-bottom: 1rpx solid #f1f1f1;
}
.gradient .box{
 padding: 0 24rpx;
}
.glyphicon .iconfont{
 font-size: 46rpx;
}
.spaceAroundCenter {
 display: flex;
 flex-flow: row wrap;
 align-items: center;
 justify-content: space-around;
}
.spaceAroundCenter_date{
 font-size: 28rpx;
}
.flex-item {
 /* flex-flow: nowrap;
 flex-grow: 1;
 flex-shrink: 1; */
 width: 14.2%;
 /* padding: 10rpx 0; */
 height: 85rpx;
 display: flex;
 align-items: center;
 justify-content: center;
}

.item-content {
 font-size: 28rpx;
 width:80%;
 height: 60%;
}
 /* 当前日期 */
.bk-color-day {
 color: #fff;
 border-radius: 50%;
 background-color: #dd5923;
}

/* 当前选中日期 */
.bk-color-dayClick {
 color: #fff;
 border-radius: 50%;
 background-color: #30318b;
}

.item-content-current-day {
 flex-grow: 2;
}
.day_item{
 position: relative;
}
.day_item_circle{
 width: 10rpx;
 height: 10rpx;
 background: #dd5923;
 position: absolute;
 bottom: 0;
 border-radius: 50%;
}
js:
Page({
data: {
currentDayList: '',
currentObj:'',
arr: ['', '', '', '', '', '', '', '', '', '', '', '', '', '', '', '', '', '', '', '', '', '', '', '', '', '', '', '', '', '', ''],
currentDate:'',
currentDay:'',
year:'',
month:'',
currentClickKey:'',
remindlist:[1,2,3]
},
onLoad: function (options) {
var currentObj = this.getCurrentDayString()
this.setData({
currentDate: currentObj.getFullYear() + '年' + (currentObj.getMonth() + 1) + '月',
currentDay: currentObj.getDate(),
currentObj: currentObj,
year: currentObj.getFullYear(),
month: currentObj.getMonth() + 1
})
this.setSchedule(currentObj);
},
doDay: function (e) {
this.setData({
currentClickKey:''
})
var arr = this.data.arr;
for (let i in arr) {
var newarr = 'arr[' + i + ']';
this.setData({
[newarr]: ''
})
}
var that = this
var currentObj = that.data.currentObj
var Y = currentObj.getFullYear();
var m = currentObj.getMonth() + 1;
var d = currentObj.getDate();
var str = ''
if (e.currentTarget.dataset.key == 'left') {
m -= 1
if (m <= 0) {
str = (Y - 1) + '/' + 12 + '/' + d
} else {
str = Y + '/' + m + '/' + d
}
} else {
m += 1
if (m <= 12) {
str = Y + '/' + m + '/' + d
} else {
str = (Y + 1) + '/' + 1 + '/' + d
}
}
currentObj = new Date(str)
this.setData({
currentDate: currentObj.getFullYear() + '年' + (currentObj.getMonth() + 1) + '月',
currentObj: currentObj,
year: currentObj.getFullYear(),
month: (currentObj.getMonth() + 1),
day: ''
})
this.setSchedule(currentObj);
},
getCurrentDayString: function () {
var objDate = this.data.currentObj
if (objDate != '') {
return objDate
} else {
var c_obj = new Date()
var a = c_obj.getFullYear() + '/' + (c_obj.getMonth() + 1) + '/' + c_obj.getDate()
return new Date(a)
}
},
setSchedule: function (currentObj) {
var that = this
var m = currentObj.getMonth() + 1
var Y = currentObj.getFullYear()
var d = currentObj.getDate();
var dayString = Y + '/' + m + '/' + currentObj.getDate()
var currentDayNum = new Date(Y, m, 0).getDate()
var currentDayWeek = currentObj.getUTCDay() + 1
var result = currentDayWeek - (d % 7 - 1);
var firstKey = result <= 0 ? 7 + result : result;
var currentDayList = []
var f = 0
for (var i = 0; i < 42; i++) {
let data = []
if (i < firstKey - 1) {
currentDayList[i] = ''
} else {
if (f < currentDayNum) {
currentDayList[i] = f + 1
f = currentDayList[i]
} else if (f >= currentDayNum) {
currentDayList[i] = ''
}
}
}
that.setData({
currentDayList: currentDayList
})
},
// 设置点击事件
onClickItem: function (e) {
// console.log(JSON.stringify(e));
// console.log(JSON.stringify(e.currentTarget));
this.setData({
currentClickKey: e.currentTarget.id
});
},
})以上就是小程序开发中如何实现一个日历功能,小编相信有部分知识点可能是我们日常工作会见到或用到的。希望你能通过这篇文章学到更多知识。更多详情敬请关注亿速云行业资讯频道。
免责声明:本站发布的内容(图片、视频和文字)以原创、转载和分享为主,文章观点不代表本网站立场,如果涉及侵权请联系站长邮箱:is@yisu.com进行举报,并提供相关证据,一经查实,将立刻删除涉嫌侵权内容。