这篇文章主要介绍了在ASP.NET Core MVC中使用Cookie的方法,具有一定借鉴价值,感兴趣的朋友可以参考下,希望大家阅读完这篇文章之后大有收获,下面让小编带着大家一起了解一下。
一.Cookie是什么?
我的朋友问我cookie是什么,用来干什么的,可是我居然无法清楚明白简短地向其阐述cookie,这不禁让我陷入了沉思:为什么我无法解释清楚,我对学习的方法产生了怀疑!所以我们在学习一个东西的时候,一定要做到知其然知其所以然。
HTTP协议本身是无状态的。什么是无状态呢,即服务器无法判断用户身份。Cookie实际上是一小段的文本信息)。客户端向服务器发起请求,如果服务器需要记录该用户状态,就使用response向客户端浏览器颁发一个Cookie。客户端浏览器会把Cookie保存起来。当浏览器再请求该网站时,浏览器把请求的网址连同该Cookie一同提交给服务器。服务器检查该Cookie,以此来辨认用户状态。
打个比方,这就犹如你办理了银行卡,下次你去银行办业务,直接拿银行卡就行,不需要身份证。
二.在.NET Core中尝试
废话不多说,干就完了,现在我们创建ASP.NET Core MVC项目,撰写该文章时使用的.NET Core SDK 3.0 构建的项目,创建完毕之后我们无需安装任何包,
但是我们需要在Startup中添加一些配置,用于Cookie相关的。
//public const string CookieScheme = "YourSchemeName";
  public Startup(IConfiguration configuration)
  {
   Configuration = configuration;
  }
  public IConfiguration Configuration { get; }
  // This method gets called by the runtime. Use this method to add services to the container.
  public void ConfigureServices(IServiceCollection services)
  {
   //CookieAuthenticationDefaults.AuthenticationScheme Cookies Default Value
   //you can change scheme
   services.AddAuthentication(CookieAuthenticationDefaults.AuthenticationScheme)
    .AddCookie(options => {
     options.LoginPath = "/LoginOrSignOut/Index/";
    });
   services.AddControllersWithViews();
   // is able to also use other services.
   //services.AddSingleton<IConfigureOptions<CookieAuthenticationOptions>, ConfigureMyCookie>();
}在其中我们配置登录页面,其中 AddAuthentication 中是我们的方案名称,这个是做什么的呢?很多小伙伴都懵懵懂懂表示很懵逼啊,我看很多人也是都写得默认,那它到底有啥用,经过我看AspNetCore源码发现它这个是可以做一些配置的。看下面的代码:
internal class ConfigureMyCookie : IConfigureNamedOptions<CookieAuthenticationOptions>
 {
  // You can inject services here
  public ConfigureMyCookie()
  {}
  public void Configure(string name, CookieAuthenticationOptions options)
  {
   // Only configure the schemes you want
   //if (name == Startup.CookieScheme)
   //{
    // options.LoginPath = "/someotherpath";
   //}
  }
  public void Configure(CookieAuthenticationOptions options)
   => Configure(Options.DefaultName, options);
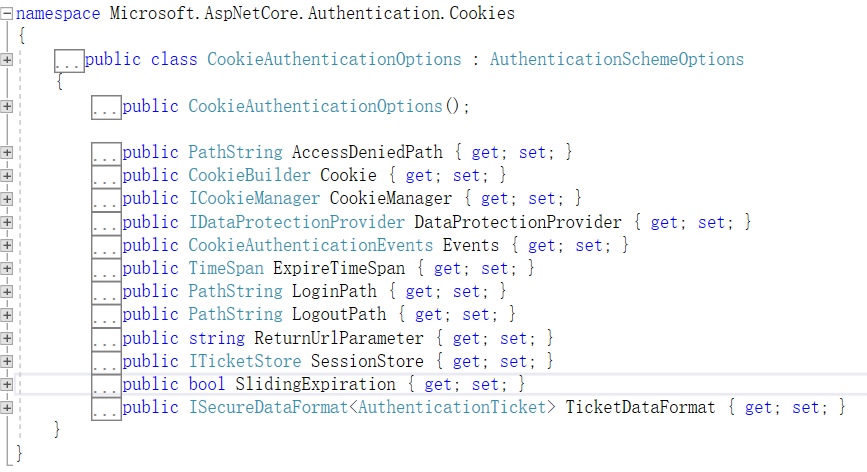
}在其中你可以定义某些策略,随后你直接改变 CookieScheme 的变量就可以替换某些配置,在配置中一共有这几项,这无疑是帮助我们快速使用Cookie的好帮手~点个赞。

在源码中可以看到Cookie默认保存的时间是14天,这个时间我们可以去选择,支持TimeSpan的那些类型。
public CookieAuthenticationOptions()
  {
   ExpireTimeSpan = TimeSpan.FromDays(14);
   ReturnUrlParameter = CookieAuthenticationDefaults.ReturnUrlParameter;
   SlidingExpiration = true;
   Events = new CookieAuthenticationEvents();
}接下来LoginOrOut Controller,我们模拟了登录和退出,通过 SignInAsync 和 SignOutAsync 方法。
[HttpPost]
  public async Task<IActionResult> Login(LoginModel loginModel)
  {
   if (loginModel.Username == "haozi zhang" &&
    loginModel.Password == "123456")
   {
    var claims = new List<Claim>
     {
     new Claim(ClaimTypes.Name, loginModel.Username)
     };
    ClaimsPrincipal principal = new ClaimsPrincipal(new ClaimsIdentity(claims, "login"));
    await HttpContext.SignInAsync(principal);
    //Just redirect to our index after logging in.
    return Redirect("/Home/Index");
   }
   return View("Index");
  }
  /// <summary>
  /// this action for web lagout
  /// </summary>
  [HttpGet]
  public IActionResult Logout()
  {
   Task.Run(async () =>
   {
    //注销登录的用户,相当于ASP.NET中的FormsAuthentication.SignOut
    await HttpContext.SignOutAsync();
   }).Wait();
   return View();
}就拿出推出的源码来看,其中获取了Handler的某些信息,随后将它转换为 IAuthenticationSignOutHandler 接口类型,这个接口 as 接口,像是在地方实现了这个接口,然后将某些运行时的值引用传递到该接口上。
public virtual async Task SignOutAsync(HttpContext context, string scheme, AuthenticationProperties properties)
  {
   if (scheme == null)
   {
    var defaultScheme = await Schemes.GetDefaultSignOutSchemeAsync();
    scheme = defaultScheme?.Name;
    if (scheme == null)
    {
     throw new InvalidOperationException($"No authenticationScheme was specified, and there was no DefaultSignOutScheme found. The default schemes can be set using either AddAuthentication(string defaultScheme) or AddAuthentication(Action<AuthenticationOptions> configureOptions).");
    }
   }
   var handler = await Handlers.GetHandlerAsync(context, scheme);
   if (handler == null)
   {
    throw await CreateMissingSignOutHandlerException(scheme);
   }
   var signOutHandler = handler as IAuthenticationSignOutHandler;
   if (signOutHandler == null)
   {
    throw await CreateMismatchedSignOutHandlerException(scheme, handler);
   }
   await signOutHandler.SignOutAsync(properties);
}其中 GetHandlerAsync 中根据认证策略创建了某些实例,这里不再多说,因为源码深不见底,我也说不太清楚...只是想表达一下看源码的好处和坏处....
public async Task<IAuthenticationHandler> GetHandlerAsync(HttpContext context, string authenticationScheme)
  {
   if (_handlerMap.ContainsKey(authenticationScheme))
   {
    return _handlerMap[authenticationScheme];
   }

   var scheme = await Schemes.GetSchemeAsync(authenticationScheme);
   if (scheme == null)
   {
    return null;
   }
   var handler = (context.RequestServices.GetService(scheme.HandlerType) ??
    ActivatorUtilities.CreateInstance(context.RequestServices, scheme.HandlerType))
    as IAuthenticationHandler;
   if (handler != null)
   {
    await handler.InitializeAsync(scheme, context);
    _handlerMap[authenticationScheme] = handler;
   }
   return handler;
}最后我们在页面上想要获取登录的信息,可以通过 HttpContext.User.Claims 中的签名信息获取。
@using Microsoft.AspNetCore.Authentication
<h3>HttpContext.User.Claims</h3>
<dl>
 @foreach (var claim in User.Claims)
 {
  <dt>@claim.Type</dt>
  <dd>@claim.Value</dd>
 }
</dl>
<h3>AuthenticationProperties</h3>
<dl>
 @foreach (var prop in (await Context.AuthenticateAsync()).Properties.Items)
 {
  <dt>@prop.Key</dt>
  <dd>@prop.Value</dd>
 }
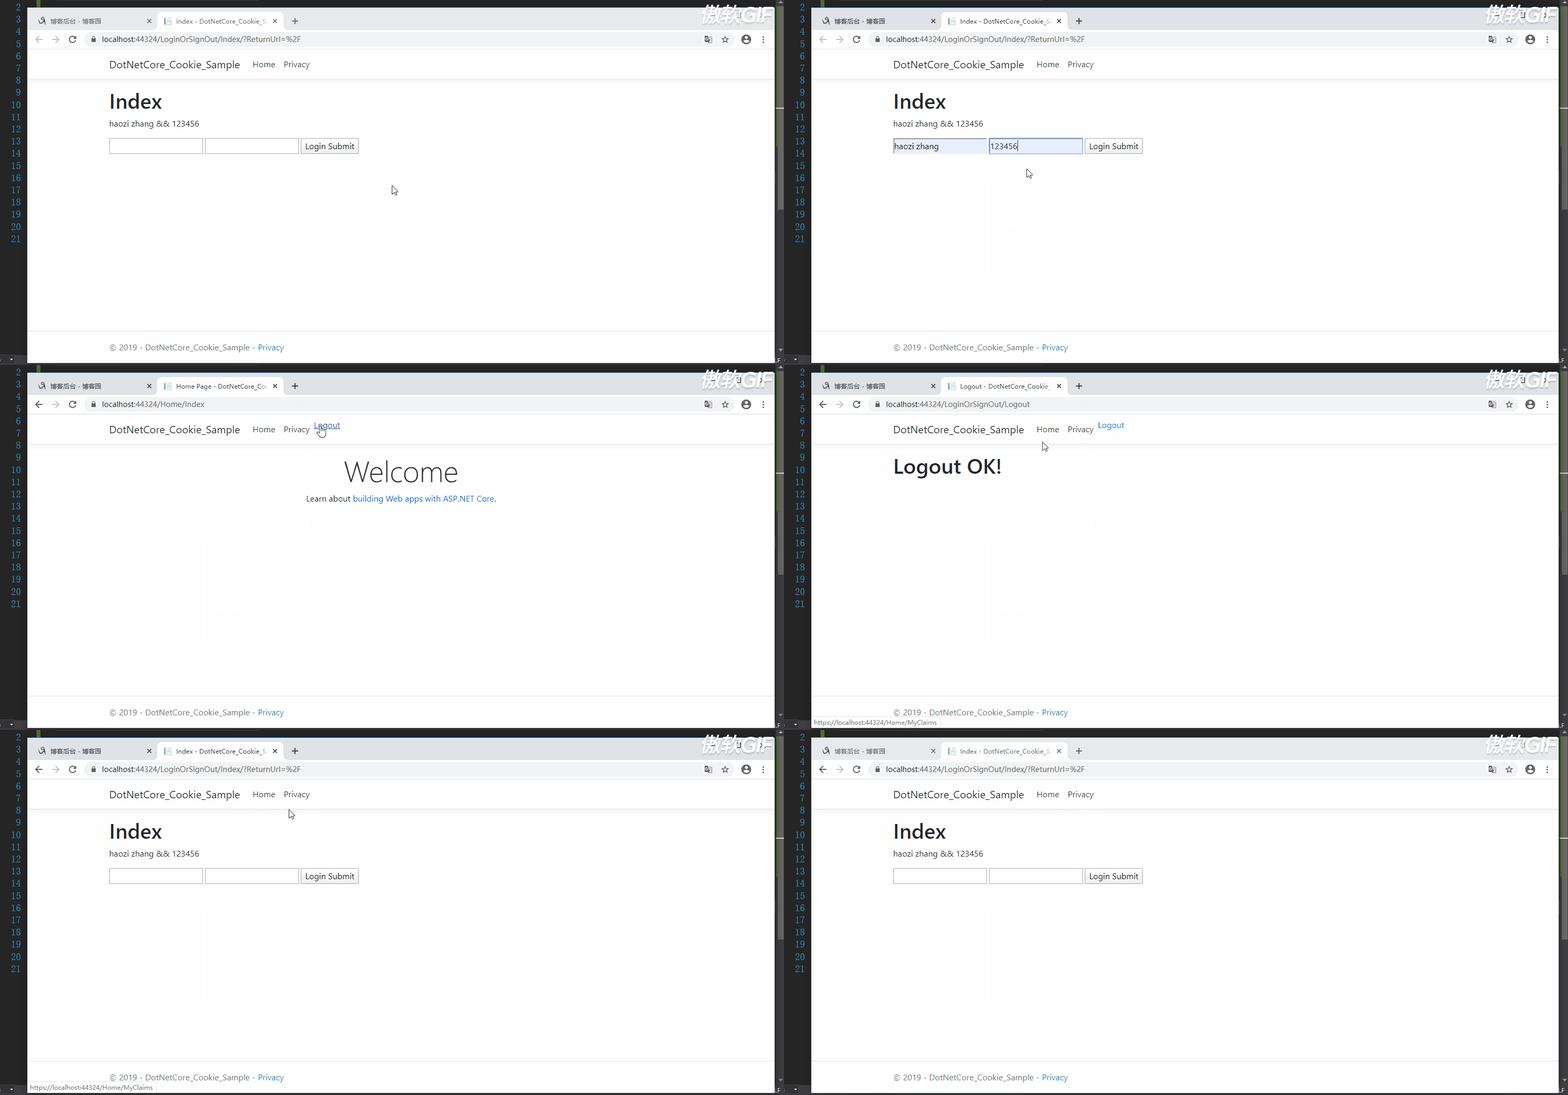
</dl>三.最后效果以及源码地址#

GitHub地址:https://github.com/zaranetCore/aspNetCore_JsonwebToken/tree/master/src/Identity.Cookie/DotNetCore_Cookie_Sample
感谢你能够认真阅读完这篇文章,希望小编分享的“在ASP.NET Core MVC中使用Cookie的方法”这篇文章对大家有帮助,同时也希望大家多多支持亿速云,关注亿速云行业资讯频道,更多相关知识等着你来学习!
亿速云「云服务器」,即开即用、新一代英特尔至强铂金CPU、三副本存储NVMe SSD云盘,价格低至29元/月。点击查看>>
免责声明:本站发布的内容(图片、视频和文字)以原创、转载和分享为主,文章观点不代表本网站立场,如果涉及侵权请联系站长邮箱:is@yisu.com进行举报,并提供相关证据,一经查实,将立刻删除涉嫌侵权内容。