本文主要给大家介绍Mysql5.5版本的一主多从配置讲义,希望可以给大家补充和更新些知识,如有其它问题需要了解的可以持续在亿速云行业资讯里面关注我的更新文章的。
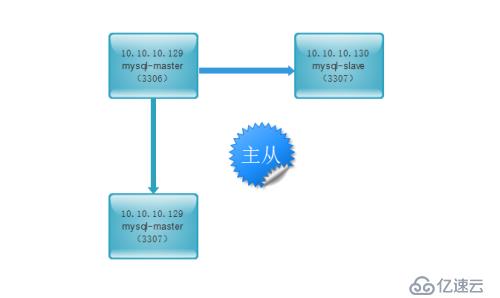
1)实验拓扑信息
mysql版本:5.5.32(基于源代码安装)
系统版本:CentOS6.7
10.10.10.129: mysql的主云服务器
10.10.10.130: mysql的从服务器
目的:
本地主从:
10.10.10.129 3306 --> 10.10.10.10.129 3307
异地主从:
10.10.10.129 3306 --> 10.10.10.10.130 3306
2)主库上的配置
a、准备mysql的测试环境
先准备好mysql多实例环境,之前我已经写过博客,这里就不重复了,可以参考http://molewan.blog.51cto.com/287340/1860198
b、在主库(10.10.10.129)上开启binlog记录功能
# grep server-id /data/3306/my.cnf
server-id = 1
# grep server-id /data/3307/my.cnf
server-id = 3
# grep log-bin /data/3306/my.cnf
log-bin = /data/3306/mysql-bin登陆数据库进行查看:
# mysql -u root -S /data/3306/mysql.sock -predhat12345
mysql> show variables like 'log_bin';
+---------------+-------+
| Variable_name | Value |
+---------------+-------+
| log_bin       | ON    |
+---------------+-------+
1 row in set (0.01 sec)c、建立用于主从复制的账号
# mysql -u root -S /data/3306/mysql.sock -predhat12345
mysql> grant replication slave on *.* to 'rep'@'10.10.10.%' identified by 'redhat12345';
Query OK, 0 rows affected (0.01 sec)
mysql> flush privileges;
Query OK, 0 rows affected (0.00 sec)
mysql> select user,host from mysql.user;
+------+------------+
| user | host       |
+------+------------+
| wan  | %          |
| rep  | 10.10.10.% |
| wan  | 10.10.10.% |
| root | 127.0.0.1  |
| root | ::1        |
|      | C67-X64-A8 |
| root | C67-X64-A8 |
|      | localhost  |
| root | localhost  |
+------+------------+
9 rows in set (0.00 sec)
mysql> select user,host from mysql.user where user='rep';
+------+------------+
| user | host       |
+------+------------+
| rep  | 10.10.10.% |
+------+------------+
1 row in set (0.00 sec)d、实现对主数据库锁表只读(当前窗口不要关闭)
mysql> flush table with read lock;
Query OK, 0 rows affected (0.00 sec)
重新打开一个窗口,锁表后查看主库状态:
# mysql -uroot -S /data/3306/mysql.sock -predhat12345
mysql> show master status;
+------------------+----------+--------------+------------------+
| File             | Position | Binlog_Do_DB | Binlog_Ignore_DB |
+------------------+----------+--------------+------------------+
| mysql-bin.000004 |      337 |              |                  |
+------------------+----------+--------------+------------------+
1 row in set (0.00 sec)e、使用mysqldump进行数据库备份:
# mysqldump -uroot -p'redhat12345' -S /data/3306/mysql.sock --events -A -B |gzip >/mysqlback/mysql_bak.$(date +%F).sql.gz
# echo $?
0
# ls -l /mysqlback/
总用量 144
-rw-r--r-- 1 root root 144402 10月  9 02:54 mysql_bak.2016-10-09.sql.gz
# du -sh /mysqlback/mysql_bak.2016-10-09.sql.gz
144K/mysqlback/mysql_bak.2016-10-09.sql.gz
为了确保导出数据期间,数据库没有数据插入,导库完毕可以再次检查主库状态信息
# mysql -uroot -S /data/3306/mysql.sock -predhat12345 -e "show master status"
+------------------+----------+--------------+------------------+
| File             | Position | Binlog_Do_DB | Binlog_Ignore_DB |
+------------------+----------+--------------+------------------+
| mysql-bin.000004 |      337 |              |                  |
+------------------+----------+--------------+------------------+f、导出数据完毕后,解锁主库,恢复可写
mysql> unlock tables;
Query OK, 0 rows affected (0.01 sec)3)从库上的配置
a、10.10.10.129 3307数据库上的配置
# cd /mysqlback/
# ls
mysql_bak.2016-10-09.sql.gz
# gzip -d mysql_bak.2016-10-09.sql.gz
# ls
mysql_bak.2016-10-09.sql
# mysql -uroot -p'redhat12345' -S /data/3307/mysql.sock </mysqlback/mysql_bak.2016-10-09.sql
# echo $?
0
# mysql -uroot -S /data/3307/mysql.sock -p'redhat12345'<<EOF
change master to
master_host='10.10.10.129',
master_port=3306,
master_user='rep',
master_password='redhat12345',
master_log_file='mysql-bin.000004',
master_log_pos=337;
EOF
mysql> start slave;
Query OK, 0 rows affected (0.01 sec)
mysql> show slave status\G;
*************************** 1. row ***************************
               Slave_IO_State: Waiting for master to send event
                  Master_Host: 10.10.10.129
                  Master_User: rep
                  Master_Port: 3306
                Connect_Retry: 60
              Master_Log_File: mysql-bin.000004
          Read_Master_Log_Pos: 337
               Relay_Log_File: relay-bin.000002
                Relay_Log_Pos: 253
        Relay_Master_Log_File: mysql-bin.000004
             Slave_IO_Running: Yes
            Slave_SQL_Running: Yes
              Replicate_Do_DB:
          Replicate_Ignore_DB: mysql
           Replicate_Do_Table:
       Replicate_Ignore_Table:
      Replicate_Wild_Do_Table:
  Replicate_Wild_Ignore_Table:
                   Last_Errno: 0
                   Last_Error:
                 Skip_Counter: 0
          Exec_Master_Log_Pos: 337
              Relay_Log_Space: 403
              Until_Condition: None
               Until_Log_File:
                Until_Log_Pos: 0
           Master_SSL_Allowed: No
           Master_SSL_CA_File:
           Master_SSL_CA_Path:
              Master_SSL_Cert:
            Master_SSL_Cipher:
               Master_SSL_Key:
        Seconds_Behind_Master: 0
Master_SSL_Verify_Server_Cert: No
                Last_IO_Errno: 0
                Last_IO_Error:
               Last_SQL_Errno: 0
               Last_SQL_Error:
  Replicate_Ignore_Server_Ids:
             Master_Server_Id: 1
1 row in set (0.00 sec)
ERROR:
No query specified主从复制是否成功,最关键的为下面的3项状态参数:
# mysql -uroot -predhat12345 -S /data/3307/mysql.sock -e "show slave status\G"|egrep "IO_Running|SQL_Running|_Behind_Master"
             Slave_IO_Running: Yes
            Slave_SQL_Running: Yes
Seconds_Behind_Master: 0b、10.10.10.130 3306数据库上的配置
# mkdir -p /mysqlback/
# scp /mysqlbackup/mysql_bak.2016-10-09.sql.gz 10.10.10.130:/mysqlback
# gzip -d mysql_bak.2016-10-09.sql.gz
# ls
mysql_bak.2016-10-09.sql
# mysql -uroot -p'redhat12345' -S /data/3306/mysql.sock </mysqlback/mysql_bak.2016-10-09.sql
# echo $?
0
# mysql -uroot -S /data/3306/mysql.sock -p'redhat12345'<<EOF
change master to
master_host='10.10.10.129',
master_port=3306,
master_user='rep',
master_password='redhat12345',
master_log_file='mysql-bin.000004',
master_log_pos=337;
EOF
mysql> start slave;
Query OK, 0 rows affected (0.01 sec)
mysql> show slave status\G;
*************************** 1. row ***************************
               Slave_IO_State: Waiting for master to send event
                  Master_Host: 10.10.10.129
                  Master_User: rep
                  Master_Port: 3306
                Connect_Retry: 60
              Master_Log_File: mysql-bin.000004
          Read_Master_Log_Pos: 337
               Relay_Log_File: relay-bin.000002
                Relay_Log_Pos: 253
        Relay_Master_Log_File: mysql-bin.000004
             Slave_IO_Running: Yes
            Slave_SQL_Running: Yes
              Replicate_Do_DB:
          Replicate_Ignore_DB: mysql
           Replicate_Do_Table:
       Replicate_Ignore_Table:
      Replicate_Wild_Do_Table:
 Replicate_Wild_Ignore_Table:
                   Last_Errno: 0
                   Last_Error:
                 Skip_Counter: 0
          Exec_Master_Log_Pos: 337
              Relay_Log_Space: 403
              Until_Condition: None
               Until_Log_File:
                Until_Log_Pos: 0
           Master_SSL_Allowed: No
           Master_SSL_CA_File:
           Master_SSL_CA_Path:
              Master_SSL_Cert:
            Master_SSL_Cipher:
               Master_SSL_Key:
        Seconds_Behind_Master: 0
        Master_SSL_Verify_Server_Cert: No
                Last_IO_Errno: 0
                Last_IO_Error:
               Last_SQL_Errno: 0
               Last_SQL_Error:
        Replicate_Ignore_Server_Ids:
             Master_Server_Id: 1
1 row in set (0.00 sec)
ERROR:
No query specified在10.10.10.130服务器上检查
主从复制是否成功,最关键的为下面的3项状态参数:
# mysql -uroot -predhat12345 -S /data/3306/mysql.sock -e "show slave status\G"|egrep "IO_Running|SQL_Running|_Behind_Master"
             Slave_IO_Running: Yes
            Slave_SQL_Running: Yes
Seconds_Behind_Master: 04)mysql主从同步测试
在10.10.10.129上查看数据库:
[root@mysql-master ~]# mysql -uroot -predhat12345 -S /data/3306/mysql.sock -e "show databases;"
+--------------------+
| Database           |
+--------------------+
| information_schema |
| dawnpro            |
| eip                |
| ems                |
| hangzhou_dawnpro   |
| mysql              |
| performance_schema |
| wh610              |
+--------------------+
[root@mysql-master ~]# mysql -uroot -predhat12345 -S /data/3307/mysql.sock -e "show databases;"
+--------------------+
| Database           |
+--------------------+
| information_schema |
| dawnpro            |
| eip                |
| ems                |
| hangzhou_dawnpro   |
| mysql              |
| performance_schema |
| wh610              |
+--------------------+在10.10.10.130上查看数据库:
[root@mysql-slave mysqlbackup]# mysql -uroot -predhat12345 -S /data/3306/mysql.sock -e "show databases;"
+--------------------+
| Database           |
+--------------------+
| information_schema |
| dawnpro            |
| eip                |
| ems                |
| hangzhou_dawnpro   |
| mysql              |
| performance_schema |
| wh610              |
+--------------------+通过对比,可以发现,数据库完全一致,然后我们在主库上新建一个blog的数据库
[root@mysql-master mysqlback]# mysql -uroot -predhat12345 -S /data/3307/mysql.sock -e "show databases;"
+--------------------+
| Database           |
+--------------------+
| information_schema |
| blog               |
| dawnpro            |
| eip                |
| ems                |
| hangzhou_dawnpro   |
| mysql              |
| performance_schema |
| wh610              |
+--------------------+
[root@mysql-slave mysqlbackup]# mysql -uroot -predhat12345 -S /data/3306/mysql.sock -e "show databases;"
+--------------------+
| Database           |
+--------------------+
| information_schema |
| blog               |
| dawnpro            |
| eip                |
| ems                |
| hangzhou_dawnpro   |
| mysql              |
| performance_schema |
| wh610              |
+--------------------+
主从同步到此完成5)注意事项
1)master与slave中的server-id要保持唯一
2)备份导出前要使用“flush table with read lock;”让数据库锁表只读,并且这个窗口不要关闭
3)slave上要start slave;接收信息
4)master与slave时间要保持一致看了以上关于Mysql5.5版本的一主多从配置讲义,希望能给大家在实际运用中带来一定的帮助。本文由于篇幅有限,难免会有不足和需要补充的地方,如有需要更加专业的解答,可在官网联系我们的24小时售前售后,随时帮您解答问题的。
亿速云「云数据库 MySQL」免部署即开即用,比自行安装部署数据库高出1倍以上的性能,双节点冗余防止单节点故障,数据自动定期备份随时恢复。点击查看>>
免责声明:本站发布的内容(图片、视频和文字)以原创、转载和分享为主,文章观点不代表本网站立场,如果涉及侵权请联系站长邮箱:is@yisu.com进行举报,并提供相关证据,一经查实,将立刻删除涉嫌侵权内容。


 计算
计算 安全
安全 数据库
数据库 网络和加速
网络和加速 企业服务
企业服务


