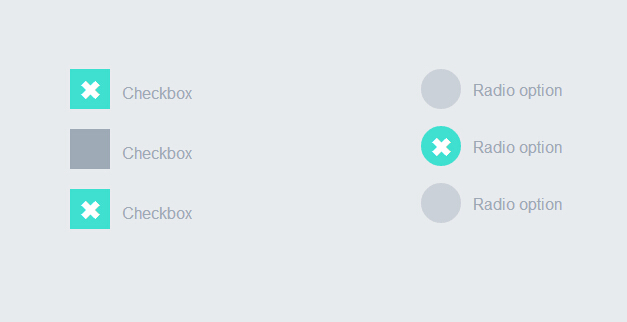
这篇文章主要讲解了“如何实现超炫checkbox复选框和radio单选框”,文中的讲解内容简单清晰,易于学习与理解,下面请大家跟着小编的思路慢慢深入,一起来研究和学习“如何实现超炫checkbox复选框和radio单选框”吧!

这个实例完全由css3实现的没有任何js代码。下面我们一起看下实现代码吧
html代码:
代码如下:
<div >
<label>
<input type="checkbox" class="option-input checkbox" checked="">
Checkbox
</label>
<label>
<input type="checkbox" class="option-input checkbox">
Checkbox
</label>
<label>
<input type="checkbox" class="option-input checkbox">
Checkbox
</label>
</div>
<div >
<label>
<input type="radio" class="option-input radio" name="example">
Radio option
</label>
<label>
<input type="radio" class="option-input radio" name="example">
Radio option
</label>
<label>
<input type="radio" class="option-input radio" name="example">
Radio option
</label>
</div>
css3代码:
代码如下:
@-webkit-keyframes click-wave {
0% {
width: 40px;
height: 40px;
opacity: 0.35;
position: relative;
}
100% {
width: 200px;
height: 200px;
margin-left: -80px;
margin-top: -80px;
opacity: 0.0;
}
}
@-moz-keyframes click-wave {
0% {
width: 40px;
height: 40px;
opacity: 0.35;
position: relative;
}
100% {
width: 200px;
height: 200px;
margin-left: -80px;
margin-top: -80px;
opacity: 0.0;
}
}
@-o-keyframes click-wave {
0% {
width: 40px;
height: 40px;
opacity: 0.35;
position: relative;
}
100% {
width: 200px;
height: 200px;
margin-left: -80px;
margin-top: -80px;
opacity: 0.0;
}
}
@keyframes click-wave {
0% {
width: 40px;
height: 40px;
opacity: 0.35;
position: relative;
}
100% {
width: 200px;
height: 200px;
margin-left: -80px;
margin-top: -80px;
opacity: 0.0;
}
}
.option-input {
-webkit-appearance: none;
-moz-appearance: none;
-ms-appearance: none;
-o-appearance: none;
appearance: none;
position: relative;
top: 13.33333px;
width: 40px;
height: 40px;
-webkit-transition: all 0.15s ease-out 0;
-moz-transition: all 0.15s ease-out 0;
transition: all 0.15s ease-out 0;
background: #cbd1d8;
border: none;
color: #fff;
cursor: pointer;
display: inline-block;
outline: none;
position: relative;
margin-right: 0.5rem;
z-index: 1000;
}
.option-input:hover {
background: #9faab7;
}
.option-input:checked {
background: #40e0d0;
}
.option-input:checked::before {
width: 40px;
height: 40px;
position: absolute;
content: '\2716';
display: inline-block;
font-size: 26.66667px;
text-align: center;
line-height: 40px;
}
.option-input:checked::after {
-webkit-animation: click-wave 0.65s;
-moz-animation: click-wave 0.65s;
animation: click-wave 0.65s;
background: #40e0d0;
content: '';
display: block;
position: relative;
z-index: 100;
}
.option-input.radio {
border-radius: 50%;
}
.option-input.radio::after {
border-radius: 50%;
}</p>
<p>body {
display: -webkit-box;
display: -moz-box;
display: box;
-webkit-box-orient: horizontal;
-moz-box-orient: horizontal;
box-orient: horizontal;
-webkit-box-pack: start;
-moz-box-pack: start;
box-pack: start;
-webkit-box-align: stretch;
-moz-box-align: stretch;
box-align: stretch;
background: #e8ebee;
color: #9faab7;
font-family: "Helvetica Neue", Helvetica, Arial, sans-serif;
text-align: center;
}
body div {
padding: 5rem;
}
body label {
display: block;
line-height: 40px;
}
感谢各位的阅读,以上就是“如何实现超炫checkbox复选框和radio单选框”的内容了,经过本文的学习后,相信大家对如何实现超炫checkbox复选框和radio单选框这一问题有了更深刻的体会,具体使用情况还需要大家实践验证。这里是亿速云,小编将为大家推送更多相关知识点的文章,欢迎关注!
亿速云「云服务器」,即开即用、新一代英特尔至强铂金CPU、三副本存储NVMe SSD云盘,价格低至29元/月。点击查看>>
免责声明:本站发布的内容(图片、视频和文字)以原创、转载和分享为主,文章观点不代表本网站立场,如果涉及侵权请联系站长邮箱:is@yisu.com进行举报,并提供相关证据,一经查实,将立刻删除涉嫌侵权内容。
原文链接:https://www.jb51.net/css/212095.html