这篇文章主要介绍Vue怎么封装一个TodoList,文中介绍的非常详细,具有一定的参考价值,感兴趣的小伙伴们一定要看完!
Vue具体轻量级框架、简单易学、双向数据绑定、组件化、数据和结构的分离、虚拟DOM、运行速度快等优势,Vue中页面使用的是局部刷新,不用每次跳转页面都要请求所有数据和dom,可以大大提升访问速度和用户体验。

使用Vue封装一个简易的Todolist的小案例. 同时加入了浏览器本地缓存的技术手段.
前提: 一般我们定义的变量,或者用Vuex保存的数据, 当浏览器进行了一个刷新 那么这个数据就会丢失, 这样就做不出历史记录的效果了, 但是, 使用浏览器缓存就可以帮助我们解决这个问题…
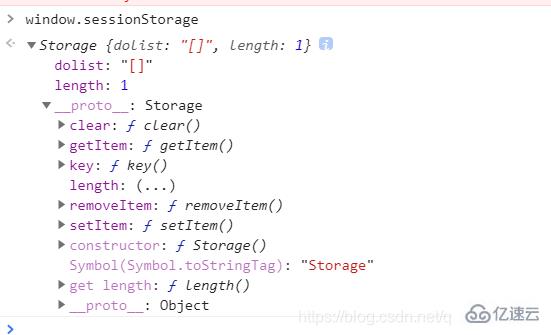
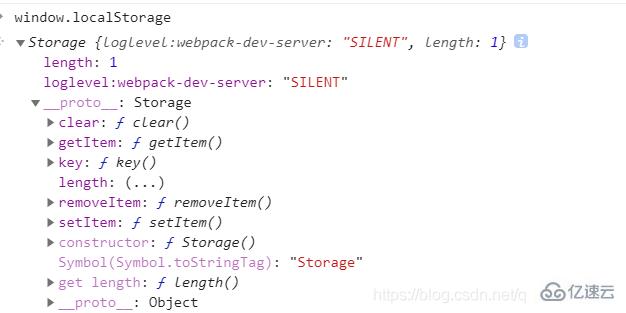
浏览器缓存分为二种 sessionStorage 和 localStorage, 二种原型链分别如下:


可以看得出, 他们的原型链上基本都是一样的, 唯一的区别在于
localStorage 作用于本地缓存, 时间是持久的,除非手动去删除, 或者清空, 不然一直都存在浏览器中
sessionStorage 作用与会话缓存, 生命周期只存在于本次打开浏览器会话, 当完成的关闭浏览器,那么信息就会丢失, 而仅仅刷新页面, 数据仍然保存。
本次实例,使用的是 sessionStorage, 并对此进行了一次小封装.
const  storage = {
	set(key, value){
		window.sessionStorage.setItem(key, JSON.stringify(value));
	},
	get(key){
		return JSON.parse(window.sessionStorage.getItem(key));
	},
	remove(key){
		window.sessionStorage.removeItem(key);
}}export default storage;<template>
<p class="todo">
<header>
<input type="text" placeholder="输入..." v-model="keyword" @keydown.enter="handleList">
TodoList </header>
<!-- 正在进行 -->
<h5>正在进行...{{dolistNumber}}</h5>
<template v-for="(item, index) in dolist" :key="index">
<p class="dolist" v-if="!item.checked">
<label :for="index +'l'">
<input type="checkbox" v-model="item.checked" :id="index +'l'" @change="handleChecked">
{{item.title}} </label>
<span @click="cancalDo(index)">X</span>
</p>
</template>
<!-- 已经完成 -->
<h5>已经完成...{{dolist.length - dolistNumber}}</h5>
<template v-for="(item, index) in dolist" :key="index">
<p class="dolist" v-if="item.checked">
<label :for="index +'ll'">
<input type="checkbox" v-model="item.checked" :id="index +'ll'" @change="handleChecked">
{{item.title}} </label>
<span @click="cancalDo(index)">X</span>
</p>
</template>
</p></template><script>
import storage from '../storage.js';
export default {
name: "todoList",
data() {
return {
keyword: "", // 输入的选项
dolist: [],
}
},
computed:{
dolistNumber(){
return this.dolist.filter(item => item.checked === false).length;
}
},
methods: {
handleChecked(){
// 当更改状态之后 重新刷新
storage.set('dolist', this.dolist);
},
handleList() {
if (this.keyword !== "") {
this.dolist.push({
title: this.keyword,
checked: false,
});
this.keyword = "";
storage.set('dolist', this.dolist);
}
},
cancalDo(index) {
// 删除这个
this.dolist.splice(index, 1);
storage.set('dolist', this.dolist);
}
},
mounted(){
let dolist = storage.get('dolist');
if(dolist){
this.dolist = dolist;
}
},
} </script><style>
.todo {
margin: 400px auto;
min-height: 300px;
width: 800px;
background-color: #eee;
}
.todo header {
position: relative;
text-align: center;
height: 60px;
line-height: 60px;
font-size: 20px;
border-bottom: 2px solid #fff;
}
.todo header input {
position: absolute;
left: 40px;
top: 50%;
transform: translateY(-50%);
outline: none;
line-height: 30px;
border-radius: 15px;
padding-left: 30px;
border: 1px solid #999;
font-size: 16px;
width: 100px;
transition: all .6s linear;
}
.todo header input:focus {
width: 200px;
}
.dolist {
padding: 20px;
font-size: 16px;
}
.dolist label {
cursor: pointer;
}
.dolist input {
margin-right: 10px;
}
.dolist span:last-child {
float: right;
border: 1px solid gray;
background-color: #999;
color: #fff;
border-radius: 50%;
padding: 5px;
}
h5 {
padding-bottom: 20px;
text-align: center;
}</style>以上是“Vue怎么封装一个TodoList”这篇文章的所有内容,感谢各位的阅读!希望分享的内容对大家有帮助,更多相关知识,欢迎关注亿速云行业资讯频道!
亿速云「云服务器」,即开即用、新一代英特尔至强铂金CPU、三副本存储NVMe SSD云盘,价格低至29元/月。点击查看>>
免责声明:本站发布的内容(图片、视频和文字)以原创、转载和分享为主,文章观点不代表本网站立场,如果涉及侵权请联系站长邮箱:is@yisu.com进行举报,并提供相关证据,一经查实,将立刻删除涉嫌侵权内容。