这篇文章将为大家详细讲解有关怎么在Node.js中使用http模块,文章内容质量较高,因此小编分享给大家做个参考,希望大家阅读完这篇文章后对相关知识有一定的了解。
要理解Web服务器程序的工作原理,首先,我们要对HTTP协议有基本的了解。如果你对HTTP协议不太熟悉,先看一看HTTP协议简介。
要开发HTTP服务器程序,从头处理TCP连接,解析HTTP是不现实的。这些工作实际上已经由Node.js自带的http模块完成了。应用程序并不直接和HTTP协议打交道,而是操作http模块提供的request和response对象。
request对象封装了HTTP请求,我们调用request对象的属性和方法就可以拿到所有HTTP请求的信息;
response对象封装了HTTP响应,我们操作response对象的方法,就可以把HTTP响应返回给浏览器。
用Node.js实现一个HTTP服务器程序非常简单。我们来实现一个最简单的Web程序hello.js,它对于所有请求,都返回Hello world!:
'use strict';
var http = require('http');// 导入http模块

// 创建http server,并传入回调函数。回调函数接收request和response对象
var server = http.createServer(function (request, response){
console.log(request.method + ': ' + request.url);// 获得HTTP请求的method和url:
response.writeHead(200, {'Content-Type': 'text/html'});// 将HTTP响应200写入response, 同时设置Content-Type: text/html
response.end('<h2>Hello world!</h2>'); });// 将HTTP响应的HTML内容写入response
server.listen(8080); // 让服务器监听8080端口

console.log('Server is running at http://127.0.0.1:8080/');
在命令提示符下运行该程序,可以看到以下输出:
$ node hello.js Server is running at http://127.0.0.1:8080/
不要关闭命令提示符,直接打开浏览器输入http://localhost:8080,即可看到服务器响应的内容:

同时,在命令提示符窗口,可以看到程序打印的请求信息:
GET: /
GET: /favicon.ico
这就是我们编写的第一个HTTP服务器程序!
让我们继续扩展一下上面的Web程序。我们可以设定一个目录,然后让Web程序变成一个文件服务器。要实现这一点,我们只需要解析request.url中的路径,然后在本地找到对应的文件,把文件内容发送出去就可以了。
解析URL需要用到Node.js提供的url模块,它使用起来非常简单,通过parse()将一个字符串解析为一个Url对象:
'use strict';
var url = require('url');

console.log(url.parse('http://user:pass@host.com:8080/path/to/file?query=string#hash'));
结果如下:
Url { protocol: 'http:', slashes: true, auth: 'user:pass', host: 'host.com:8080', port: '8080', hostname: 'host.com', hash: '#hash', search: '?query=string', query: 'query=string', pathname: '/path/to/file', path: '/path/to/file?query=string', href: 'http://user:pass@host.com:8080/path/to/file?query=string#hash' }
处理本地文件目录需要使用Node.js提供的path模块,它可以方便地构造目录:
'use strict';
var path = require('path');
var workDir = path.resolve('.');// 解析当前目录('/Users/michael')
var filePath = path.join(workDir, 'pub', 'index.html');// 组合完整的文件路径:当前目录+'pub'+'index.html'('/Users/michael/pub/index.html')
使用path模块可以正确处理操作系统相关的文件路径。在Windows系统下,返回的路径类似于C:\Users\michael\static\index.html,这样,我们就不关心怎么拼接路径了。
最后,我们实现一个文件服务器file_server.js:
'use strict';
var  fs = require('fs'),url = require('url'),path = require('path'),http = require('http');
var root = path.resolve(process.argv[2] || '.');// 从命令行参数获取root目录,默认是当前目录
console.log('Static root dir: ' + root);
var server = http.createServer(function (request, response){// 创建服务器
var pathname = url.parse(request.url).pathname;// 获得URL的path,类似 '/css/bootstrap.css'
var filepath = path.join(root, pathname);// 获得对应的本地文件路径,类似 '/srv/www/css/bootstrap.css'
fs.stat(filepath, function (err, stats) {if (!err && stats.isFile()) {// 获取文件状态
console.log('200 ' + request.url);// 没有出错并且文件存在
response.writeHead(200);// 发送200响应
// 将文件流导向response:
fs.createReadStream(filepath).pipe(response);

} else {
console.log('404 ' + request.url);// 出错了或者文件不存在
response.writeHead(404); response.end('404 Not Found'); }  }); }); // 发送404响应

server.listen(8080);

console.log('Server is running at http://127.0.0.1:8080/');
没有必要手动读取文件内容。由于response对象本身是一个Writable Stream,直接用pipe()方法就实现了自动读取文件内容并输出到HTTP响应。
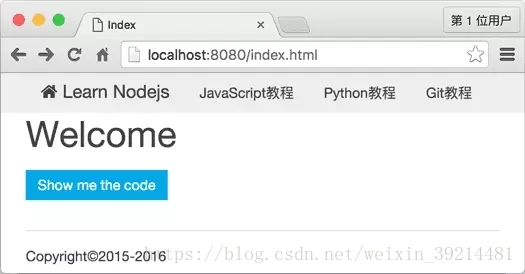
在命令行运行node file_server.js /path/to/dir,把/path/to/dir改成你本地的一个有效的目录,然后在浏览器中输入http://localhost:8080/index.html:

只要当前目录下存在文件index.html,服务器就可以把文件内容发送给浏览器。观察控制台输出:
200 /index.html
200 /css/uikit.min.css
200 /js/jquery.min.js
200 /fonts/fontawesome-webfont.woff2
关于怎么在Node.js中使用http模块就分享到这里了,希望以上内容可以对大家有一定的帮助,可以学到更多知识。如果觉得文章不错,可以把它分享出去让更多的人看到。
免责声明:本站发布的内容(图片、视频和文字)以原创、转载和分享为主,文章观点不代表本网站立场,如果涉及侵权请联系站长邮箱:is@yisu.com进行举报,并提供相关证据,一经查实,将立刻删除涉嫌侵权内容。