今天就跟大家聊聊有关Harbor多实例高可用共享存储该怎么搭建,可能很多人都不太了解,为了让大家更加了解,小编给大家总结了以下内容,希望大家根据这篇文章可以有所收获。
多实例共享存储架构图
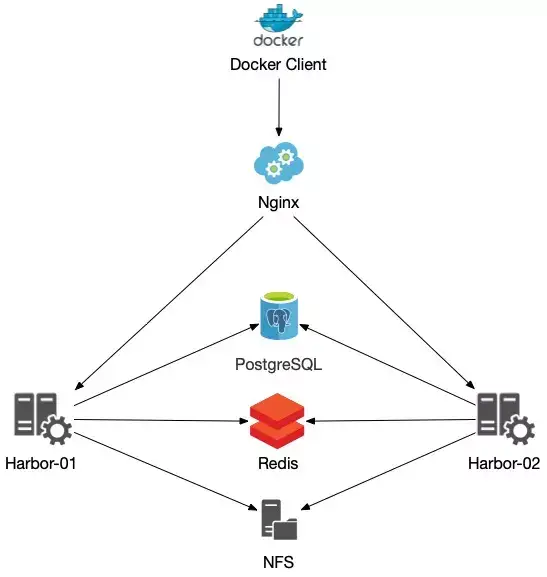
本文 LB 不使用 Nginx,使用阿里SLB。
1、共享存储的选取,Harbor的后端存储目前支持AWS S3、Openstack Swift, Ceph等。本文使用阿里云极速性NAS,磁盘IO性能比单块磁盘读写性能要好。使用 NFS V3 版本挂载。
2、Session 不能在不同的实例上共享,所以Harbor Redis 需要单独部署,并且多个实例连接相同的Redis。
3、Harbor多实例数据库问题,必须单独部署一个数据库,并且多个实例连接相同的数据库。
注意:生产环境如果使用阿里云NAS,推荐使用 极速性NAS,不推荐使用 通用型NAS。
阿里云NAS性能参考文档 https://help.aliyun.com/document_detail/124577.html?spm=a2c4g.11186623.6.552.2eb05ea0HJUgUB

Harbor 选择在线部署,使用 docker-compose 部署,docker-compose 和 Docker 部署环境本文不在介绍,网上可以搜索到相关文档。
harbor1 和 harbor2 机器都需要执行挂载 NAS
配置开机自动挂载,打开 /etc/fstab 配置文件,添加挂载命令。
# 创建 NAS 挂载目录 $ mkdir /data # 提高同时发起的NFS请求数量 $ sudo echo "options sunrpc tcp_slot_table_entries=128" >> /etc/modprobe.d/sunrpc.conf $ sudo echo "options sunrpc tcp_max_slot_table_entries=128" >> /etc/modprobe.d/sunrpc.conf挂载NFS v4文件系统,添加以下命令:
file-system-id.region.nas.aliyuncs.com:/ /data nfs vers=4,minorversion=0,rsize=1048576,wsize=1048576,hard,timeo=600,retrans=2,_netdev,noresvport 0 0如果您要挂载NFS v3文件系统,添加以下命令:
file-system-id.region.nas.aliyuncs.com:/ /data nfs vers=3,nolock,proto=tcp,rsize=1048576,wsize=1048576,hard,timeo=600,retrans=2,_netdev,noresvport 0 0 # 在 /etc/fstab 配置文件添加好挂载,并执行挂载 $ mount -a # 检查挂载,如果结果中存在NFS文件系统的挂载地址,则说明挂载成功 $ df -h | grep aliyun在 harbor1 机器上操作
# 在线部署Harbor $ cd /opt/ $ wget https://github.com/goharbor/harbor/releases/download/v2.2.1/harbor-online-installer-v2.2.1.tgz $ tar xf harbor-online-installer-v2.2.1.tgz $ cd /opt/harbor $ cp harbor.yml.tmpl harbor.yml # 创建harbor数据存储 $ mkdir /data/harbor # 添加域名证书,已有域名SSL证书 $ mkdir /data/harbor/cert # 把SSL证书公钥和私钥上传到 /data/harbor/cert 目录中 $ scp harbor.example.pem root@192.168.10.10:/data/harbor/cert/ $ scp harbor.example.key root@192.168.10.10:/data/harbor/cert/ # 配置 harbor.yml 文件,下面是修改后文件与原文件比较结果 $ diff harbor.yml harbor.yml.tmpl 5c5 < hostname: harbor.example.com --- > hostname: reg.mydomain.com 17,18c17,18 < certificate: /data/harbor/cert/harbor.example.pem < private_key: /data/harbor/cert/harbor.example.key --- > certificate: /your/certificate/path > private_key: /your/private/key/path 29c29 < external_url: https://harbor.example.com --- > # external_url: https://reg.mydomain.com:8433 < data_volume: /data/harbor --- > data_volume: /data # 生成配置文件 $ cd /opt/harbor # harbor开启helm charts 和 镜像漏洞扫描 $ ./prepare --with-notary --with-trivy --with-chartmuseum # 安装 $ ./install.sh --with-notary --with-trivy --with-chartmuseum # 查看 $ docker-compose ps# 创建 postgres 和 redis 存储目录 $ mkdir -p /data/harbor-redis /data/harbor-postgresql # 修改所属组 $ chown -R 999.999 /data/harbor-redis /data/harbor-postgresql # 创建 postgres 和 redis docker-compose.yml 文件 $ vim docker-compose.yml version: '2.3' services: redis: image: goharbor/redis-photon:v2.2.1 container_name: harbor-redis restart: always cap_drop: - ALL cap_add: - CHOWN - SETGID - SETUID volumes: - /data/harbor-redis:/var/lib/redis networks: - harbor-db ports: - 6379:6379 postgresql: image: goharbor/harbor-db:v2.2.1 container_name: harbor-postgresql restart: always cap_drop: - ALL cap_add: - CHOWN - DAC_OVERRIDE - SETGID - SETUID environment: POSTGRES_USER: postgres POSTGRES_PASSWORD: test2021 volumes: - /data/harbor-postgresql:/var/lib/postgresql/data:z networks: - harbor-db ports: - 5432:5432 networks: harbor-db: driver: bridge # 部署 postgres 和 redis $ docker-compose up -d# 进入临时harbor-db容器导出相关表及数据 $ docker exec -it -u postgres harbor-db bash # 导出数据 $ pg_dump -U postgres registry > /tmp/registry.sql $ pg_dump -U postgres notarysigner > /tmp/notarysigner.sql $ pg_dump -U postgres notaryserver > /tmp/notaryserver.sql # 将数据导入单独部署的PostgreSQL数据库 $ psql -h 192.168.10.10 -U postgres registry -W < /tmp/registry.sql $ psql -h 192.168.10.10 -U postgres notarysigner -W < /tmp/notarysigner.sql $ psql -h 192.168.10.10 -U postgres notaryserver -W < /tmp/notaryserver.sql# 清理harbr数据和配置文件 $ cp -a /data/harbor/cert /tmp/ $ rm -rf /data/harbor/* $ rm -rf /opt/harbor $ cp -a /tmp/cert /data/harbor/ # 重新创建配置文件 $ cd /opt/ $ tar xf harbor-online-installer-v2.2.1.tgz $ cd /opt/harbor # 修改配置文件,连接单独部署postgres和redis,注释harbor自带的postgres和redis $ cp harbor.yml.tmpl harbor.yml $ diff harbor.yml harbor.yml.tmpl 5c5 < hostname: harbor.example.com --- > hostname: reg.mydomain.com 17,18c17,18 < certificate: /data/harbor/cert/harbor.example.pem < private_key: /data/harbor/cert/harbor.example.key --- > certificate: /your/certificate/path > private_key: /your/private/key/path 29c29 < external_url: https://harbor.example.com --- > # external_url: https://reg.mydomain.com:8433 37c37 < # database: --- > database: 39c39 < # password: root123 --- > password: root123 41c41 < # max_idle_conns: 50 --- > max_idle_conns: 50 44c44 < # max_open_conns: 1000 --- > max_open_conns: 1000 47c47 < data_volume: /data/harbor --- > data_volume: /data 135,158c135,158 < external_database: < harbor: < host: 192.168.10.10 < port: 5432 < db_name: registry < username: postgres < password: test2021 < ssl_mode: disable < max_idle_conns: 50 < max_open_conns: 1000 < notary_signer: < host: 192.168.10.10 < port: 5432 < db_name: notarysigner < username: postgres < password: test2021 < ssl_mode: disable < notary_server: < host: 192.168.10.10 < port: 5432 < db_name: notaryserver < username: postgres < password: test2021 < ssl_mode: disable --- > # external_database: > # harbor: > # host: harbor_db_host > # port: harbor_db_port > # db_name: harbor_db_name > # username: harbor_db_username > # password: harbor_db_password > # ssl_mode: disable > # max_idle_conns: 2 > # max_open_conns: 0 > # notary_signer: > # host: notary_signer_db_host > # port: notary_signer_db_port > # db_name: notary_signer_db_name > # username: notary_signer_db_username > # password: notary_signer_db_password > # ssl_mode: disable > # notary_server: > # host: notary_server_db_host > # port: notary_server_db_port > # db_name: notary_server_db_name > # username: notary_server_db_username > # password: notary_server_db_password > # ssl_mode: disable 161,175c161,175 < external_redis: < # support redis, redis+sentinel < # host for redis: <host_redis>:<port_redis> < # host for redis+sentinel: < # <host_sentinel1>:<port_sentinel1>,<host_sentinel2>:<port_sentinel2>,<host_sentinel3>:<port_sentinel3> < host: 192.168.10.10:6379 < password: < # sentinel_master_set must be set to support redis+sentinel < #sentinel_master_set: < # db_index 0 is for core, it's unchangeable < registry_db_index: 1 < jobservice_db_index: 2 < chartmuseum_db_index: 3 < trivy_db_index: 5 < idle_timeout_seconds: 30 --- > # external_redis: > # # support redis, redis+sentinel > # # host for redis: <host_redis>:<port_redis> > # # host for redis+sentinel: > # # <host_sentinel1>:<port_sentinel1>,<host_sentinel2>:<port_sentinel2>,<host_sentinel3>:<port_sentinel3> > # host: redis:6379 > # password: > # # sentinel_master_set must be set to support redis+sentinel > # #sentinel_master_set: > # # db_index 0 is for core, it's unchangeable > # registry_db_index: 1 > # jobservice_db_index: 2 > # chartmuseum_db_index: 3 > # trivy_db_index: 5 > # idle_timeout_seconds: 30 # 部署第一个节点 harbor $ cd /opt/harbor # harbor开启helm charts 和 镜像漏洞扫描 $ ./prepare --with-notary --with-trivy --with-chartmuseum # 安装 $ ./install.sh --with-notary --with-trivy --with-chartmuseum # 查看 $ docker-compose ps # 拷贝配置到 harbor2 机器上 $ scp -r /opt/harbor 192.168.10.11:/opt/在 harbor2 机器上操作
# 部署第二个节点 harbor $ cd /opt/harbor # harbor开启helm charts 和 镜像漏洞扫描 $ ./prepare --with-notary --with-trivy --with-chartmuseum # 安装 $ ./install.sh --with-notary --with-trivy --with-chartmuseum # 查看 $ docker-compose ps这里不具体介绍SLB配置方法,具体配置方法参考下面阿里云SLB配置文档,配置 443端口,使用 TCP 协议,后端映射到两台 harbor1 和 harbor2 443端口上。
看完上述内容,你们对Harbor多实例高可用共享存储该怎么搭建有进一步的了解吗?如果还想了解更多知识或者相关内容,请关注亿速云行业资讯频道,感谢大家的支持。
亿速云「云服务器」,即开即用、新一代英特尔至强铂金CPU、三副本存储NVMe SSD云盘,价格低至29元/月。点击查看>>
免责声明:本站发布的内容(图片、视频和文字)以原创、转载和分享为主,文章观点不代表本网站立场,如果涉及侵权请联系站长邮箱:is@yisu.com进行举报,并提供相关证据,一经查实,将立刻删除涉嫌侵权内容。
原文链接:https://mp.weixin.qq.com/s/ZFLuZO1ryUZp4XGwc_f1vw


 计算
计算 安全
安全 数据库
数据库 网络和加速
网络和加速 企业服务
企业服务


