这篇文章给大家介绍Spring Bean有哪些生命周期,内容非常详细,感兴趣的小伙伴们可以参考借鉴,希望对大家能有所帮助。
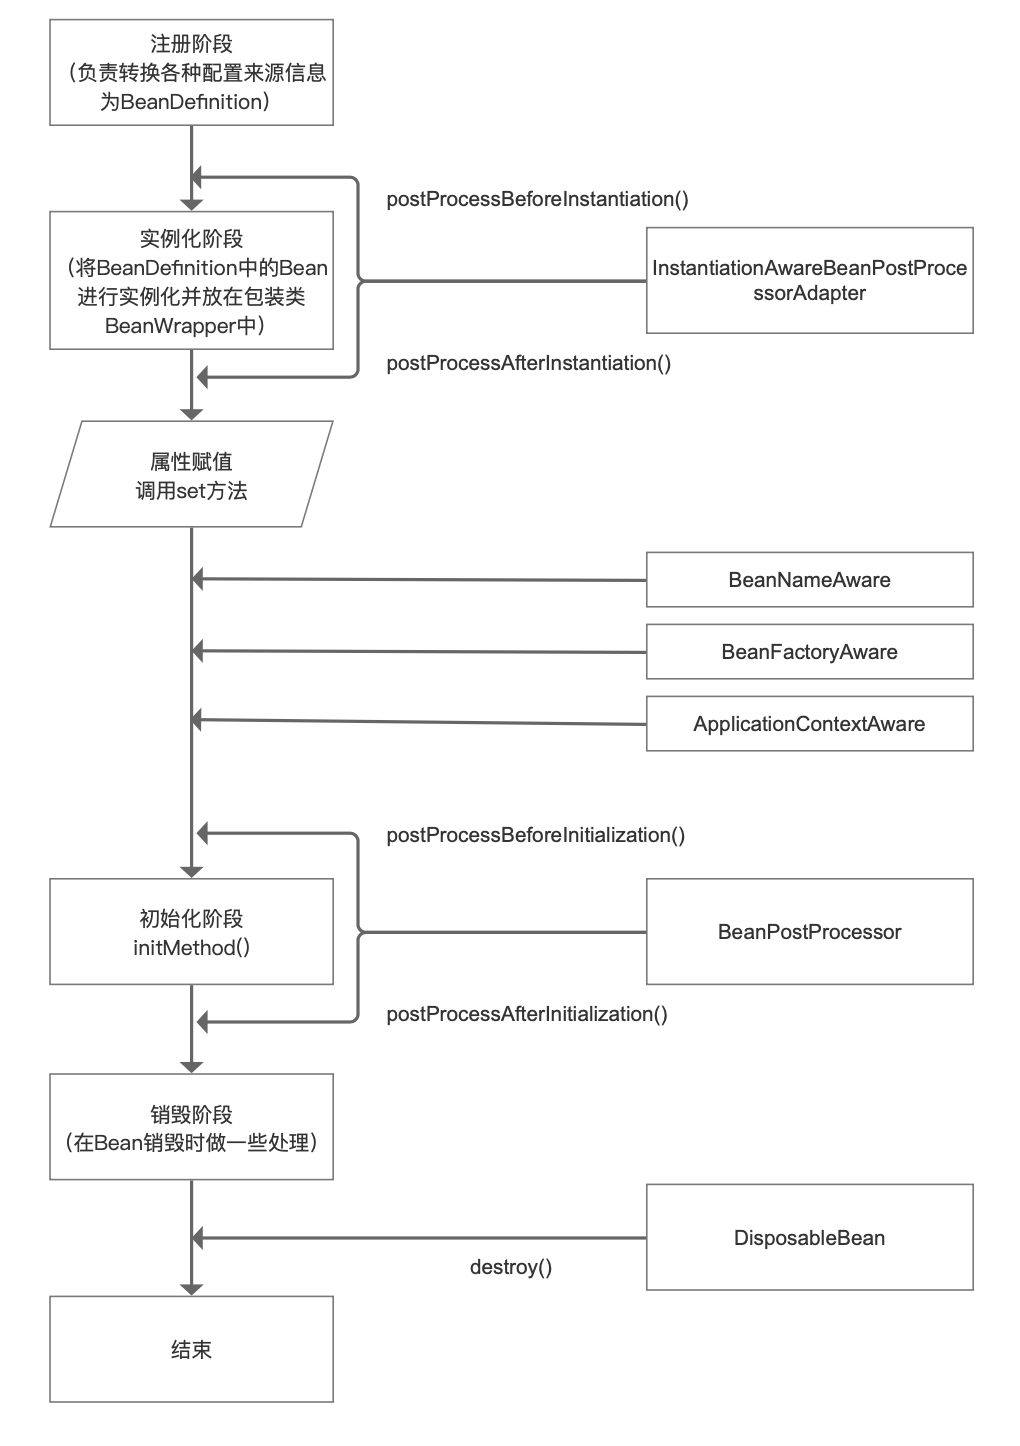
生命周期解读:
1. 注册阶段
2. 实例化阶段
3. 初始化阶段
4. 销毁阶段
注册阶段主要任务是通过各种BeanDefinitionReader读取扫描各种配置来源信息(xml文件、注解等),并转换为BeanDefinition的过程。
BeanDefinition可以理解为类的定义,描述一个类的基本情况,比较像我们注册某些网站时的基本信息,比如需要填写姓名、住址、出生日期等。
最终会将我们扫描到的类整体注册到一个DefaultListableBeanFactory的Map容器中,便于我们之后获取使用。
public class DefaultListableBeanFactory extends AbstractAutowireCapableBeanFactory implements ConfigurableListableBeanFactory, BeanDefinitionRegistry, Serializable {
	//存储注册信息的BeanDefinition
	private final Map<String, BeanDefinition> beanDefinitionMap = new ConcurrentHashMap<>(256);
	//beanDefinitionMap的数据结构是ConcurrentHashMap,因此不能保证顺序,为了记录注册的顺序,这里使用了ArrayList类型beanDefinitionNames用来记录注册顺序
	private volatile List<String> beanDefinitionNames = new ArrayList<>(256);

	//省略部分代码.......
	@Override
	public void registerBeanDefinition(String beanName, BeanDefinition beanDefinition) throws BeanDefinitionStoreException {
		//省略判断代码.......
		// Still in startup registration phase
		this.beanDefinitionMap.put(beanName, beanDefinition);
		this.beanDefinitionNames.add(beanName);
	}
}在实例化阶段,Spring主要将BeanDefinition转换为实例Bean,并放在包装类BeanWrapper中。
无论是否设置Bean的懒加载方式,最后都会通过AbstractBeanFactory.getBean()方法进行实例化,并进入到AbstractAutowireCapableBeanFactory.createBean()方法。
public abstract class AbstractAutowireCapableBeanFactory extends AbstractBeanFactory implements AutowireCapableBeanFactory {
	//省略部分代码......
	@Nullable
	protected Object resolveBeforeInstantiation(String beanName, RootBeanDefinition mbd) {
		Object bean = null;
		if (!Boolean.FALSE.equals(mbd.beforeInstantiationResolved)) {
			// Make sure bean class is actually resolved at this point.
			if (!mbd.isSynthetic() && hasInstantiationAwareBeanPostProcessors()) {
				Class<?> targetType = determineTargetType(beanName, mbd);
				if (targetType != null) {
					//实例化前处理器
					bean = applyBeanPostProcessorsBeforeInstantiation(targetType, beanName);
					if (bean != null) {
						//实例化后处理器
						bean = applyBeanPostProcessorsAfterInitialization(bean, beanName);
					}
				}
			}
			mbd.beforeInstantiationResolved = (bean != null);
		}
		return bean;
	}
	//省略部分代码......
}在实例化阶段AbstractAutowireCapableBeanFactory.createBeanInstance()完成Bean的创建,并放到BeanWrapper中。
初始化阶段主要是在返回Bean之前做一些处理,主要由AbstractAutowireCapableBeanFactory.initializeBean()方法实现。
public abstract class AbstractAutowireCapableBeanFactory extends AbstractBeanFactory implements AutowireCapableBeanFactory {
	//省略部分代码......
	//真正创建Bean的方法
	protected Object doCreateBean(final String beanName, final RootBeanDefinition mbd, final @Nullable Object[] args)
			throws BeanCreationException {

		//省略部分代码......
		// Initialize the bean instance.
		//Bean对象的初始化,依赖注入在此触发
		//这个exposedObject在初始化完成之后返回作为依赖注入完成后的Bean
		Object exposedObject = bean;
		try {
			//将Bean实例对象封装,并且Bean定义中配置的属性值赋值给实例对象
			populateBean(beanName, mbd, instanceWrapper);
			//初始化Bean对象
			exposedObject = initializeBean(beanName, exposedObject, mbd);
		}
		catch (Throwable ex) {
			if (ex instanceof BeanCreationException && beanName.equals(((BeanCreationException) ex).getBeanName())) {
				throw (BeanCreationException) ex;
			}
			else {
				throw new BeanCreationException(
						mbd.getResourceDescription(), beanName, "Initialization of bean failed", ex);
			}
		}
		//省略部分代码......
		return exposedObject;
	}

	//初始容器创建的Bean实例对象,为其添加BeanPostProcessor后置处理器
	protected Object initializeBean(final String beanName, final Object bean, @Nullable RootBeanDefinition mbd) {
		//JDK的安全机制验证权限
		if (System.getSecurityManager() != null) {
			//实现PrivilegedAction接口的匿名内部类
			AccessController.doPrivileged((PrivilegedAction<Object>) () -> {
				invokeAwareMethods(beanName, bean);
				return null;
			}, getAccessControlContext());
		}
		else {
			//为Bean实例对象包装相关属性,如名称,类加载器,所属容器等信息
			invokeAwareMethods(beanName, bean);
		}

		Object wrappedBean = bean;
		//对BeanPostProcessor后置处理器的postProcessBeforeInitialization
		//回调方法的调用,为Bean实例初始化前做一些处理
		if (mbd == null || !mbd.isSynthetic()) {
			wrappedBean = applyBeanPostProcessorsBeforeInitialization(wrappedBean, beanName);
		}

		//调用Bean实例对象初始化的方法,这个初始化方法是在Spring Bean定义配置
		//文件中通过init-method属性指定的
		try {
			invokeInitMethods(beanName, wrappedBean, mbd);
		}
		catch (Throwable ex) {
			throw new BeanCreationException(
					(mbd != null ? mbd.getResourceDescription() : null),
					beanName, "Invocation of init method failed", ex);
		}
		//对BeanPostProcessor后置处理器的postProcessAfterInitialization
		//回调方法的调用,为Bean实例初始化之后做一些处理
		if (mbd == null || !mbd.isSynthetic()) {
			wrappedBean = applyBeanPostProcessorsAfterInitialization(wrappedBean, beanName);
		}

		return wrappedBean;
	}
	//省略部分代码......
}一般是在ApplicationContext关闭的时候调用,也就是AbstractApplicationContext.close() 方法。
在注册的时候Spring通过适配器模式包装了一个类DisposableBeanAdapter,在销毁阶段的时候会获得这个类,进而调用到DisposableBeanAdapter.destroy()方法:
class DisposableBeanAdapter implements DisposableBean, Runnable, Serializable {
	//省略部分代码......
	@Override
	public void destroy() {
		if (!CollectionUtils.isEmpty(this.beanPostProcessors)) {
			for (DestructionAwareBeanPostProcessor processor : this.beanPostProcessors) {
				processor.postProcessBeforeDestruction(this.bean, this.beanName);
			}
		}

		if (this.invokeDisposableBean) {
			if (logger.isDebugEnabled()) {
				logger.debug("Invoking destroy() on bean with name '" + this.beanName + "'");
			}
			try {
				if (System.getSecurityManager() != null) {
					AccessController.doPrivileged((PrivilegedExceptionAction<Object>) () -> {
						((DisposableBean) bean).destroy();
						return null;
					}, acc);
				}
				else {
					((DisposableBean) bean).destroy();
				}
			}
			catch (Throwable ex) {
				String msg = "Invocation of destroy method failed on bean with name '" + this.beanName + "'";
				if (logger.isDebugEnabled()) {
					logger.warn(msg, ex);
				}
				else {
					logger.warn(msg + ": " + ex);
				}
			}
		}

		if (this.destroyMethod != null) {
			invokeCustomDestroyMethod(this.destroyMethod);
		}
		else if (this.destroyMethodName != null) {
			Method methodToCall = determineDestroyMethod(this.destroyMethodName);
			if (methodToCall != null) {
				invokeCustomDestroyMethod(methodToCall);
			}
		}
	}
	//省略部分代码......
}销毁阶段主要包括三个销毁途径,按照执行顺序:
@PreDestroy注解,主要通过DestructionAwareBeanPostProcessor实现
实现DisposableBean接口,主要通过DisposableBean.destroy()实现
自定义销毁方 DisposableBeanAdapter.invokeCustomDestroyMethod()实现
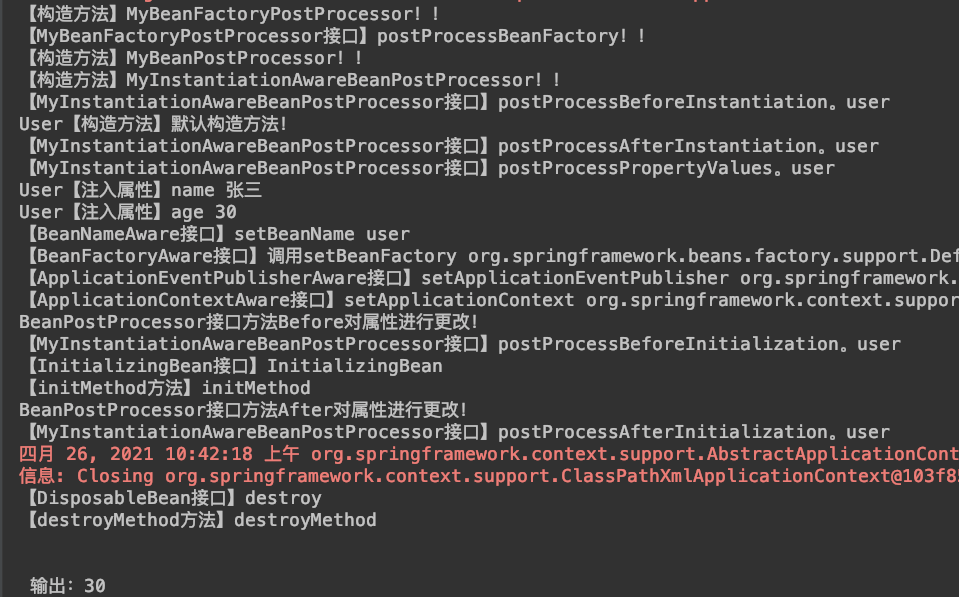
下边通过一个简单实例来做一个简单测试。
import org.springframework.beans.BeansException;
import org.springframework.beans.factory.*;
import org.springframework.context.ApplicationContext;
import org.springframework.context.ApplicationContextAware;
import org.springframework.context.ApplicationEventPublisher;
import org.springframework.context.ApplicationEventPublisherAware;

/**
 * @Author: maomao
 * @Date: 2021-04-18 20:50
 */
public class User implements BeanFactoryAware, BeanNameAware, InitializingBean, DisposableBean, ApplicationContextAware, ApplicationEventPublisherAware {

    private String name;

    private int age;

    private BeanFactory beanFactory;

    private String beanName;

    public User(){
        System.out.println("User【构造方法】默认构造方法!");
    }

    public String getName() {
        return name;
    }

    public void setName(String name) {
        this.name = name;
        System.out.println("User【注入属性】name " + name);
    }

    public int getAge() {
        return age;
    }

    public void setAge(int age) {
        this.age = age;
        System.out.println("User【注入属性】age " + age);
    }

    @Override
    public void setBeanFactory(BeanFactory beanFactory) throws BeansException {
        System.out.println("【BeanFactoryAware接口】调用setBeanFactory " + beanFactory);
        this.beanFactory = beanFactory;
    }

    @Override
    public void setBeanName(String name) {
        System.out.println("【BeanNameAware接口】setBeanName " + name);
        this.beanName = name;
    }

    @Override
    public void destroy() throws Exception {
        System.out.println("【DisposableBean接口】destroy");
    }

    @Override
    public void afterPropertiesSet() throws Exception {
        System.out.println("【InitializingBean接口】InitializingBean");
    }

    public void initMethod(){
        System.out.println("【initMethod方法】initMethod");
    }

    public void destroyMethod(){
        System.out.println("【destroyMethod方法】destroyMethod");
    }

    @Override
    public void setApplicationContext(ApplicationContext applicationContext) throws BeansException {
        System.out.println("【ApplicationContextAware接口】setApplicationContext " + applicationContext);
    }

    @Override
    public void setApplicationEventPublisher(ApplicationEventPublisher applicationEventPublisher) {
        System.out.println("【ApplicationEventPublisherAware接口】setApplicationEventPublisher " + applicationEventPublisher);
    }
}application.xml配置
<?xml version="1.0" encoding="UTF-8"?>
<beans xmlns="http://www.springframework.org/schema/beans"
	   xmlns:xsi="http://www.w3.org/2001/XMLSchema-instance"
	   xsi:schemaLocation="http://www.springframework.org/schema/beans http://www.springframework.org/schema/beans/spring-beans.xsd">

	<bean id="beanPostProcessor" class="com.freecloud.spring.lifecycle.MyBeanPostProcessor"></bean>

	<bean id="instantiationAwareBeanPostProcessor" class="com.freecloud.spring.lifecycle.MyInstantiationAwareBeanPostProcessor"></bean>

	<bean id="beanFactoryPostProcessor" class="com.freecloud.spring.lifecycle.MyBeanFactoryPostProcessor"></bean>

	<bean id="user" class="com.freecloud.spring.lifecycle.User" init-method="initMethod" destroy-method="destroyMethod" >
		<property name="name" value="张三"></property>
		<property name="age" value="18"></property>
	</bean>

</beans>测试类:
import org.junit.Before;
import org.junit.Test;
import org.springframework.context.ConfigurableApplicationContext;
import org.springframework.context.support.ClassPathXmlApplicationContext;

/**
 * @Author: maomao
 * @Date: 2021-04-18 20:57
 */
public class LifecycleTest {

    private ConfigurableApplicationContext applicationContext;

    @Before
    public void init(){
        applicationContext = new ClassPathXmlApplicationContext("application.xml");
    }


    @Test
    public void Test(){
        User user = applicationContext.getBean("user",User.class);
        //ConfigurableApplicationContext.close()将关闭该应用程序的上下文,释放所有资源,并销毁所有缓存的单例bean
        // 只用于destroy演示
        applicationContext.close();
        //applicationContext.registerShutdownHook();

        System.out.println("\n\n 输出:" + user.getAge());
    }
}最终结果:

关于Spring Bean有哪些生命周期就分享到这里了,希望以上内容可以对大家有一定的帮助,可以学到更多知识。如果觉得文章不错,可以把它分享出去让更多的人看到。
亿速云「云服务器」,即开即用、新一代英特尔至强铂金CPU、三副本存储NVMe SSD云盘,价格低至29元/月。点击查看>>
免责声明:本站发布的内容(图片、视频和文字)以原创、转载和分享为主,文章观点不代表本网站立场,如果涉及侵权请联系站长邮箱:is@yisu.com进行举报,并提供相关证据,一经查实,将立刻删除涉嫌侵权内容。
原文链接:https://my.oschina.net/u/1019754/blog/5031820