这篇文章主要介绍“如何使用Redis+SpringBoot实现定时任务测试”,在日常操作中,相信很多人在如何使用Redis+SpringBoot实现定时任务测试问题上存在疑惑,小编查阅了各式资料,整理出简单好用的操作方法,希望对大家解答”如何使用Redis+SpringBoot实现定时任务测试”的疑惑有所帮助!接下来,请跟着小编一起来学习吧!
Redis实现定时任务是基于对RedisKey值的监控
建一个SpringBoot项目
引入依赖
<?xml version="1.0" encoding="UTF-8"?>
<project xmlns="http://maven.apache.org/POM/4.0.0" xmlns:xsi="http://www.w3.org/2001/XMLSchema-instance"xsi:schemaLocation="http://maven.apache.org/POM/4.0.0 https://maven.apache.org/xsd/maven-4.0.0.xsd">
    <modelVersion>4.0.0</modelVersion>
    <parent>
        <groupId>org.springframework.boot</groupId>
        <artifactId>spring-boot-starter-parent</artifactId>
        <version>2.4.4</version>
        <relativePath/> <!-- lookup parent from repository -->
    </parent>
    <groupId>com.example</groupId>
    <artifactId>redistask</artifactId>
    <version>0.0.1-SNAPSHOT</version>
    <name>redistask</name>
    <description>Demo project for Spring Boot</description>
    <properties>
        <java.version>1.8</java.version>
    </properties>
    <dependencies>
        <dependency>
            <groupId>org.springframework.boot</groupId>
            <artifactId>spring-boot-starter-data-redis</artifactId>
        </dependency>
        <dependency>
            <groupId>org.springframework.boot</groupId>
            <artifactId>spring-boot-starter-web</artifactId>
        </dependency>

        <dependency>
            <groupId>org.springframework.boot</groupId>
            <artifactId>spring-boot-starter-test</artifactId>
            <scope>test</scope>
        </dependency>
    </dependencies>

    <build>
        <plugins>
            <plugin>
                <groupId>org.springframework.boot</groupId>
                <artifactId>spring-boot-maven-plugin</artifactId>
            </plugin>
        </plugins>
    </build>
</project>配置文件
spring.redis.host=127.0.0.1spring.redis.port=6379spring.redis.timeout=10000新建一个配置类
package com.zhouhong.redistask.redistaskconfig;

import org.springframework.context.annotation.Bean;
import org.springframework.context.annotation.Configuration;
import org.springframework.data.redis.connection.RedisConnectionFactory;
import org.springframework.data.redis.listener.RedisMessageListenerContainer;/**
 * description: Redis配置类
 * @author: zhouhong
 * @version: V1.0.0
 * @date: 2021年3月19日 上午10:58:24 */@Configurationpublic class RedisTaskConfig {
    @Bean
    RedisMessageListenerContainer container(RedisConnectionFactory connectionFactory) {

        RedisMessageListenerContainer container = new RedisMessageListenerContainer();
        container.setConnectionFactory(connectionFactory);return container;
    }
}新建Controller,设置不同过期时间的Key值,注意这里key值最好使用当前的业务标识做前缀,不然可能出现key重复的现象。
package com.zhouhong.redistask.redistaskcontroller;

import java.util.Date;
import java.util.concurrent.TimeUnit;

import org.apache.logging.log4j.LogManager;
import org.apache.logging.log4j.Logger;
import org.springframework.beans.factory.annotation.Autowired;
import org.springframework.data.redis.core.RedisTemplate;
import org.springframework.web.bind.annotation.RequestMapping;
import org.springframework.web.bind.annotation.RequestMethod;
import org.springframework.web.bind.annotation.RestController;/**
 * description: 测试Redis定时Controller类
 * @author: zhouhong
 * @version: V1.0.0
 * @date: 2021年3月19日 上午10:59:21 */@RestControllerpublic class RedisTaskController {

    @Autowiredprivate RedisTemplate< String, String> template;
    Logger logger = LogManager.getLogger(LogManager.ROOT_LOGGER_NAME);/**
     * 设置定时key,这里key最好使用业务前缀,防止名字相同
     * @return     */@RequestMapping(value =  "putkeys", method = RequestMethod.POST)public String putRedisTaskKeys() {
        Date date = new Date();
        logger.info("业务开始时间:" + date);
        String key10S = "business1"+"|"+"key10S"+"|"+"其他业务中需要使用到的参数";
        String key20S = "business1"+"|"+"key20S"+"|"+"其他业务中需要使用到的参数";
        template.opsForValue().set(key10S, "values", 10, TimeUnit.SECONDS);
        template.opsForValue().set(key20S, "values", 20, TimeUnit.SECONDS);return "RedisKey过期键设置成功";
    }

}新建Service用来监控过期Key,并且针对不同时间做不同的业务
package com.zhouhong.redistask.service;

import java.util.Date;

import org.apache.logging.log4j.LogManager;
import org.apache.logging.log4j.Logger;
import org.springframework.data.redis.connection.Message;
import org.springframework.data.redis.listener.KeyExpirationEventMessageListener;
import org.springframework.data.redis.listener.RedisMessageListenerContainer;
import org.springframework.stereotype.Component;
import org.springframework.stereotype.Service;/**
 * description: RedisKey键监听以及业务逻辑处理
 * @author: zhouhong
 * @version: V1.0.0
 * @date: 2021年3月19日 上午10:58:52 */@Service
@Componentpublic class RedisTaskService extends KeyExpirationEventMessageListener {

    Logger logger = LogManager.getLogger(LogManager.ROOT_LOGGER_NAME);/**
     * @param listenerContainer     */public RedisTaskService(RedisMessageListenerContainer listenerContainer) {
        super(listenerContainer);
    }
    @Overridepublic void onMessage(Message message, byte[] pattern) {
        String expiredKey = message.toString();    // 将拿到的过期键使用之前拼接时的特殊符号分割成字符数组String[] expiredKeyArr = expiredKey.split("\|");
        String businessSign = expiredKeyArr[0].toString();
        String expiredTimeSign = expiredKeyArr[1].toString();
        String othersParm = expiredKeyArr[2].toString();

        logger.info(businessSign + expiredTimeSign + othersParm);
        Date date = new Date();// 只有本业务才执行以下操作if (businessSign.equals("business1")) {if (expiredTimeSign.equals("key10S")) {// 定时十秒钟后业务处理logger.info("十秒钟时的时间:"+ date);
                logger.info("定时任务10秒钟已到,下面处理相关业务逻辑代码!!!");
                logger.info("10秒钟后的业务逻辑代码,其他业务参数" + othersParm);
            } else if (expiredTimeSign.equals("key20S")) {// 定时十秒钟后业务处理logger.info("二十秒钟时的时间:"+ date);
                logger.info("定时任务20秒钟已到,下面处理相关业务逻辑代码!!!");
                logger.info("20秒钟后的业务逻辑代码,其他业务参数" + othersParm);
            }
        } else {
            logger.error("非business1业务不做处理");
        }
    }
}演示:
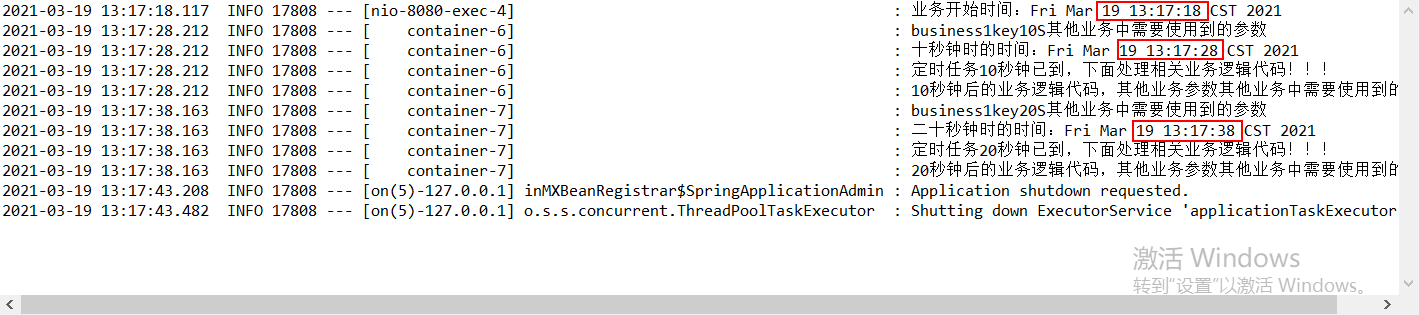
定时成功!!
到此,关于“如何使用Redis+SpringBoot实现定时任务测试”的学习就结束了,希望能够解决大家的疑惑。理论与实践的搭配能更好的帮助大家学习,快去试试吧!若想继续学习更多相关知识,请继续关注亿速云网站,小编会继续努力为大家带来更多实用的文章!
亿速云「云服务器」,即开即用、新一代英特尔至强铂金CPU、三副本存储NVMe SSD云盘,价格低至29元/月。点击查看>>
免责声明:本站发布的内容(图片、视频和文字)以原创、转载和分享为主,文章观点不代表本网站立场,如果涉及侵权请联系站长邮箱:is@yisu.com进行举报,并提供相关证据,一经查实,将立刻删除涉嫌侵权内容。
原文链接:https://my.oschina.net/u/4209276/blog/4349826


 计算
计算 安全
安全 数据库
数据库 网络和加速
网络和加速 企业服务
企业服务


