这篇文章主要讲解了“如何用单线程和定时任务分别实现WebSocket聊天室”,文中的讲解内容简单清晰,易于学习与理解,下面请大家跟着小编的思路慢慢深入,一起来研究和学习“如何用单线程和定时任务分别实现WebSocket聊天室”吧!
多媒体实时聊天
股票基金等数据报价
位置定位
社交订阅
数据库更新,前端实时显示
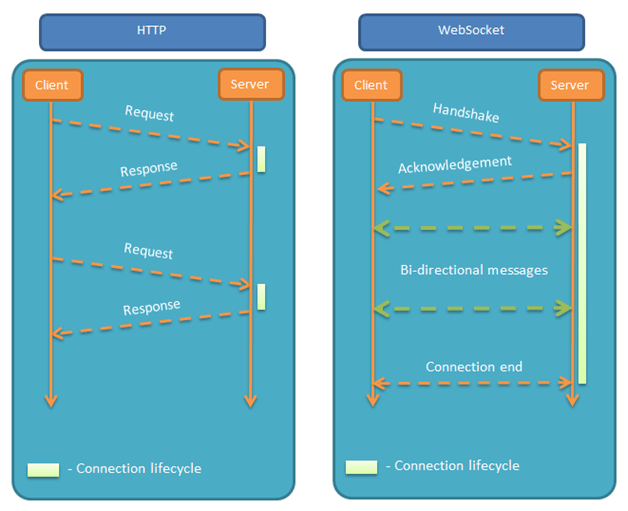
要实现这种实时性较强的功能,以前经常采用的方法:轮询和Comet技术
总结:都是基于请求-应答模式,不算真正意义上的实时技术,每一次请求应答,都要消耗一定流量。
WebSocket协议基于TCP协议实现,工作流程是这 样的:浏览器通过JavaScript向服务端发出建立WebSocket连接的请求,在WebSocket连接建立成功后,客户端和服务端就可以通过 TCP连接传输数据。因为WebSocket连接本质上是TCP连接,不需要每次传输都带上重复的头部数据, 其优点:
通过第一次Http Request第一次建立连接之后,之后的数据交换都不要再重新发送Http Request,节省了宽带资源
WebSocket协议是双向通信协议,既可以发送又可以接受
多路复用即多个不同的URL可以复用同一个Websocket连接
温馨提示:基于IAEA+SpringBoot+Gradle开发,得益于SpringBoot提供的自动配置,只需要通过简单注解@ServerEndpoint就能创建WebSocket服务端,再通过简单的回调函数就能完成WebSocket服务端的编写!build.gadle
	//spring-boot-starter-websocket的依赖springboot的高级组件会自动引用基础的组件,
	// 像spring-boot-starter-websocket就引入了spring-boot-starter-web和spring-boot-starter
	compile group: 'org.springframework.boot', name: 'spring-boot-starter-websocket', version: '2.1.6.RELEASE'
       //thymeleaf
compile group: 'org.springframework.boot', name: 'spring-boot-starter-thymeleaf', version: '2.1.6.RELEASE'创建一个WebSocketConfig
package com.example.SmartHome.config;


import org.springframework.boot.autoconfigure.condition.ConditionalOnWebApplication;
import org.springframework.context.annotation.Bean;
import org.springframework.context.annotation.Configuration;
import org.springframework.stereotype.Component;
import org.springframework.web.socket.server.standard.ServerEndpointExporter;

/*
 *@Description:  自动注册使用了@ServerEndpoint注解声明的Websocket endpoint
 *@ClassName: WebSocketConfig
 *@Author: zzq
 *@Date: 2019/7/7 11:01
 *@Version: 1.0
 */
@Configuration
@Component
@ConditionalOnWebApplication

public class WebSocketConfig {
    /**
     * 自动注册使用了@ServerEndpoint注解声明的Websocket endpoint
     */
    @Bean
    public ServerEndpointExporter serverEndpointExporter() {
        return new ServerEndpointExporter();
    }
}提醒:ServerEndpointExporter 是由Spring官方提供的标准实现,用于扫描ServerEndpointConfig配置类和@ServerEndpoint注解实例。使用规则:1.如果使用默认的嵌入式容器 比如Tomcat 则必须手工在上下文提供ServerEndpointExporter。2. 如果使用外部容器部署war包,则不要提供提供ServerEndpointExporter,因为此时SpringBoot默认将扫描服务端的行为交给外部容器处理。创建WebSocket服务器
核心思路:

① 通过注解@ServerEndpoint来声明实例化WebSocket服务端。
② 通过注解@OnOpen、@OnMessage、@OnClose、@OnError 来声明回调函数。| 事件类型 | 注解 | 事件描述 |
| open | @OnOpen | 当打开连接后触发 |
| message | @OnMessage | 当接受客户端消息时触发 |
| error | @OnError | 当通信异常时触发 |
| close | @OnClose | 当连接关闭时触发 |
package com.example.SmartHome.server;
import org.springframework.stereotype.Component;

import javax.websocket.*;
import javax.websocket.server.ServerEndpoint;
import java.io.IOException;
import java.util.concurrent.CopyOnWriteArraySet;

/*
 *@Description: WebSocketServer服务器端
 *@ClassName: WebSocketServer
 *@Author: zzq
 *@Date: 2019/7/3 17:05
 *@Version: 1.0
 */
//ServerEndpoint这个bean会自动注册使用了@ServerEndpoint注解声明的Websocket endpoint。
// 要注意,如果使用独立的servlet容器,而不是直接使用springboot的内置容器,
// 就不要注入ServerEndpointExporter,
// 因为它将由容器自己提供和管理。
/**
 * @ServerEndpoint 注解是一个类层次的注解,它的功能主要是将目前的类定义成一个websocket服务器端,
 * 注解的值将被用于监听用户连接的终端访问URL地址,客户端可以通过这个URL来连接到WebSocket服务器端
 */
@ServerEndpoint("/websocket")
@Component  //它的主要作用就是将这个监听器纳入到Spring容器中进行管理

public class WebSocket {
//    MyThread thread1=new MyThread();
//    Thread  thread  =new Thread(thread1);
    //每个客户端都会有相应的session,服务端可以发送相关消息
    private Session session;
    public static int onlineCount = 0;
    //J.U.C包下线程安全的类,主要用来存放每个客户端对应的webSocket连接
    private static CopyOnWriteArraySet<WebSocket> copyOnWriteArraySet = new CopyOnWriteArraySet<WebSocket>();

    /**
     * @Name:onOpen
     * @Description:打开连接。进入页面后会自动发请求到此进行连接
     */
    @OnOpen
    public void onOpen(Session session) throws IOException {
        this.session = session;
        copyOnWriteArraySet.add(this);
        addOnlineCount();
        System.out.println("websocket有新的连接, 总数:" + getOnlineCount());
        sendMessage("成功连接");

    }

    /**
     * @Name:onClose
     * @Description:用户关闭页面,即关闭连接
     */
    @OnClose
    public void onClose() {
        copyOnWriteArraySet.remove(this);
        shortOnlineCount();
        System.out.println("websocket连接断开, 总数:" + getOnlineCount());
    }

    /**
     * @Name:onMessage
     * @Description:收到客户端消息后调用的方法
     */
    @OnMessage
    public void onMessage(String message,Session session) throws IOException {

        System.out.println("websocket收到客户端发来的消息:" + message);
        for(WebSocket webSocket:copyOnWriteArraySet){
            webSocket.sendMessage(message);
        }

    }

    /**
     * @Name:onError
     * @Description:出现错误
     */
    @OnError
    public void onError(Session session, Throwable error) {
        System.out.println("发生错误:" + error.getMessage() + "; sessionId:" + session.getId());
        error.printStackTrace();
    }
    public void sendMessage(String message) throws IOException {
        this.session.getBasicRemote().sendText(message);
        // this.session.getAsyncRemote().sendText(message);
    }


    public void sendMessage(Object object) {
        //遍历客户端
        for (WebSocket webSocket : copyOnWriteArraySet) {
            System.out.println("websocket广播消息:" + object.toString());
            try {
                //服务器主动推送
                webSocket.session.getBasicRemote().sendObject(object);
            } catch (Exception e) {
                e.printStackTrace();
            }
        }
    }

    /**
     * @Name:sendMessage
     * @Description:用于发送给客户端消息(群发)
     */
    public static void sendInfo(String message) {
        //遍历客户端
        for (WebSocket webSocket : copyOnWriteArraySet) {
            System.out.println("websocket广播消息:" + message);
            try {
                //服务器主动推送
                webSocket.session.getBasicRemote().sendText(message);
            } catch (Exception e) {
                e.printStackTrace();
            }
        }
    }

    /**
     * @Name:sendMessage
     * @Description:用于发送给指定客户端消息
     */
    public void sendMessage(String sessionId, String message) throws IOException {
        Session session = null;
        WebSocket tempWebSocket = null;
        for (WebSocket webSocket : copyOnWriteArraySet) {
            if (webSocket.session.getId().equals(sessionId)) {
                tempWebSocket = webSocket;
                session = webSocket.session;
                break;
            }
        }
        if (session != null) {
            tempWebSocket.session.getBasicRemote().sendText(message);
        } else {
            System.out.println("没有找到你指定ID的会话:{}" + "; sessionId:" + sessionId);
        }
    }

    public static  synchronized int getOnlineCount(){
        return onlineCount;
    }
    public static synchronized void addOnlineCount(){
        WebSocket.onlineCount++;
    }
    public static  synchronized void shortOnlineCount(){
        WebSocket.onlineCount--;
    }

}package com.example.SmartHome.controller;
import org.springframework.stereotype.Controller;
import org.springframework.web.bind.annotation.RequestMapping;
/*
*@Description: TODO
*@ClassName: ChatController
*@Author: zzq
*@Date: 2019/7/9 16:56
*@Version: 1.0
*/
@Controller
public class ChatController {
@RequestMapping("/websocket")
public String init() {
return "websocket.html";
}
}<!DOCTYPE html>
<html> <head> <meta charset="UTF-8">
<title>My WebSocket Test</title>
</head>
<body> Welcome<br/>
<input id="text" type="text" /> <button onclick="send()">Send</button>
<button onclick="closeWebSocket()">Close</button>
<div id="message"> </div> </body> <script type="text/javascript">
var websocket = null;
//判断当前浏览器是否支持WebSocket
if('WebSocket' in window){
websocket = new WebSocket("ws:2559qs1996.qicp.vip:20422/websocket");
}
else{
alert('Not support websocket')
}
//连接发生错误的回调方法
websocket.onerror = function(){
setMessageInnerHTML("error");
};
//连接成功建立的回调方法
websocket.onopen = function(event){
setMessageInnerHTML("open");
}
//接收到消息的回调方法
websocket.onmessage = function(event){
setMessageInnerHTML(event.data);
}
//连接关闭的回调方法
websocket.onclose = function(){
setMessageInnerHTML("close");
}
//监听窗口关闭事件,当窗口关闭时,主动去关闭websocket连接,防止连接还没断开就关闭窗口,server端会抛异常。
window.onbeforeunload = function(){
websocket.close();
}
//将消息显示在网页上
function setMessageInnerHTML(innerHTML){
document.getElementById('message').innerHTML += innerHTML + '<br/>';
}
//关闭连接
function closeWebSocket(){
websocket.close();
}
//发送消息
function send(){
var message = document.getElementById('text').value;
websocket.send(message);
}
</script> </html>6.结果展示
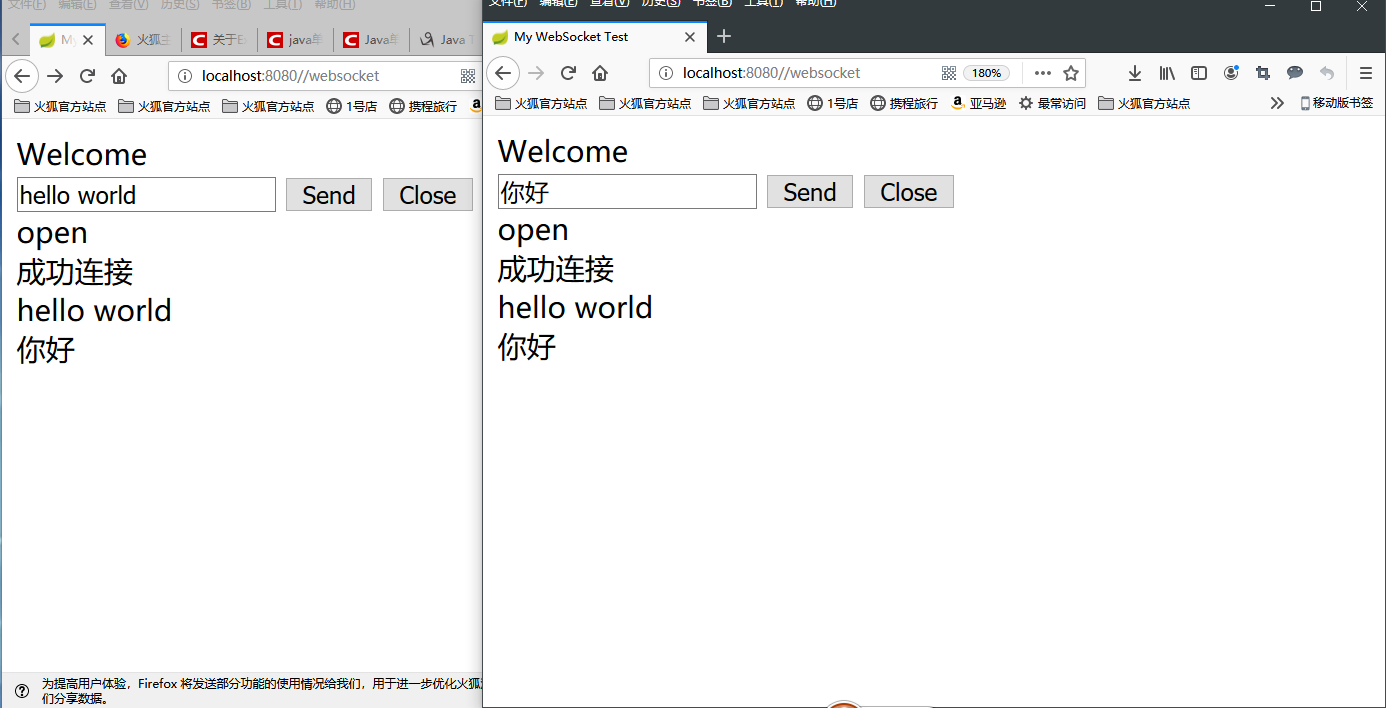
服务端:

感谢各位的阅读,以上就是“如何用单线程和定时任务分别实现WebSocket聊天室”的内容了,经过本文的学习后,相信大家对如何用单线程和定时任务分别实现WebSocket聊天室这一问题有了更深刻的体会,具体使用情况还需要大家实践验证。这里是亿速云,小编将为大家推送更多相关知识点的文章,欢迎关注!
亿速云「云服务器」,即开即用、新一代英特尔至强铂金CPU、三副本存储NVMe SSD云盘,价格低至29元/月。点击查看>>
免责声明:本站发布的内容(图片、视频和文字)以原创、转载和分享为主,文章观点不代表本网站立场,如果涉及侵权请联系站长邮箱:is@yisu.com进行举报,并提供相关证据,一经查实,将立刻删除涉嫌侵权内容。
原文链接:https://my.oschina.net/1024and1314/blog/3073490


 计算
计算 安全
安全 数据库
数据库 网络和加速
网络和加速 企业服务
企业服务


