这篇文章主要介绍“SpringMVC与前端交互的方法”,在日常操作中,相信很多人在SpringMVC与前端交互的方法问题上存在疑惑,小编查阅了各式资料,整理出简单好用的操作方法,希望对大家解答”SpringMVC与前端交互的方法”的疑惑有所帮助!接下来,请跟着小编一起来学习吧!
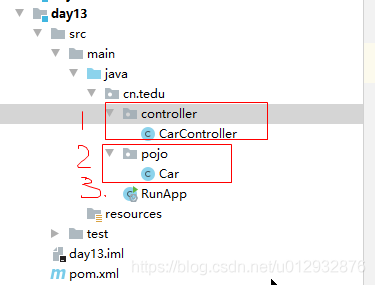
一,创建day13的module
二,复习SpringMVC
–1,需求:访问/car/get ,获取汽车数据
–2,创建RunApp类
–3,创建Car类
–4,创建CarController类
三,SpringMVC解析请求参数
–1,普通的GET提交
–2,RestFul提交
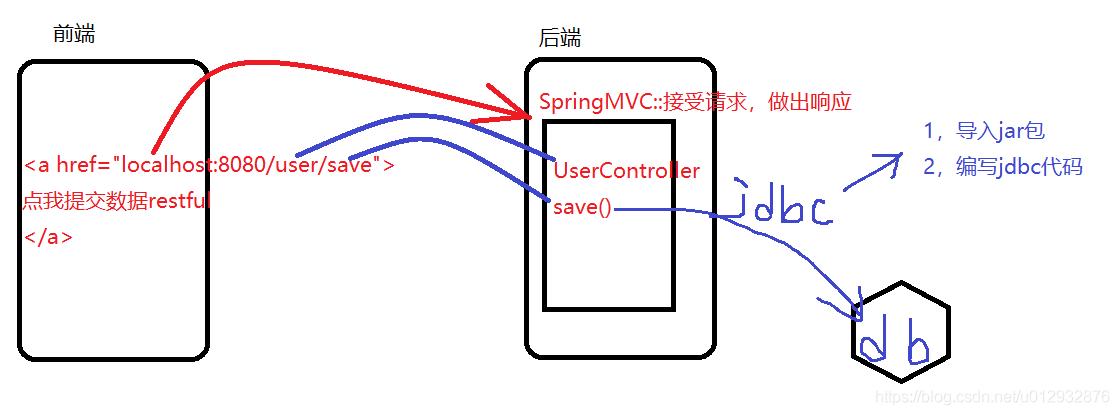
四,简单的前后端关联
–1,需求
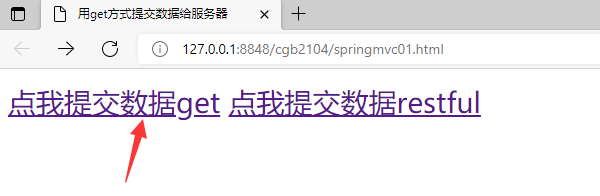
–2,创建html页面
–3,创建UserController类,解析参数
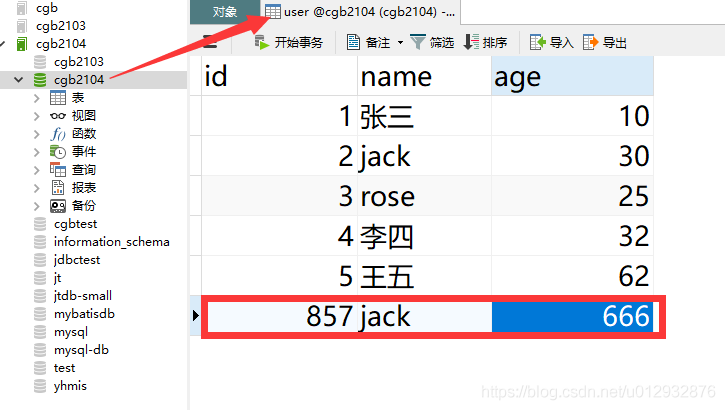
五,利用JDBC技术,把请求参数入库
–1,添加jdbc的依赖(修改pom.xml)
–2,准备user表
–3,修改UserController类的save()
–4,测试
选中project-右键-new-module-选择maven-next-输入module名-finish
package cn.tedu;
import org.springframework.boot.SpringApplication;
import org.springframework.boot.autoconfigure.SpringBootApplication;
//启动类
@SpringBootApplication
public class RunApp {
    public static void main(String[] args) {
        SpringApplication.run(RunApp.class);
    }
}package cn.tedu.pojo;
//Model用来封装数据
public class Car {
private int id;
private String name;
private double price;
//Constructor构造方法,用来方便的new
public Car(){}
public Car(int id, String name, double price) {
this.id = id;
this.name = name;
this.price = price;
}
public int getId() {
return id;
}
public void setId(int id) {
this.id = id;
}
public String getName() {
return name;
}
public void setName(String name) {
this.name = name;
}
public double getPrice() {
return price;
}
public void setPrice(double price) {
this.price = price;
}
}package cn.tedu.controller;
//MVC里的C层,用来接受请求和做出响应(springmvc)
import cn.tedu.pojo.Car;
import org.springframework.web.bind.annotation.RequestMapping;
import org.springframework.web.bind.annotation.RestController;
@RestController//接受请求,并把json数据返回
@RequestMapping("car") //规定了url地址的写法
public class CarController {
@RequestMapping("get")
public Car get(){
Car c = new Car(10,"BMW",19.9);
return c ;
}
}SpringMVC框架,可以自动解析请求中,携带的参数。甚至可以直接封装成Java对象。而不必自己一个个解析参数。
package cn.tedu.controller;
//MVC里的C层,用来接受请求和做出响应(springmvc)
import cn.tedu.pojo.Car;
import org.springframework.web.bind.annotation.RequestMapping;
import org.springframework.web.bind.annotation.RestController;
@RestController//接受请求,并把json数据返回
@RequestMapping("car")  //规定了url地址的写法
public class CarController {
    //SpringMVC框架解析请求中的参数
    //http://localhost:8080/car/get5?id=10&name=BMW&price=9.9
    @RequestMapping("get5")
    public void get5(Car c){//springmvc框架会把请求的参数,封装给car对象
        System.out.println(c.getId()+c.getName()+c.getPrice());
    }
    //http://localhost:8080/car/get4?id=10&name=BMW
    @RequestMapping("get4")
    public void get4(Integer id,String name){
        //id是用来接受url里id的值,name用来接受url里name的值
        System.out.println(id+name);
    }
    //http://localhost:8080/car/get3?id=10
    @RequestMapping("get3")
//    public void get3(int id){ //参数是基本类型,访问这个方法必须带参数,否则有异常
    public void get3(Integer id){//参数是引用类型,访问这个方法没带参数就是null
        System.out.println(id);
    }
    //自己解析请求中的参数
    public void get2(){
        String url="http://localhost:8080/car/get2?id=10&name=BMW&price=9.9";
        //先按?切出来,取第二部分,再用&切出来参数名和参数值[id=10,name=BMW,price=9.9]
        String[] s = url.split("\\?")[1].split("&");
        for (String ss : s) {
            String key =  ss.split("=")[0];
            String value = ss.split("=")[1] ;
        }
    }
    @RequestMapping("get")
    public Car get(){
        Car c = new Car(10,"BMW",19.9);
        return c ;
    }
}package cn.tedu.controller;
import org.springframework.web.bind.annotation.PathVariable;
import org.springframework.web.bind.annotation.RequestMapping;
import org.springframework.web.bind.annotation.RestController;
//对比,请求参数的不同获取方式:get/restful
@RestController
@RequestMapping("car2")
public class CarController2 {
//1.普通的get方式获取请求参数
//解析参数:http://localhost:8080/car2/get?id=10&name=BMW&age=10&sex=1
@RequestMapping("get")
public String get(Integer id,String name,Integer age,Integer sex){
// return id+name+age+sex ;//直接把结果展示在浏览器上
return "{'id':'"+id+"'}" ;//组织成json串给浏览器展示
}
//2.restful方式获取请求参数:通过{}绑定地址中参数的位置 + 通过注解获取{???}的值
//解析参数:http://localhost:8080/car2/get2/10/BMW/10/1
@RequestMapping("get2/{id}/{name}/{x}/{y}")
public void get2(@PathVariable Integer id,
@PathVariable String name,
@PathVariable String x,
@PathVariable Integer y){
System.out.println(id);
System.out.println(name);
System.out.println(x);
System.out.println(y);
}
}点击页面的a,Get方式提交数据,交给框架解析参数
<!DOCTYPE html>
<html>
	<head>
		<meta charset="utf-8">
		<title>用get方式提交数据给服务器</title>
	</head>
	<body>
		<a href="http://localhost:8080/user/save?id=857&name=jack&age=666">点我提交数据get</a>
		<a href="http://localhost:8080/user/save2/857/jack/666">点我提交数据restful</a>
	</body>
</html>package cn.tedu.controller;
import org.springframework.web.bind.annotation.PathVariable;
import org.springframework.web.bind.annotation.RequestMapping;
import org.springframework.web.bind.annotation.RestController;
@RestController
@RequestMapping("user")
public class UserController {
//1. 解析get的请求参数 http://localhost:8080/user/save?id=857&name=jack&age=666
@RequestMapping("save")
public void save(Integer id,String name,Integer age){
System.out.println(id+name+age);
}
//2. 解析restful的请求参数 http://localhost:8080/user/save2/857/jack/666
//get和restful的区别?
//get的好处是数据都在地址栏拼接,restful的好处是相对安全
//restful主要是用来优化、简化get提交数据的写法
@RequestMapping("save2/{x}/{y}/{z}")
public void save2(@PathVariable Integer x,
@PathVariable String y,
@PathVariable Integer z){
System.out.println(x+y+z);
}
}
<?xml version="1.0" encoding="UTF-8"?>
<project xmlns="http://maven.apache.org/POM/4.0.0"
         xmlns:xsi="http://www.w3.org/2001/XMLSchema-instance"
         xsi:schemaLocation="http://maven.apache.org/POM/4.0.0 http://maven.apache.org/xsd/maven-4.0.0.xsd">
    <parent>
        <artifactId>cgb2104boot01</artifactId>
        <groupId>cn.tedu</groupId>
        <version>0.0.1-SNAPSHOT</version>
    </parent>
    <modelVersion>4.0.0</modelVersion>
    <artifactId>day13</artifactId>
    <!--添加jar包的依赖-->
    <dependencies>
        <dependency>
            <groupId>mysql</groupId>
            <artifactId>mysql-connector-java</artifactId>
            <version>5.1.48</version>
        </dependency>
    </dependencies>
</project>CREATE TABLE `user` (
`id` int(3) default NULL,
`name` varchar(10) default NULL,
`age` int(2) default NULL
) ENGINE=InnoDB DEFAULT CHARSET=utf8;package cn.tedu.controller;
import org.springframework.web.bind.annotation.PathVariable;
import org.springframework.web.bind.annotation.RequestMapping;
import org.springframework.web.bind.annotation.RestController;
import java.sql.Connection;
import java.sql.DriverManager;
import java.sql.PreparedStatement;
@RestController
@RequestMapping("user")
public class UserController {
//1. 解析get的请求参数 http://localhost:8080/user/save?id=857&name=jack&age=666
@RequestMapping("save")
public void save(Integer id,String name,Integer age) throws Exception {
// System.out.println(id+name+age);
/* 把解析出来的参数,利用jdbc技术入库*/
//注册驱动
Class.forName("com.mysql.jdbc.Driver");
//获取连接
String url ="jdbc:mysql:///cgb2104?characterEncoding=utf8&serverTimezone=Asia/Shanghai";
Connection conn = DriverManager.getConnection(url,"root","root");
//获取传输器
// String sql= "insert into user(id,name) values(?,?)";//给指定的字段设置值
String sql= "insert into user values(?,?,?)";//所有字段设置值
PreparedStatement ps = conn.prepareStatement(sql);
//给SQL设置参数
ps.setInt(1,id);//给第一个?设置值
ps.setString(2,name);//给第二个?设置值
ps.setInt(3,age);//给第三个?设置值
//执行SQL
int rows = ps.executeUpdate();
//释放资源 -- OOM(OutOfMemory)
ps.close();
conn.close();
}
//2. 解析restful的请求参数 http://localhost:8080/user/save2/857/jack/666
//get和restful的区别?
//get的好处是数据都在地址栏拼接,restful的好处是相对安全
//restful主要是用来优化、简化get提交数据的写法
@RequestMapping("save2/{x}/{y}/{z}")
public void save2(@PathVariable Integer x,
@PathVariable String y,
@PathVariable Integer z){
System.out.println(x+y+z);
}
}
到此,关于“SpringMVC与前端交互的方法”的学习就结束了,希望能够解决大家的疑惑。理论与实践的搭配能更好的帮助大家学习,快去试试吧!若想继续学习更多相关知识,请继续关注亿速云网站,小编会继续努力为大家带来更多实用的文章!
亿速云「云服务器」,即开即用、新一代英特尔至强铂金CPU、三副本存储NVMe SSD云盘,价格低至29元/月。点击查看>>
免责声明:本站发布的内容(图片、视频和文字)以原创、转载和分享为主,文章观点不代表本网站立场,如果涉及侵权请联系站长邮箱:is@yisu.com进行举报,并提供相关证据,一经查实,将立刻删除涉嫌侵权内容。


 计算
计算 安全
安全 数据库
数据库 网络和加速
网络和加速 企业服务
企业服务


