这篇文章主要介绍“vue怎么实现echarts中的仪表盘”,在日常操作中,相信很多人在vue怎么实现echarts中的仪表盘问题上存在疑惑,小编查阅了各式资料,整理出简单好用的操作方法,希望对大家解答”vue怎么实现echarts中的仪表盘”的疑惑有所帮助!接下来,请跟着小编一起来学习吧!
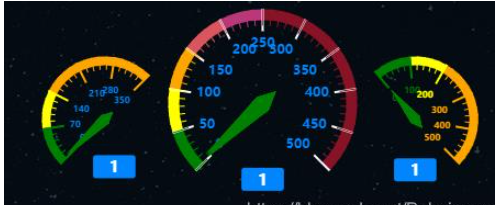
最终结果

1. 首先需要安装echarts依赖包
npm install echarts -S
2. 或者使用国内的淘宝镜像:
npm install -g cnpm --registry=https://registry.npm.taobao.org
全局引入
main.js
// 引入echarts
import echarts from 'echarts'

Vue.prototype.$echarts = echartsHello.vue
<div id="myChart" :></div>export default {
data(){
return {}
},
mounted(){
this.myChart() //函数调用
},
methods:{
myChart() {
let columnar = this.$echarts.init(document.getElementById('myChart'));
columnar.setOption({
tooltip : {
formatter: "{a} <br/>{c} {b}"
},
toolbox: {
show: true,
feature: {
restore: {show: true},
saveAsImage: {show: true}
}
},
series : [
{
name: '空气质量:',
type: 'gauge',
z: 3,
min: 0,
max: 500,
splitNumber: 10,
radius: '60%',
axisLine: {
lineStyle: {
width: 10,
color: [[0.1, 'green'], [0.2, 'yellow'],[0.3, 'orange'],[0.4,'#db555e'],[0.5,'#ba3779'],[1.1,'#881326'] ]
}
},
axisTick: {
length: 15,
lineStyle: {
color: 'auto'
}
},
//刻度分割线样式
splitLine: {
length: 20,
lineStyle: {
color: 'white'
}
},
//刻度数字样式
axisLabel: {
fontWeight:'bold',
color: '#0085FF',
},
detail : {
//说明数字大小
formatter: function (value) {
return value;
},
offsetCenter:['0%','80%'],
fontWeight: 'bolder',
borderRadius: 3,
backgroundColor: '#0085FF',
fontSize:14,
width: 100,
color: 'white',
padding:[5,15,2,15]
},
data:[1,2,3,4,5,6,7]
},
{
name: 'PM2.5:',
type: 'gauge',
center: ['20%', '55%'],
radius: '40%',
min:0,
max:350,
valu:55,
endAngle:45,
splitNumber:5,
axisLine: {
lineStyle: {
width: 8,
color: [[0.2, 'green'], [0.4, 'yellow'],[1.1,'orange'] ]
}
},
axisTick: {
length:12,
lineStyle: {
color: 'auto'
}
},
splitLine: {
length:20,
lineStyle: {
color: 'auto'
}
},
pointer: {
width:5,
color:'red'
},
//刻度数字样式
axisLabel: {
fontWeight:'bold',
color: '#0085FF',
fontSize:8, //改变仪表盘内刻度数字的大小
},
detail: {
formatter: function (value) {
return value;
},
offsetCenter:['15%','75%'],
fontWeight: 'bolder',
borderRadius: 3,
backgroundColor: '#0085FF',
fontSize:14,
width: 100,
color: 'white',
padding:[5,15,2,15]
},
data:[1,2,3,4,5,6]
},
{
name: 'PM10:',
type: 'gauge',
//仪表盘位置
center: ['79%', '55%'],
//仪表盘半径
radius: '40%',
min:0,
max:500,
startAngle:130,
splitNumber:5,
//仪表盘弧线宽度
axisLine: {
lineStyle: {
width: 8,
color: [[0.2, 'green'], [0.4, 'yellow'],[1, 'orange'] ]
}
},
//仪表盘小刻度样式
axisTick: {
length:12,
lineStyle: {
color: 'auto'
}
},
//仪表盘大刻度样式
splitLine: {
length:20,
lineStyle: {
color: 'auto'
}
},
//仪表盘指针样式
pointer: {
width:5,//指针的宽度
length:"60%", //指针长度,按照半圆半径的百分比
shadowColor : 'blue', //默认透明
shadowBlur: 5
},
//刻度数字样式
axisLabel: {
fontWeight:'bold',
color: 'auto',
fontSize:8, //改变仪表盘内刻度数字的大小
},
detail: {
//说明数字大小
formatter: function (value) {
return value;
},
//仪表盘下方文字说明
offsetCenter:['0%','80%'],
fontWeight: 'bolder',
borderRadius: 3,
backgroundColor: '#0085FF',
fontSize:14,
width: 100,
color: 'white',
padding:[5,15,2,15]
},
data:[1,2,3,4]
}
]
})
}
}到此,关于“vue怎么实现echarts中的仪表盘”的学习就结束了,希望能够解决大家的疑惑。理论与实践的搭配能更好的帮助大家学习,快去试试吧!若想继续学习更多相关知识,请继续关注亿速云网站,小编会继续努力为大家带来更多实用的文章!
亿速云「云服务器」,即开即用、新一代英特尔至强铂金CPU、三副本存储NVMe SSD云盘,价格低至29元/月。点击查看>>
免责声明:本站发布的内容(图片、视频和文字)以原创、转载和分享为主,文章观点不代表本网站立场,如果涉及侵权请联系站长邮箱:is@yisu.com进行举报,并提供相关证据,一经查实,将立刻删除涉嫌侵权内容。