这篇文章主要介绍“Spring Boot Actuator管理日志如何实现”的相关知识,小编通过实际案例向大家展示操作过程,操作方法简单快捷,实用性强,希望这篇“Spring Boot Actuator管理日志如何实现”文章能帮助大家解决问题。
为了解决以下两个问题:
1、单JAR包应用查看日志需要的时候如果需要远程访问服务器登录查看日志,那样相对比较麻烦
2、生产环境为了解决BUG需要临时更换日志级别,总不能重启服务来解决吧
所以使用了actuator 其中的部分来解决这两个问题。
首先在POM文件中引入actuator依赖:
  <dependency>
            <groupId>org.springframework.boot</groupId>
            <artifactId>spring-boot-starter-actuator</artifactId>
            <version>${spring-boot.version}</version>
 </dependency>
配置文件中配置:
management.endpoints.web.base-path=/actuator
management.endpoints.web.exposure.include=logfile,loggers
management.endpoint.health.show-details=always
logging.file.name=logs/EL-3KJ/EL-3KJ.log
然后直接可以访问 http://localhost:8085/actuator
得到下列结果:
{"_links":{
"self"{"href":"http://localhost:8085/actuator","templated":false},
"logfile: {"href":"http://localhost:8085/actuator/logfile","templated":false},"loggers":{"href":"http://localhost:8085/actuator/loggers","templated":false},"loggers-name":{"href":"http://localhost:8085/actuator/loggers/{name}","templated":true}}}
其中
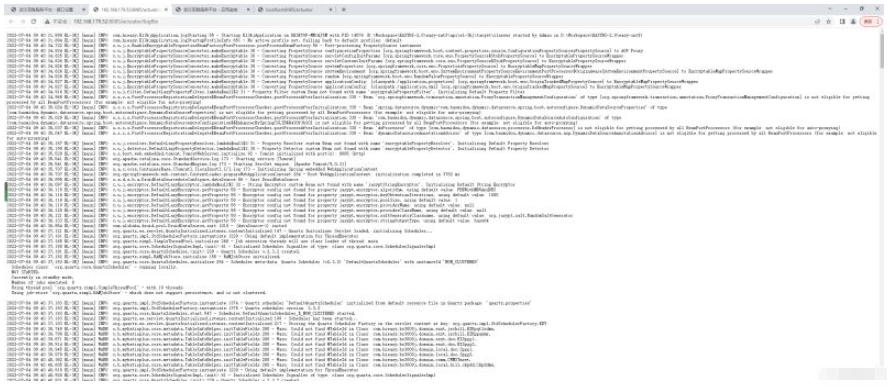
logfile 是查看日志文件
loggers是查看日志级别
loggers/{name}是更改日志级别
前端参考代码:
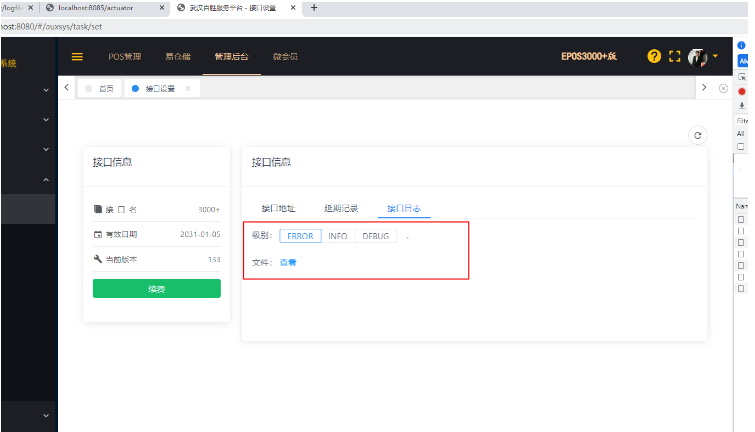
 <TabPane label="接口日志" name="name3">
                级别:
                <RadioGroup v-model="loglevel" type="button" size="small" @on-
                      change="lvChange()">
                  <Radio label="ERROR"></Radio>
                  <Radio label="INFO"></Radio>
                  <Radio label="DEBUG"></Radio>
                </RadioGroup> <br/><br/>
                文件:<a :href="logfileurl" rel="external nofollow"  target="_blank"  > 查看</a>
 </TabPane>


 this.logfileurl = res.dataApi+"actuator/logfile";
 this.loglevelurl = res.dataApi+"actuator/loggers/root";


getLogLevel(){
      this.ajax_get({
        url: this.loglevelurl,
        params: {},
      }).then((res) => {
        this.loglevel=res.configuredLevel
      });
},
lvChange(){
      this.changeLogLevel(this.loglevel)
},
changeLogLevel(level){
      this.ajax_post({
        url: this.tenant.dataApi + "actuator/loggers/root",
        params: {'configuredLevel':level},
      }).then((res) => {
        this.spinShow = false;
        if (!res.code) {
          this.$Notice.success({
            title:'更改日志级别为'+level,
            desc:res.msg
          });
        } else {
          this.$Notice.error({
            title:'更改日志级别失败',
            desc:res.msg
          });
        }
      });
 }
最终效果如下:
关于“Spring Boot Actuator管理日志如何实现”的内容就介绍到这里了,感谢大家的阅读。如果想了解更多行业相关的知识,可以关注亿速云行业资讯频道,小编每天都会为大家更新不同的知识点。
免责声明:本站发布的内容(图片、视频和文字)以原创、转载和分享为主,文章观点不代表本网站立场,如果涉及侵权请联系站长邮箱:is@yisu.com进行举报,并提供相关证据,一经查实,将立刻删除涉嫌侵权内容。


