这篇文章主要讲解了“微信小程序如何实现点餐小程序左侧滑动菜单”,文中的讲解内容简单清晰,易于学习与理解,下面请大家跟着小编的思路慢慢深入,一起来研究和学习“微信小程序如何实现点餐小程序左侧滑动菜单”吧!
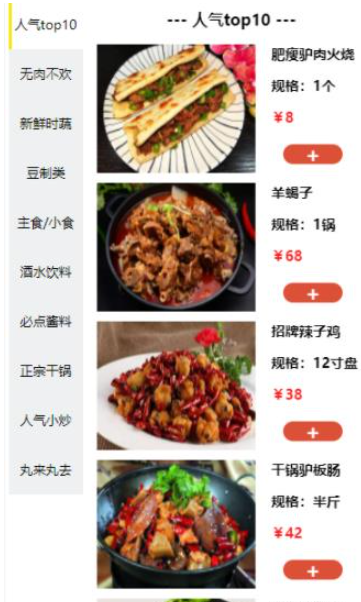
效果图:

想要实现上述功能我们必须要借助微信为我们提供的scroll-view组件,没有了解过的同学需要先去简单阅读下API。从图中我们可以看出整个布局主要是由左右两个滚动界面构成。但是它们彼此之间又有联系,在点击左侧菜单类型跟滑动右侧菜品的时候另外一个滚动窗口必须做出响应。滚动条实现原理其实就是我们HTML中的锚点,右侧整个菜单是一个完整界面它会将其按唯一id标识拆分成不同模块。比如我们整个界面的高度是2000rpx,其中人气top10占400rpx。那么height:0-400就对应人气top10。而无肉不欢对应模块高度为300rpx那么,400-700区域就是无肉不欢。以此类推,下面代码中我们使用id="{{ ‘right’ + item.id}}" 为每个分类模块做了唯一标识。
<view>
  <view class="menuMain">
    <scroll-view scroll-y="true" class="menuLeft">
      <view wx:for="{{menuArr}}" wx:key="*this" bindtap="leftMenuClick" data-current_index="{{index}}" class="{{leftView == index ? 'active' : ''}}">{{item.name}}

      </view>
    </scroll-view>
    <scroll-view scroll-y="true" scroll-with-animation="true" bindscroll="rightScroll" scroll-into-view="{{rightId}}"
     class="menuRight">
      <view  wx:for="{{menuArr}}" wx:key="*this" id="{{ 'right' + item.id}}" class="goods">
        <view class="goodsType">
         ---  {{item.name}} ---
        </view>
        <view wx:for="{{item.subArr}}" wx:key="*this" wx:for-item="goods" class="goodsContent">
          <view class="orderDishes">
            <image src="{{goods.imageUrl}}" ></image>
            <view class="goodsInfo">
              <view class="goodsInfo">{{goods.goodsName}}</view>
              <view class="goodsInfo">规格:{{goods.unit}}</view>
              <view class="goodsInfo goodsInfoPrice">¥{{goods.price}}</view>
              <view class="add">
                +
              </view>
            </view>
          </view>
        </view>
      </view>
    </scroll-view>
  </view>


</view>在小程序初始化生命周期函数onReady中我们需要提前获取不同模块的高度并存入数组中,来为我们后续跳转提供高度信息。我们分段将所有的view对应高度都放入到heightArr 数组中。首先实现左侧点击导航右侧滑动到对应高度需求,这里使用bindtap微信我们提供的绑定事件函数来控制右侧的位置。这里我们为for循环参数index进行了重命名,通过自定义属性data-传递给函数调用者。这里需要注意一个属性scroll-into-view。值应为某子元素id(id不能以数字开头)。设置哪个方向可滚动,则在哪个方向滚动到该元素 其对应的view标识id就是当前右侧滑动窗口要显示的内容,所以我们需要将左侧属性与右侧视图id对应起来。在data中我们定义两个字段leftView代表左侧人气top10,无肉不欢等分类导航。rightId对应scroll-view标签下各个view的唯一id值。这里注意我们的id并不是直接对应,前面有right字段使用是需要进行组合。点击左侧控制右侧滑动的功能并不需要用到高度数组,只需要使其与view中的id对应起来即可。详细请看leftMenuClick函数。为了使动画看起来比较流畅请加上scroll-with-animation属性
let heightArr = [0]  // 存放高度累加数组
data: {
    rightId: 'right0',
    leftView: 0
  },
/**
   * 生命周期函数--监听页面初次渲染完成
   */
  onReady: function () {
    const query = wx.createSelectorQuery()
    query.selectAll('.goods').boundingClientRect()
    query.selectViewport().scrollOffset()
    query.exec(function (res) {
      res[0].top // #the-id节点的上边界坐标
      res[1].scrollTop // 显示区域的竖直滚动位置
      res[0].map( val => {
        let result = val.height  + heightArr[heightArr.length - 1]
        console.log(result)
        // 拿后一个view盒子的高度加上前面的高度
        heightArr.push(result)
      })
      console.log(heightArr)
    })

  },
/**
   * 左侧菜单点击事件,事件对象e传输index
   */
  leftMenuClick(e){
    console.log(e.currentTarget.dataset.current_index)
    this.setData({
      leftView: e.currentTarget.dataset.current_index,
      rightId: 'right' + e.currentTarget.dataset.current_index
    })
  },

  /**
   * 右侧滚动事件
   */
  rightScroll(e) {
    let st = e.detail.scrollTop
    console.log('st' + e.detail.scrollTop)
    for(let i = 0; i < heightArr.length; i++){
      if(st >= heightArr[i] && st <= heightArr[i+1] - 5){
        this.setData({
          leftView: i,
        })
        console.log(this.data.leftView)
        return
      }
    }
}右侧滑动控制左侧菜单自动选择就需要用到我们前面说到的滑动高度了,上面我们获取到了每个view对应的高度分别存储到了heightArr 数组中。数组中存放的每个数值对应的是我们view所在高度。e.detail.scrollTop获取到的是顶部界面所属高度,假设当前顶部高度为500我们知道400-700是属于无肉不欢对应的界面。此时只需要判断后将leftView修改为所对应的2即可。具体实现看rightScroll函数,我们遍历循环heightArr中的高度数值判断当前st属于哪个阶层,找到后将左侧标识字段设置为对应值即可。其中我们 -5是为了使用户体验更友好避免出现分类标题已经划过去了,左侧导航还没变更的情况。大体逻辑就是这样,样式根据自己需求来就可以。下面给出我实现界面对应的代码,其中很多样式都是伪代码大家到时自信更改。
/* pages/order/order.wxss */

.link {
  height: 30px;
}

.mainMenu {
  width: 180rpx;
}

.menuMain {
  height: 100vh;
  display: flex;
  flex-direction: row;
  justify-content: space-around;
}

/* 左侧菜单导航栏 */
.menuLeft {
  width: 20%;
}

.menuLeft view {
  font-size: 26rpx;
  text-align: center;
  height: 100rpx;
  line-height: 100rpx;
  background-color: rgb(238, 241, 241);
  position: relative;
}
.menuLeft view.active{
  background-color: rgb(255, 255, 255);
}

.menuLeft view::before {
  content: '';
  width: 6rpx;
  height: 100%;
  position: absolute;
  left: 0;
  top: 0;
  background-color:transparent;
  border-left: none;
}

.menuLeft view.active::before {
  background-color: rgb(245, 229, 6);
}


.menuRight {
  height: 100vh;
  width: 75%;
}

.menuRight .goods{
  padding: 10rpx;
}

.menuRight .goodsType{
  text-align: center;
  height: 60rpx;
  line-height: 60rpx;
  font-weight: 600;
  color: rgb(0, 0, 0);
}

.menuRight .goods .goodsContent .orderDishes image{
  width: 320rpx;
  height: 260rpx;
}


.menuRight .goods .goodsContent text{
  overflow: hidden;
  text-overflow: ellipsis;
  white-space: nowrap;
}

.orderDishes{
  padding-top: 20rpx;
  display: flex;
  flex-direction: row;
}

.add{
  margin-left: 40rpx;
  margin-top: 10rpx;
  width: 120rpx;
  font-size: 40rpx;
  font-weight: 600;
  height: 40rpx;
  line-height: 40rpx;
  text-align: center;
  background-color: rgb(219, 80, 55);
  border-radius: 20rpx;
  color: rgb(255, 255, 255);
}

.goodsInfo{
  margin-left: 16rpx;
  height: 65rpx;
  font-size: 28rpx;
  font-weight: 800;
  color: rgb(0, 0, 0);
}


.goodsInfoPrice{
  color: rgb(247, 36, 36);
}感谢各位的阅读,以上就是“微信小程序如何实现点餐小程序左侧滑动菜单”的内容了,经过本文的学习后,相信大家对微信小程序如何实现点餐小程序左侧滑动菜单这一问题有了更深刻的体会,具体使用情况还需要大家实践验证。这里是亿速云,小编将为大家推送更多相关知识点的文章,欢迎关注!
亿速云「云服务器」,即开即用、新一代英特尔至强铂金CPU、三副本存储NVMe SSD云盘,价格低至29元/月。点击查看>>
免责声明:本站发布的内容(图片、视频和文字)以原创、转载和分享为主,文章观点不代表本网站立场,如果涉及侵权请联系站长邮箱:is@yisu.com进行举报,并提供相关证据,一经查实,将立刻删除涉嫌侵权内容。