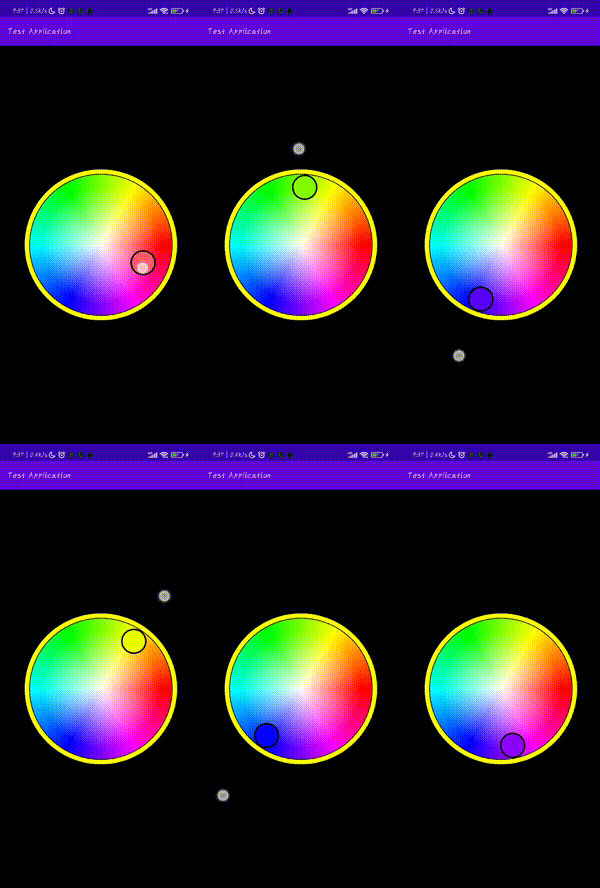
这篇文章主要讲解了“android如何实现自定义圆形取色盘”,文中的讲解内容简单清晰,易于学习与理解,下面请大家跟着小编的思路慢慢深入,一起来研究和学习“android如何实现自定义圆形取色盘”吧!
这是一个自定义色盘,根据点,直线和圆的几何学加上hsv颜色模型完成

几何:
(x-a)²+(y-b)²=r²
已知直线上的两点P1(X1,Y1) P2(X2,Y2), P1 P2两点不重合。
AX+BY+C=0
A = Y2 - Y1
B = X1 - X2
C = X2*Y1 - X1*Y2
点在圆内、点在圆上、点在圆外。假设圆的半径为r,点到圆心的距离为d,则有:d<r点在圆内,d=r点在圆上,d>r点在圆外。
点P(x1,y1) 与圆(x-a)²+(y-b)²=r²的位置关系:
当(x-a)²+(y-b)²>r²时,则点P在圆外。
当(x-a)²+(y-b)²=r²时,则点P在圆上。
当(x-a)²+(y-b)²<r²时,则点P在圆内。
一条直线与某平面直角坐标系横轴正半轴方向的夹角的正切值即该直线相对于该坐标系的斜率
斜率 k=tanα(α倾斜角)
与x轴垂直的直线不存在斜率
直线的斜率公式为:k=y2-y1)/(x2-x1)或(y1-y2)/(x1-x2)
记(x,y) 是象限中的一点
第一象限中的点:x > 0, y > 0
第二象限中的点:x < 0, y > 0
第三象限中的点:x < 0, y < 0
第四象限中的点:x > 0, y < 0
值得注意的是原点和坐标轴上的点不属于任何象限。

自定义View、ComposeShader、SweepGradient、RadialGradient、Paint。
上源码
代码都比较简单这里就不介绍了
class RoundColorPaletteHSV360 constructor(context: Context, attrs: AttributeSet?, defStyleAttr:Int): View(context,attrs,defStyleAttr) {

    constructor(context: Context):this(context,null,0)

    constructor(context: Context,attrs: AttributeSet?):this(context,attrs,0)

    //取色范围半径
    var radius:Float = 0f
        private set(value){
            field = value-stroke-gap-colorRadius
        }

    //取色圆半径
    var colorRadius = 50f
        set(value){
            if (value >= 0)
                field = value
        }

    //取色圆边框半径
    var colorStroke = 8f
        set(value){
            if (value >= 0)
                field = value
        }

    //取色圆边框颜色
    var colorStrokeColor = Color.BLACK

    //取色颜色
    var color = Color.WHITE

    //边框半径
    var stroke = 24f
        set(value){
            if (value >= 0)
                field = value
        }

    //边框颜色
    var strokeColor = Color.YELLOW

    //间隙半径
    var gap = 4f
        set(value){
            if (value >= 0)
                field = value
        }

    var isOutOfBounds:Boolean = false

    private val paint = Paint()
    private val colors1:IntArray
    private val positions1 :FloatArray
    private val colors2:IntArray
    private val positions2 :FloatArray
    private var xColor: Float = 0f
    private var yColor: Float = 0f
    private var colorChangeCallBack: ColorChangeCallBack? = null

    init {
//        <declare-styleable name="RoundColorPaletteHSV360">
//        <attr name="colorRadius" format="dimension"/>
//        <attr name="colorStroke" format="dimension"/>
//        <attr name="gap" format="dimension"/>
//        <attr name="stroke" format="dimension"/>
//        <attr name="colorStrokeColor" format="color"/>
//        <attr name="strokeColor" format="color"/>
//        <attr name="isOutOfBounds" format="boolean"/>
//        </declare-styleable>
        val  typedArray = context.obtainStyledAttributes(attrs, R.styleable.RoundColorPaletteHSV360)
        colorRadius = typedArray.getDimension(R.styleable.RoundColorPaletteHSV360_colorRadius,50f)
        colorStroke = typedArray.getDimension(R.styleable.RoundColorPaletteHSV360_colorStroke,8f)
        gap = typedArray.getDimension(R.styleable.RoundColorPaletteHSV360_gap,4f)
        stroke = typedArray.getDimension(R.styleable.RoundColorPaletteHSV360_stroke,24f)
        colorStrokeColor = typedArray.getColor(R.styleable.RoundColorPaletteHSV360_colorStrokeColor,Color.BLACK)
        strokeColor = typedArray.getColor(R.styleable.RoundColorPaletteHSV360_strokeColor,Color.YELLOW)
        isOutOfBounds = typedArray.getBoolean(R.styleable.RoundColorPaletteHSV360_isOutOfBounds,false)
        typedArray.recycle()

        val colorCount1 = 360
        val colorCount2 = 255
        val colorAngleStep = 360 / colorCount1
        positions1 = FloatArray(colorCount1+1){i-> i/(colorCount1*1f)}
        var hsv = floatArrayOf(0f, 1f, 1f)
        colors1 = IntArray(colorCount1+1){ i->
            hsv[0] = 360 - i * colorAngleStep % 360f
            Color.HSVToColor(hsv)
        }
        hsv = floatArrayOf(0f, 0f, 1f)
        positions2 = FloatArray(colorCount2+1){i-> i/(colorCount2*1f)}
        colors2 = IntArray(colorCount2+1){ i->
            Color.HSVToColor(255 * (colorCount2 -i) / colorCount2 , hsv)
        }

    }

    override fun onMeasure(widthMeasureSpec: Int, heightMeasureSpec: Int) {
        val width = MeasureSpec.getSize(widthMeasureSpec)/2f
        val height = MeasureSpec.getSize(heightMeasureSpec)/2f
        radius = if(width-height<0) width else height
        super.onMeasure(widthMeasureSpec, heightMeasureSpec)
    }

    @SuppressLint("DrawAllocation")
    override fun onDraw(canvas: Canvas?) {
        createColorWheel(canvas)
        createColorRadius(canvas,xColor,yColor)
        super.onDraw(canvas)
    }

    //色盘
    private fun createColorWheel(canvas: Canvas?){
        paint.reset()
        paint.isAntiAlias = true
        paint.shader = ComposeShader(
            SweepGradient(
                width / 2f,
                height / 2f,
                colors1,
                positions1
            ), RadialGradient(
                width / 2f,
                height / 2f,
                radius-colorRadius,
                colors2,
                positions2,
                Shader.TileMode.CLAMP
            ),  PorterDuff.Mode.SRC_OVER)
        canvas?.drawCircle(width / 2f,height / 2f,radius,paint)
        paint.shader = null
        paint.style = Paint.Style.STROKE
        paint.strokeWidth = stroke.toFloat()
        paint.color = strokeColor
        canvas?.drawCircle(width / 2f,height / 2f,radius+gap+stroke/2,paint)
    }

    //取色圆
    private fun createColorRadius(canvas: Canvas?, rx: Float, ry: Float){
        var x = rx
        var y = ry
        if(x==0f || y==0f ){
            x = width / 2f
            y = height / 2f
        }
        paint.reset()
        paint.isAntiAlias = true
        paint.color = color
        canvas?.drawCircle(x,y,colorRadius,paint)
        paint.style = Paint.Style.STROKE
        paint.color = colorStrokeColor
        paint.strokeWidth = colorStroke
        canvas?.drawCircle(x,y,colorRadius+colorStroke/2,paint)
    }

    fun setColorChangeCallBack(colorChangeCallBack: ColorChangeCallBack){
        this.colorChangeCallBack = colorChangeCallBack
    }

    override fun onTouchEvent(event: MotionEvent?): Boolean {
        event?.let {
            val pointToCircle = pointToCircle(it.x, it.y)
            if( pointToCircle <= radius - if(isOutOfBounds) 0f else (colorRadius-colorStroke)){
                xColor =  it.x
                yColor =  it.y
                color =  Color.HSVToColor(floatArrayOf((angdeg(it.x,it.y)),pointToCircle/radius,1f))
                colorChangeCallBack?.onChange(color)
            }else{
                findPoint( it.x, it.y)
            }
            invalidate()
        }
        return true
    }

    //点到圆心距离
    private fun pointToCircle(x: Float = width / 2f, y: Float = height / 2f ) =
        sqrt((x - width / 2f)*(x - width / 2f) + (y-height / 2f)*(y-height / 2f))

    //离目标最近的点 待开发
    private fun findPoint(x1: Float = width / 2f, y1: Float = height / 2f ){
//      直线一般方程
//      以圆心为坐标0,0 重新计算点(a,b)坐标
        val a = y1 - height / 2f
        val b = x1 - width / 2f
        val r = radius - if(isOutOfBounds) 0f else (colorRadius-colorStroke)
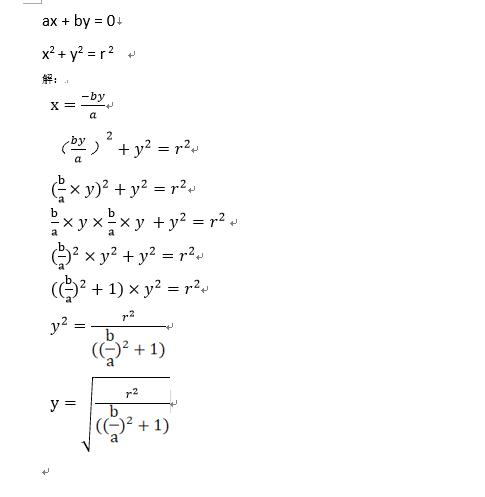
        //r^2/((b/a)^2+1)的开平方
        yColor = sqrt( (r * r) / ((b / a) * (b / a) + 1))
        //判断开平方的正负值
        if(a<0) yColor = -yColor
        xColor =  (b*yColor)/a + width / 2f
        yColor += height / 2f
        color =  Color.HSVToColor(floatArrayOf((angdeg(xColor,yColor)),1f,1f))
        colorChangeCallBack?.onChange(color)

    }


    //角度
    private fun angdeg(x: Float = width / 2f, y: Float = height / 2f ):Float{
        var angdeg = 0

        //特殊角度, 与x轴垂直不存在斜率
        if(x - width / 2f == 0f && y - height / 2f < 0){
            angdeg = 90
        }else{
            //到圆心的斜率
            val k = ((y-height / 2f)*(y-height / 2f))/((x - width / 2f)*(x - width / 2f))
            //二分法
            var min = 0.00
            var max = 90.00
            while(max-min>1){
                val deg = min + (max - min) / 2
                if(k>tan(toRadians(deg))) min = deg else max = deg
            }
            angdeg = (max-1).toInt()
        }

        if((x - width / 2f <= 0f && y - height / 2f <= 0f)) {//第二象限 90~180
            angdeg = 180 - angdeg
        }else if((x - width / 2f <= 0f && y - height / 2f >= 0f)) {//第三象限 180~270
            angdeg += 180
        }else if((x - width / 2f >= 0f && y - height / 2f >= 0f)) {//第四象限 270~360
            angdeg = 360 - angdeg
        }

        return angdeg.toFloat()
    }

    interface ColorChangeCallBack{
        fun onChange(@ColorInt color: Int)
    }
}gradle 7.0以上的在 settings.gradle 添加:
```
dependencyResolutionManagement {
repositoriesMode.set(RepositoriesMode.FAIL_ON_PROJECT_REPOS)
repositories {
google()
mavenCentral()
maven {url "https://gitee.com/yangguizhong/circular-color-plate/raw/master"}
jcenter() // Warning: this repository is going to shut down soon
}
}
```
gradle 7.0以下的在根 build.gradle 添加:
```
allprojects {
repositories {
google()
mavenCentral()
maven {url "https://gitee.com/yangguizhong/circular-color-plate/raw/master"}
}
}
```
build.gradle 添加:
```
implementation 'com.xiaotie.colorPicker:colorPicker:1.0.0'
```
#### 使用说明
```
<com.wifiled.ipixels.view.RoundColorPaletteHSV360
android:id="@+id/color_picker"
android:layout_width="300dp"
android:layout_height="300dp"
app:gap="1dp"//取色背景和背景边框的间隙
app:colorRadius="20dp"//取色圆的半径
app:colorStroke="3dp"//取色圆的边框宽度
app:stroke="8dp"//背景边框的宽度
app:strokeColor="#FFF7A6"//背景边框的颜色
app:isOutOfBounds="true"//是否超出边框
app:colorStrokeColor="#2E3C3C"//取色圆的边框宽度
app:layout_constraintBottom_toBottomOf="parent"
app:layout_constraintEnd_toEndOf="parent"
app:layout_constraintStart_toStartOf="parent"
app:layout_constraintTop_toTopOf="parent" />
```
```
colorPickerView.setColorChangeCallBack(object:RoundColorPaletteHSV360.ColorChangeCallBack{
override fun onChange(color: Int) {
//返回的颜色
}

})

```
感谢各位的阅读,以上就是“android如何实现自定义圆形取色盘”的内容了,经过本文的学习后,相信大家对android如何实现自定义圆形取色盘这一问题有了更深刻的体会,具体使用情况还需要大家实践验证。这里是亿速云,小编将为大家推送更多相关知识点的文章,欢迎关注!
免责声明:本站发布的内容(图片、视频和文字)以原创、转载和分享为主,文章观点不代表本网站立场,如果涉及侵权请联系站长邮箱:is@yisu.com进行举报,并提供相关证据,一经查实,将立刻删除涉嫌侵权内容。