因为公司项目需要,最近在学习IOS开发,为了巩固我的学习,我想着能不能把以前用C# 开发的拼图游戏移植到 Iphone 上呢,然后我就开始了这一移植的历程,因为这是第二次做这个游戏了,所以想的也就比较深入,对以前的算法进行了优化,借助系统提供的API又节省了不少代码。个人感觉这个游戏还是挺成功的。
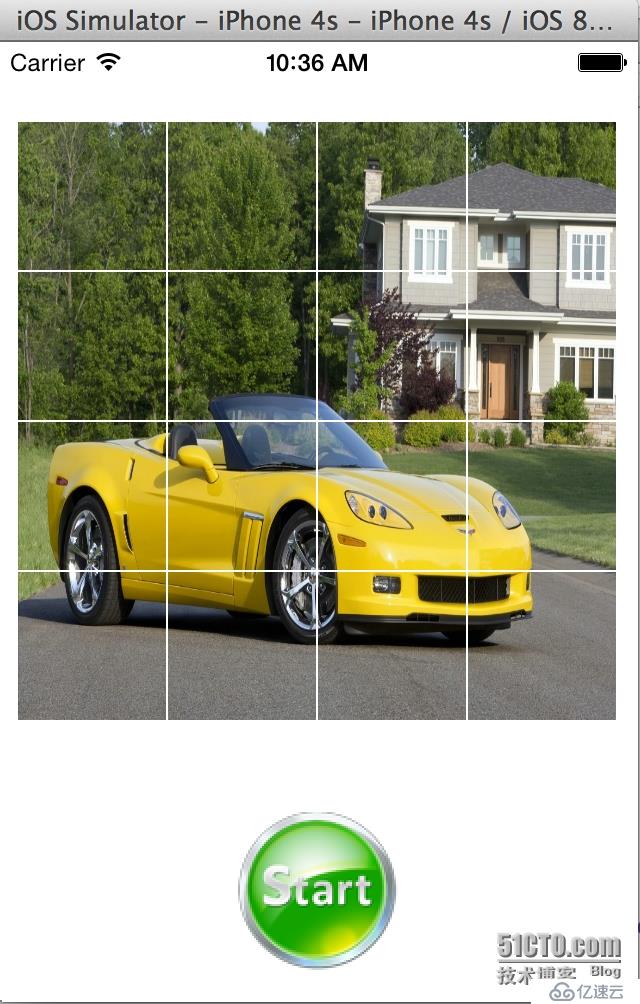
界面设计:
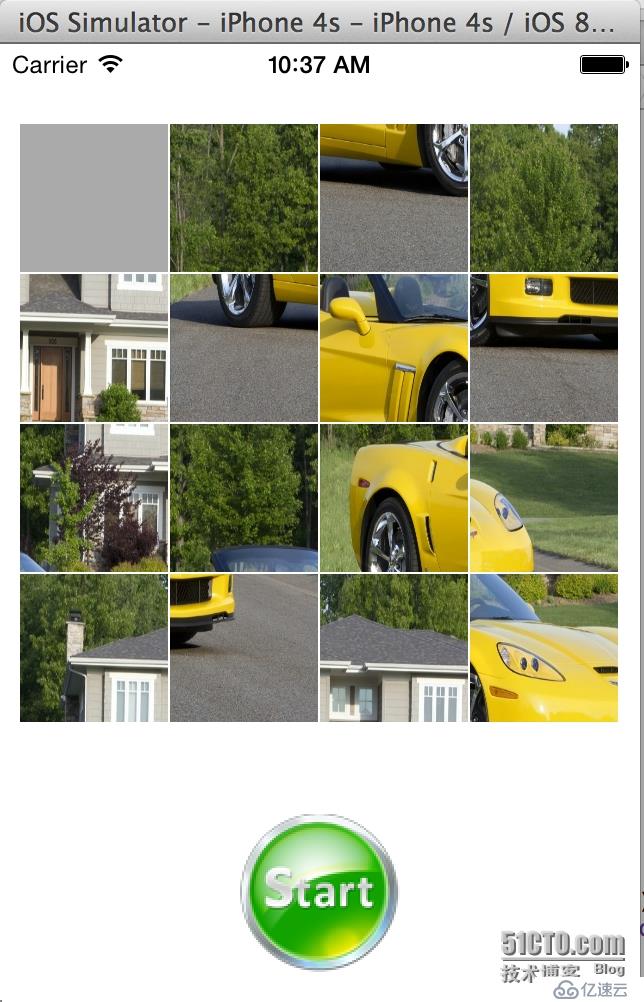
开始之后:
算法:
自定义一个控件,有两个属性 ImageTag 和ImageIndex,ImageTag用来存储控件的位置,ImageIndex 用来存储图片的序号,tag 的取值范围是0 - 15
一张图片分割成4 *4 =16 张小图,从 0 开始标号,初始的时候,tag 和index相等的,
当向下滑动时,它与它的ImageTag +4的图片互换,
当向上的时间 ,取p_w_picpathTag-4,
当向左的时候,取ImageTag-1,
当向右的时候,取p_w_picpathTag+1,
改变图片后index也跟着改变,tag不变,用 tag==index来判断图片是否复位,当所有的图片都复位了,拼图也就完成了
我的想法是能不能利用系统提供的手势来移动UIImageView 控件呢,然后我就写了一个测试程序,发现手势操作只能控制View的移动,不能移动UIImageView,
所以要改变一下思路,把一个UIImageView控件加到一个View中,做成一个自定义控件,问题解决:
import Foundation
import UIKit
class PImageView:UIView
{

//    init(p_w_picpath: UIImage!)
//    {
//       // super.init(p_w_picpath:p_w_picpath)
//    }
    var parentView:ViewController!
    var p_w_picpathView:UIImageView!
   init(frame: CGRect)
   {
    super.init(frame: frame)
    var temp=frame
    temp.origin=CGPointMake(0, 0)
    p_w_picpathView=UIImageView(frame:temp)
    self.addSubview(p_w_picpathView)

    var recognizer1=UISwipeGestureRecognizer()

    recognizer1.addTarget(self, action:"handleSwipeView:")
    recognizer1.direction=UISwipeGestureRecognizerDirection.Right

    var recognizer2=UISwipeGestureRecognizer()

    recognizer2.addTarget(self, action:"handleSwipeView:")
    recognizer2.direction=UISwipeGestureRecognizerDirection.Left


    var recognizer3=UISwipeGestureRecognizer()
    recognizer3.addTarget(self, action:"handleSwipeView:")
    recognizer3.direction=UISwipeGestureRecognizerDirection.Up


    var recognizer4=UISwipeGestureRecognizer()
    recognizer4.addTarget(self, action:"handleSwipeView:")
    recognizer4.direction=UISwipeGestureRecognizerDirection.Down

    self.addGestureRecognizer(recognizer1)
    self.addGestureRecognizer(recognizer2)
    self.addGestureRecognizer(recognizer3)
    self.addGestureRecognizer(recognizer4)
   }
    func handleSwipeView(recognizer:UISwipeGestureRecognizer!)
    {
        var dir:String!
        if recognizer.direction.value==UISwipeGestureRecognizerDirection.Down.value
        {
            dir="Down"
            NSLog("move Down")
        }
        if recognizer.direction.value==UISwipeGestureRecognizerDirection.Up.value
        {
            dir="Up"
            NSLog("move Up")
        }
        if recognizer.direction.value==UISwipeGestureRecognizerDirection.Left.value
        {
            dir="Left"
            NSLog("move Left")
        }
        if recognizer.direction.value==UISwipeGestureRecognizerDirection.Right.value
        {
            dir="Right"
            NSLog("move Right")
        }
        //NSLog("tag:%d", self.p_w_picpathTag)

        parentView.moveImages(self, directionStr: dir)
    }

    func initWithTagAndIndex(myTag:Int! ,myIndex:Int!)
    {
        self.p_w_picpathIndex=myIndex
        self.p_w_picpathTag=myTag
    }

    func checkTagAndIndexValueIsSame()->Bool
    {
        return self.p_w_picpathIndex==self.p_w_picpathTag
    }
    var p_w_picpathTag:Int!
    var p_w_picpathIndex:Int!


}这个是自定义View的代码,初始化的时候设置View的iamgeIndex和 p_w_picpathTag,设置图片,注册系统手势操作
调用它的checkTagAndIndexValueIsSame() 方法来检测图片是否复位.
我们再看看主界面代码:
import UIKit

class ViewController: UIViewController {

    @IBOutlet var v_allImageViews : UIView
    var screenWidth:CGFloat!
    var screenHeight:CGFloat!
    var dicImages:NSMutableDictionary!
    var dicIndexValues:NSMutableDictionary!
    var LocationX:Int = 0
    var locationY:Int=0
    override func viewDidLoad() {
        super.viewDidLoad()
        // Do any additional setup after loading the view, typically from a nib.
        //var p_w_picpathView:UIImageView
        //var p_w_picpath:UIImage
        var myImage:UIImage
        self.screenWidth=self.view.frame.size.width
        self.screenHeight=self.view.frame.size.height
        var colWidth=(self.screenWidth-24)/4

        var rowHeight=(self.screenHeight-184)/4
        myImage=UIImage(named:"7.jpg")
        dicImages=NSMutableDictionary()
        var p_w_picpathW=myImage.size.width/4
        var p_w_picpathH=myImage.size.height/4
        var num=0

        while(num<16)
        {

            var row = Float( num/4)
            var col = Float(num%4)

            NSLog("row:%.2f col:%.2f\r\n", row,col)


            var rect = CGRectMake(p_w_picpathW * col, p_w_picpathH *  row, p_w_picpathW, p_w_picpathH)
            var tem=CGRectMake(10+colWidth * col+col, 40+rowHeight * row+row, colWidth, rowHeight)
            var sv=PImageView(frame: tem)
            //            sv.frame.origin=CGPointMake(10+colWidth * col+col, 40+rowHeight * row+row)
            //            sv.frame.size=CGSizeMake(colWidth, rowHeight)
            sv.backgroundColor=UIColor.lightGrayColor()
            //            var frm=CGRect()
            //            var p_w_picpathView=PImageView(frame:frm)
            //            p_w_picpathView.frame.origin=CGPointMake(0, 0)
            //            p_w_picpathView.frame.size=CGSizeMake(colWidth, rowHeight)
            //            p_w_picpathView.backgroundColor=UIColor.redColor()

            sv.initWithTagAndIndex(num,myIndex: num)

            var p_w_picpath=getImage(myImage,rect: rect)

            if(num==0){
                sv.p_w_picpathView.p_w_picpath=p_w_picpath
            }
            else
            {
                //var data = UIImagePNGRepresentation(p_w_picpath)
                dicImages.setObject(p_w_picpath, forKey:String( num))
                sv.p_w_picpathView.p_w_picpath=p_w_picpath
            }
            sv.parentView=self
            self.v_allImageViews.addSubview(sv)
            //self.view.addSubview(p_w_picpathView)
            num++
        }

        NSLog("dic count: %d ", dicImages.count)
    }


    override func didReceiveMemoryWarning() {
        super.didReceiveMemoryWarning()
        // Dispose of any resources that can be recreated.
    }

    func getImage(img:UIImage, rect:CGRect)->UIImage
    {
        var  im:UIImage
        var p_w_picpathPartRef:CGImageRef
        var p_w_picpathRef:CGImageRef

        p_w_picpathRef=img.CGImage

        p_w_picpathPartRef=CGImageCreateWithImageInRect(p_w_picpathRef, rect)

        im=UIImage(CGImage: p_w_picpathPartRef)

        //CGImageRelease(p_w_picpathPartRef)

        return im
    }

    @IBOutlet var btnStart : UIButton

    //开始游戏
    @IBAction func start(sender : AnyObject) {
       var vFrist =  self.v_allImageViews.subviews[0] as PImageView
        vFrist.p_w_picpathView.p_w_picpath=nil
        dicIndexValues=NSMutableDictionary()
        var num=1
        dicIndexValues.setObject(0, forKey: 0)
        var  arr:NSArray = ["0"]

        while(num<self.v_allImageViews.subviews.count)
        {
            var myindex=arc4random()%15+1;
            //if(!dicIndexValues.allValues.(String(myindex)))
             //var obj = arr.indexOfObject(String(myindex))
            if (!arr.containsObject(String(myindex)))
            {
              arr = arr.arrayByAddingObject(String(myindex))
                dicIndexValues.setObject(String( myindex), forKey: num)
                NSLog("key :%d value: %@\r\n",num, String( myindex))
                //var data = dicImages.objectForKey(String( myindex))

                var   v_img  = self.v_allImageViews.subviews[num]  as PImageView

                v_img.p_w_picpathView.p_w_picpath = dicImages.objectForKey(String(myindex)) as UIImage
                v_img.p_w_picpathIndex=Int( myindex)
                num++

                // NSLog("tag:%d index:%d", v_img.p_w_picpathTag,v_img.p_w_picpathIndex)
            }


        }
    }
    //动画切换图片(没有加入动画,只是简单的移动)
    func moveImages(myImageView:PImageView,directionStr:String! )
    {
        var myTag=myImageView.p_w_picpathTag
        let anotherCharacter:String=directionStr
        var num=0
        switch  anotherCharacter
            {

        case "Up":
            num = -4
            NSLog("up")
        case "Down":
            num = 4
            NSLog("Down")

        case "Left":
            num = -1
        case "Right":
            num = 1
        default:
            NSLog("default")
        }
        //边界检查
        if (myTag + num)>=0 && (myTag + num) <= 15
        {
             var   v_img  = self.v_allImageViews.subviews[myTag + num]  as PImageView
            //判断目标位置是否为空
             if v_img.p_w_picpathIndex != 0
             {
                return
             }
            var tempImage=myImageView.p_w_picpathView.p_w_picpath
            //dicImages.objectForKey(String(myImageView.p_w_picpathIndex)) as UIImage
            v_img.p_w_picpathView.p_w_picpath=tempImage
            v_img.p_w_picpathIndex=myImageView.p_w_picpathIndex
            myImageView.p_w_picpathIndex=0
            myImageView.p_w_picpathView.p_w_picpath=nil
        }

        //up -4 >=0
        //down +4 <=15
        //left -1>=0
        //right +1<=15

        //检测是否完成
        var indexValue=0
        var isComplate:Bool = false

        while (indexValue < self.v_allImageViews.subviews.count)
        {
            var tempView = self.v_allImageViews.subviews[myTag + num]  as PImageView
            if !tempView.checkTagAndIndexValueIsSame()
            {
                return
            }
            indexValue++
        }
        //弹出消息,完成拼图

        NSLog("p_w_picpath Tag:%d ,direction:%@", myImageView.p_w_picpathTag,directionStr)

    }
}每移动一步就检测一次.当遇到第一个没复位的就反回,如果所有都 复位了则游戏完成了.
代码请看附件
亿速云「云服务器」,即开即用、新一代英特尔至强铂金CPU、三副本存储NVMe SSD云盘,价格低至29元/月。点击查看>>
免责声明:本站发布的内容(图片、视频和文字)以原创、转载和分享为主,文章观点不代表本网站立场,如果涉及侵权请联系站长邮箱:is@yisu.com进行举报,并提供相关证据,一经查实,将立刻删除涉嫌侵权内容。


 计算
计算 安全
安全 数据库
数据库 网络和加速
网络和加速 企业服务
企业服务


