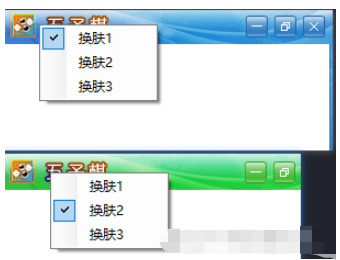
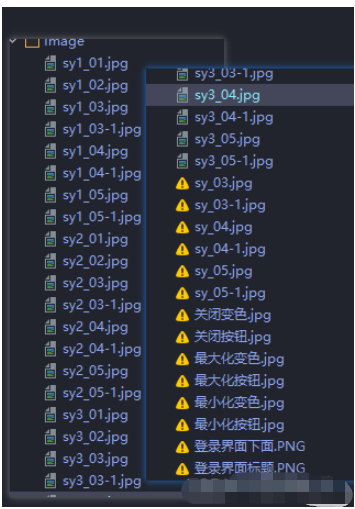
这篇“C#怎么实现窗体换肤”文章的知识点大部分人都不太理解,所以小编给大家总结了以下内容,内容详细,步骤清晰,具有一定的借鉴价值,希望大家阅读完这篇文章能有所收获,下面我们一起来看看这篇“C#怎么实现窗体换肤”文章吧。


public partial class Form1 : Form
{
    public Form1()
    {
        InitializeComponent();
    }

    public static int var_bar = 1;

    private void barter(int n)
    {
        switch (n)
        {
            case 1:
            {
                this.Width = Properties.Resources.sy1_01.Width;
                this.Height = Properties.Resources.sy1_01.Height + Properties.Resources.sy1_02.Height - 5;
                panel_Title.BackgroundImage = Properties.Resources.sy1_01;
                panel_ALL.BackgroundImage = Properties.Resources.sy1_02;
                pictureBox_Min.Image = null;
                pictureBox_Min.Image = Properties.Resources.sy1_04;
                pictureBox_Max.Image = null;
                pictureBox_Max.Image = Properties.Resources.sy1_05;
                pictureBox_Close.Image = null;
                pictureBox_Close.Image = Properties.Resources.sy1_03;
                var_bar = 1;
                break;
            }
            case 2:
            {
                this.Width = Properties.Resources.sy2_01.Width;
                this.Height = Properties.Resources.sy2_01.Height + Properties.Resources.sy2_02.Height - 5;
                panel_Title.BackgroundImage = Properties.Resources.sy2_01;
                panel_ALL.BackgroundImage = Properties.Resources.sy2_02;
                pictureBox_Min.Image = null;
                pictureBox_Min.Image = Properties.Resources.sy2_04;
                pictureBox_Max.Image = null;
                pictureBox_Max.Image = Properties.Resources.sy2_05;
                pictureBox_Close.Image = null;
                pictureBox_Close.Image = Properties.Resources.sy2_03;
                var_bar = 2;
                break;
            }
            case 3:
            {
                this.Width = Properties.Resources.sy3_01.Width;
                this.Height = Properties.Resources.sy3_01.Height + Properties.Resources.sy3_02.Height - 5;
                panel_Title.BackgroundImage = Properties.Resources.sy3_01;
                panel_ALL.BackgroundImage = Properties.Resources.sy3_02;
                pictureBox_Min.Image = null;
                pictureBox_Min.Image = Properties.Resources.sy3_04;
                pictureBox_Max.Image = null;
                pictureBox_Max.Image = Properties.Resources.sy3_05;
                pictureBox_Close.Image = null;
                pictureBox_Close.Image = Properties.Resources.sy3_03;
                var_bar = 3;
                break;
            }
        }

        barterShow(n);
    }

    private void barterShow(int n)
    {
        ToolS_1.Checked = false;
        ToolS_2.Checked = false;
        ToolS_3.Checked = false;
        switch (n)
        {
            case 1:
                ToolS_1.Checked = true;
                break;
            case 2:
                ToolS_2.Checked = true;
                break;
            case 3:
                ToolS_3.Checked = true;
                break;
        }
    }

    private void Form1_Load(object sender, EventArgs e)
    {
        barter(1);
    }

    #region 设置窗体的最大化、最小化和关闭按钮的单击事件

    /// <summary>
    /// 设置窗体的最大化、最小化和关闭按钮的单击事件
    /// </summary>
    /// <param Frm_Tem="Form">窗体</param>
    /// <param n="int">标识</param>
    public void FrmClickMeans(Form Frm_Tem, int n)
    {
        switch (n)
        {
            case 0:
                Frm_Tem.WindowState = FormWindowState.Minimized;
                break;
            case 1:
            {
                if (Frm_Tem.WindowState == FormWindowState.Maximized)
                    Frm_Tem.WindowState = FormWindowState.Normal;
                else
                    Frm_Tem.WindowState = FormWindowState.Maximized;
                break;
            }
            case 2:
                Frm_Tem.Close();
                break;
        }
    }

    #endregion

    #region 控制图片的切换状态

    /// <summary>
    /// 控制图片的切换状态
    /// </summary>
    /// <param Frm_Tem="Form">要改变图片的对象</param>
    /// <param n="int">标识</param>
    /// <param ns="int">移出移入标识</param>
    public static PictureBox Tem_PictB = new PictureBox();

    public void ImageSwitch(object sender, int n, int ns)
    {
        Tem_PictB = (PictureBox) sender;

        switch (n)
        {
            case 0:
            {
                Tem_PictB.Image = null;
                if (ns == 0)
                {
                    switch (var_bar)
                    {
                        case 1:
                            Tem_PictB.Image = Properties.Resources.sy1_04_1;
                            break;
                        case 2:
                            Tem_PictB.Image = Properties.Resources.sy2_04_1;
                            break;
                        case 3:
                            Tem_PictB.Image = Properties.Resources.sy3_04_1;
                            break;
                    }
                }

                if (ns == 1)
                {
                    switch (var_bar)
                    {
                        case 1:
                            Tem_PictB.Image = Properties.Resources.sy1_04;
                            break;
                        case 2:
                            Tem_PictB.Image = Properties.Resources.sy2_04;
                            break;
                        case 3:
                            Tem_PictB.Image = Properties.Resources.sy3_04;
                            break;
                    }
                }

                break;
            }
            case 1:
            {
                Tem_PictB.Image = null;
                if (ns == 0)
                {
                    switch (var_bar)
                    {
                        case 1:
                            Tem_PictB.Image = Properties.Resources.sy1_05_1;
                            break;
                        case 2:
                            Tem_PictB.Image = Properties.Resources.sy2_05_1;
                            break;
                        case 3:
                            Tem_PictB.Image = Properties.Resources.sy3_05_1;
                            break;
                    }
                }

                if (ns == 1)
                {
                    switch (var_bar)
                    {
                        case 1:
                            Tem_PictB.Image = Properties.Resources.sy1_05;
                            break;
                        case 2:
                            Tem_PictB.Image = Properties.Resources.sy2_05;
                            break;
                        case 3:
                            Tem_PictB.Image = Properties.Resources.sy3_05;
                            break;
                    }
                }

                break;
            }
            case 2:
            {
                Tem_PictB.Image = null;
                if (ns == 0)
                {
                    switch (var_bar)
                    {
                        case 1:
                            Tem_PictB.Image = Properties.Resources.sy1_03_1;
                            break;
                        case 2:
                            Tem_PictB.Image = Properties.Resources.sy2_03_1;
                            break;
                        case 3:
                            Tem_PictB.Image = Properties.Resources.sy3_03_1;
                            break;
                    }
                }

                if (ns == 1)
                {
                    switch (var_bar)
                    {
                        case 1:
                            Tem_PictB.Image = Properties.Resources.sy1_03;
                            break;
                        case 2:
                            Tem_PictB.Image = Properties.Resources.sy2_03;
                            break;
                        case 3:
                            Tem_PictB.Image = Properties.Resources.sy3_03;
                            break;
                    }
                }

                break;
            }
        }
    }

    #endregion

    private void pictureBox_Close_Click(object sender, EventArgs e)
    {
        FrmClickMeans(this, Convert.ToInt16(((PictureBox) sender).Tag.ToString()));
    }

    private void pictureBox_Close_MouseEnter(object sender, EventArgs e)
    {
        ImageSwitch(sender, Convert.ToInt16(((PictureBox) sender).Tag.ToString()), 0);
    }

    private void pictureBox_Close_MouseLeave(object sender, EventArgs e)
    {
        ImageSwitch(sender, Convert.ToInt16(((PictureBox) sender).Tag.ToString()), 1);
    }

    private void ToolS_1_Click(object sender, EventArgs e)
    {
        barter(Convert.ToInt32(((ToolStripMenuItem) sender).Tag));
    }
}
以上就是关于“C#怎么实现窗体换肤”这篇文章的内容,相信大家都有了一定的了解,希望小编分享的内容对大家有帮助,若想了解更多相关的知识内容,请关注亿速云行业资讯频道。
免责声明:本站发布的内容(图片、视频和文字)以原创、转载和分享为主,文章观点不代表本网站立场,如果涉及侵权请联系站长邮箱:is@yisu.com进行举报,并提供相关证据,一经查实,将立刻删除涉嫌侵权内容。