这篇文章主要介绍“Android ButterKnife依赖注入框架如何使用”,在日常操作中,相信很多人在Android ButterKnife依赖注入框架如何使用问题上存在疑惑,小编查阅了各式资料,整理出简单好用的操作方法,希望对大家解答”Android ButterKnife依赖注入框架如何使用”的疑惑有所帮助!接下来,请跟着小编一起来学习吧!
BuffterKnife 采用 注解+ APT技术
APT:Annotation Processor tool 注解处理器,是javac的一个工具,每个处理器都是继承于AbstractProcessor
注解处理器是运行在自己的java虚拟机中
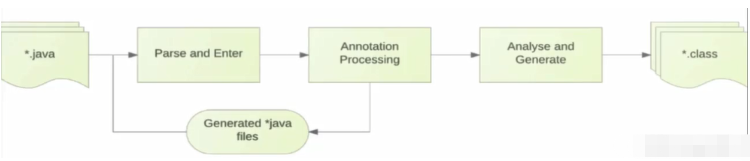
APT如何生成字节码文件:
Annotation Processing 不能加入或删除java方法
APT整个流程
声明的注解等待生命周期为CLASS
继承AbstractProcessor类
再调用AbstractProcessor 的process方法
AbstractProcessor.java
//
// Source code recreated from a .class file by IntelliJ IDEA
// (powered by FernFlower decompiler)
//
package javax.annotation.processing;
import java.util.Collections;
import java.util.HashSet;
import java.util.Objects;
import java.util.Set;
import javax.lang.model.SourceVersion;
import javax.lang.model.element.AnnotationMirror;
import javax.lang.model.element.Element;
import javax.lang.model.element.ExecutableElement;
import javax.lang.model.element.TypeElement;
import javax.tools.Diagnostic.Kind;
public abstract class AbstractProcessor implements Processor {
    protected ProcessingEnvironment processingEnv;
    private boolean initialized = false;
    protected AbstractProcessor() {
    }
    public Set<String> getSupportedOptions() {
        SupportedOptions so = (SupportedOptions)this.getClass().getAnnotation(SupportedOptions.class);
        return so == null ? Collections.emptySet() : arrayToSet(so.value(), false);
    }
    public Set<String> getSupportedAnnotationTypes() {  // 返回所支持注解的类型
        SupportedAnnotationTypes sat = (SupportedAnnotationTypes)this.getClass().getAnnotation(SupportedAnnotationTypes.class);
        boolean initialized = this.isInitialized();
        if (sat == null) {
            if (initialized) {
                this.processingEnv.getMessager().printMessage(Kind.WARNING, "No SupportedAnnotationTypes annotation found on " + this.getClass().getName() + ", returning an empty set.");
            }
            return Collections.emptySet();
        } else {
            boolean stripModulePrefixes = initialized && this.processingEnv.getSourceVersion().compareTo(SourceVersion.RELEASE_8) <= 0;
            return arrayToSet(sat.value(), stripModulePrefixes);
        }
    }
    public SourceVersion getSupportedSourceVersion() {  //用来指定所使用的java版本
        SupportedSourceVersion ssv = (SupportedSourceVersion)this.getClass().getAnnotation(SupportedSourceVersion.class);
        SourceVersion sv = null;
        if (ssv == null) {
            sv = SourceVersion.RELEASE_6;
            if (this.isInitialized()) {
                Messager var10000 = this.processingEnv.getMessager();
                Kind var10001 = Kind.WARNING;
                String var10002 = this.getClass().getName();
                var10000.printMessage(var10001, "No SupportedSourceVersion annotation found on " + var10002 + ", returning " + sv + ".");
            }
        } else {
            sv = ssv.value();
        }
        return sv;
    }
    public synchronized void init(ProcessingEnvironment processingEnv) {  // 初始化工作
        if (this.initialized) {
            throw new IllegalStateException("Cannot call init more than once.");
        } else {
            Objects.requireNonNull(processingEnv, "Tool provided null ProcessingEnvironment");
            this.processingEnv = processingEnv;
            this.initialized = true;
        }
    }
    public abstract boolean process(Set<? extends TypeElement> var1, RoundEnvironment var2);  // process相对于main函数,即方法的入口,在process方法中可以完成扫描、评估、处理注解等等代码。process方法最后会生成所需要的java代码
    public Iterable<? extends Completion> getCompletions(Element element, AnnotationMirror annotation, ExecutableElement member, String userText) {
        return Collections.emptyList();
    }
    protected synchronized boolean isInitialized() {
        return this.initialized;
    }
    private static Set<String> arrayToSet(String[] array, boolean stripModulePrefixes) {
        assert array != null;
        Set<String> set = new HashSet(array.length);
        String[] var3 = array;
        int var4 = array.length;
        for(int var5 = 0; var5 < var4; ++var5) {
            String s = var3[var5];
            if (stripModulePrefixes) {
                int index = s.indexOf(47);
                if (index != -1) {
                    s = s.substring(index + 1);
                }
            }
            set.add(s);
        }
        return Collections.unmodifiableSet(set);
    }
}ProcessingEnvironment.java
//
// Source code recreated from a .class file by IntelliJ IDEA
// (powered by FernFlower decompiler)
//
package javax.annotation.processing;
import java.util.Locale;
import java.util.Map;
import javax.lang.model.SourceVersion;
import javax.lang.model.util.Elements;
import javax.lang.model.util.Types;
public interface ProcessingEnvironment {
    Map<String, String> getOptions();
    Messager getMessager();
    Filer getFiler();  //用于创建文件
    Elements getElementUtils();  //用来处理Element的工具类,Element是指在注解处理过程中扫描的所有java源文件,可以把这个源文件想象成Element的全部,而源代码中每个独立的部分就可以认作为特定类型的Element
    Types getTypeUtils();  //TypeElement代表Element的类型, Types是用于获取源代码类型的信息
    SourceVersion getSourceVersion();
    Locale getLocale();
}编译的时候扫描注解,并做相应的处理,生成java代码,生成Java代码是调用 javapoet 库生成的
调用ButterKnife.bind(this);方法的时候,将ID与对应的上下文绑定在一起
到此,关于“Android ButterKnife依赖注入框架如何使用”的学习就结束了,希望能够解决大家的疑惑。理论与实践的搭配能更好的帮助大家学习,快去试试吧!若想继续学习更多相关知识,请继续关注亿速云网站,小编会继续努力为大家带来更多实用的文章!
亿速云「云服务器」,即开即用、新一代英特尔至强铂金CPU、三副本存储NVMe SSD云盘,价格低至29元/月。点击查看>>
免责声明:本站发布的内容(图片、视频和文字)以原创、转载和分享为主,文章观点不代表本网站立场,如果涉及侵权请联系站长邮箱:is@yisu.com进行举报,并提供相关证据,一经查实,将立刻删除涉嫌侵权内容。


 计算
计算 安全
安全 数据库
数据库 网络和加速
网络和加速 企业服务
企业服务


