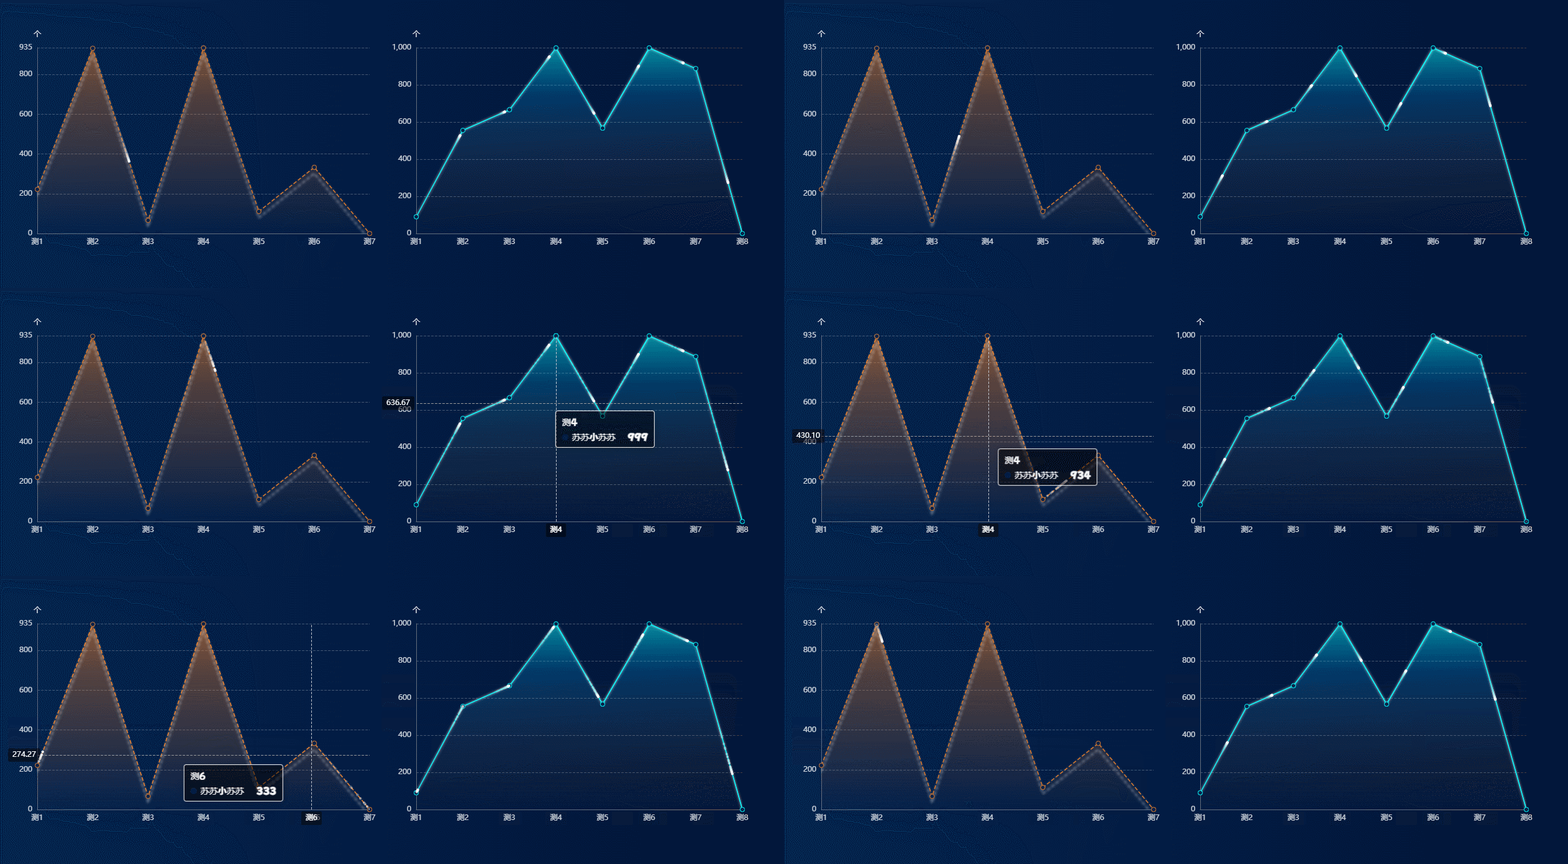
本文小编为大家详细介绍“echarts折线图流动特效怎么实现”,内容详细,步骤清晰,细节处理妥当,希望这篇“echarts折线图流动特效怎么实现”文章能帮助大家解决疑惑,下面跟着小编的思路慢慢深入,一起来学习新知识吧。

echarts官网:series-lines
注意:流动特效只支持非平滑曲线(smooth:false)
series-lines路径图:
用于带有起点和终点信息的线数据的绘制,主要用于地图上的航线,路线的可视化。
ECharts 2.x 里会用地图上的 markLine 去绘制迁徙效果,在 ECharts 3 里建议使用单独的 lines 类型图表。
一些参数:
series-lines.coordinateSystem :该系列使用的坐标系,可选:
‘cartesian2d’-使用二维的直角坐标系(也称笛卡尔坐标系),通过 xAxisIndex, yAxisIndex指定相应的坐标轴组件。
‘geo’-使用地理坐标系,通过 geoIndex 指定相应的地理坐标系组件。
series-lines.polyline:是否是多段线。
默认为 false,只能用于绘制只有两个端点的线段,线段可以通过 lineStyle.curveness 配置为曲线。
如果该配置项为 true,则可以在 data.coords 中设置多于 2 个的顶点用来绘制多段线,在绘制路线轨迹的时候比较有用,见示例 北京公交路线,设置为多段线后 lineStyle.curveness 无效。
series-lines.effect. show:是否显示特效。
series-lines.effect. period = 4。 特效动画的时间,单位为 s。
series-lines.effect. symbol = ‘circle’。特效图形的标记。
ECharts 提供的标记类型包括’circle’, ‘rect’, ‘roundRect’, ‘triangle’, ‘diamond’, ‘pin’, ‘arrow’, 'none’可以通过 ‘image://url’ 设置为图片,其中 URL 为图片的链接,或者 dataURI。
series-lines.effect. symbolSize = 3。特效标记的大小,可以设置成诸如 10 这样单一的数字,也可以用数组分开表示高和宽,例如 [20, 10] 表示标记宽为20,高为10。
series-lines.effect. trailLength = 0.2。特效尾迹的长度。取从 0 到 1 的值,数值越大尾迹越长。
series-lines.effect. loop = true。是否循环显示特效。
series-lines.data. coords :一个包含两个到多个二维坐标的数组。在 polyline 设置为 true 时支持多于两个的坐标。
eg:
[
 {
    coords: [
      ["测1", 222],
      ["测2", 932],
      ["测3", 66],
      ["测4", 934],
      ["测5", 111],
      ["测6", 333],
      ["测7", 0],
    ],
  },
];data. coords的获取:
//多线段(polyline=true),如图左侧连续一段:
let yData = [222, 932, 66, 934, 111, 333, 0],
  xData = ["测1", "测2", "测3", "测4", "测5", "测6", "测7"],
   datacoords = [
     {
       coords: [],
     },
   ];
 for (var i = 0; i < xData.length; i++) {
   datacoords[0].coords.push([xData[i], yData[i]]);
}//单线段(polyline=false),如图右侧各段展示:
let yData = [90, 555, 666, 999, 567, 999, 888, 0],
xData = ["测1", "测2", "测3", "测4", "测5", "测6", "测7", "测8"],
datacoords = [];
for (var i = 0; i < xData.length; i++) {
datacoords.push([
{
coord: [i, yData[i]],
},
{
coord: [i + 1, yData[i + 1]],
},
]);
}setOption设置:
 this.charts.setOption({
   animation: true, //控制动画示否开启
   animationDuration: 3000,
   animationEasing: "bounceOut", //缓动动画
   animationThreshold: 8, //动画元素的阈值
   backgroundColor: "transparent", // 给echarts图设置背景色
   tooltip: {
     trigger: "axis",
     backgroundColor: "rgba(0,0,0,.5)",
     axisPointer: {
       type: "cross",
       label: {
         backgroundColor: "rgba(0,0,0,.5)",
       },
     },
     textStyle: {
       color: "#fff",
       fontSize: 14,
     },
   },
   grid: {
     left: "3%", //图表距边框的距离
     right: "3%",
     top: "15%",
     bottom: "5%",
     containLabel: true,
   },
   xAxis: [
     {
       nameGap: 3,
       nameTextStyle: {
         color: "rgba(255,255,255,.8)",
         fontSize: 12,
       },
       type: "category",
       data: xData,
       boundaryGap: false, //从0开始
       axisLine: {
         onZero: true,
         rotate: 30, //坐标轴内容过长旋转
         interval: 1,
         lineStyle: {
           color: "#636E7C",
         },
       },
       axisLabel: {
         color: "rgba(255,255,255,.8)", //坐标的字体颜色
         fontSize: 12,
       },
       axisTick: {
         //坐标轴刻度颜色  x和y不交叉
         show: false,
       },
     },
   ],
   yAxis: [
     {
       name: "个",
       min: 0,
       max: function (value) {
         return Math.ceil(value.max / 5) * 5;
       },
       splitNumber: 5,
       type: "value",
       nameTextStyle: {
         color: "rgba(255,255,255,.89)",
         fontSize: 12,
       },
       splitLine: {
         show: true,
         lineStyle: {
           color: "rgba(255,255,255,.25)",
           type: "dashed",
         },
       },
       axisTick: {
         //坐标轴刻度颜色
         show: false,
       },
       axisLine: {
         //坐标轴线颜色
         show: true,
         lineStyle: {
           color: "#636E7C",
         },
       },
       axisLabel: {
         color: "rgba(255,255,255,.8)", //坐标的字体颜色
         fontSize: 12,
       },
     },
   ],
   series: [
     {
       name: "苏苏小苏苏",
       type: "line",
       smooth: false,
       lineStyle: {
         color: "#DC7828",
         width: 1.5,
         type: "dashed",
         shadowOffsetX: 0, // 折线的X偏移
         shadowOffsetY: 10, // 折线的Y偏移
         shadowBlur: 4, // 折线模糊
         shadowColor: "rgba(255, 255, 255, 0.8)", //设置折线阴影颜色
       },
       showSymbol: true, //是否默认展示圆点
       symbol: "circle", // 默认是空心圆(中间是白色的)
       symbolSize: 7,
       itemStyle: {
         color: "#021E47", //实圆的背景色
         borderWidth: 1,
         borderColor: "#DC7828",
       },
       areaStyle: {
         color: new echarts.graphic.LinearGradient(0, 1, 0, 0, [
           {
             offset: 1,
             color: "rgba(220,120,40,0.8)",
           },
           {
             offset: 0.74,
             color: "rgba(220,120,40,0.5)",
           },
           {
             offset: 0,
             color: "rgba(220,120,40,0)",
           },
         ]),
       },
       emphasis: {
         focus: "series",
       },
       data: yData,
     },
     {
       showSymbol: false,
       name: "苏苏小苏苏",
       type: "lines",
       polyline: true,
       smooth: false,
       coordinateSystem: "cartesian2d",
       zlevel: 1,
       effect: {
         show: true,
         smooth: true,
         period: 6,
         symbolSize: 4,
       },
       lineStyle: {
         color: "#fff",
         width: 1,
         opacity: 0,
         curveness: 0,
         cap: "round",
       },
       data: datacoords,
     },
   ],
});读到这里,这篇“echarts折线图流动特效怎么实现”文章已经介绍完毕,想要掌握这篇文章的知识点还需要大家自己动手实践使用过才能领会,如果想了解更多相关内容的文章,欢迎关注亿速云行业资讯频道。
亿速云「云服务器」,即开即用、新一代英特尔至强铂金CPU、三副本存储NVMe SSD云盘,价格低至29元/月。点击查看>>
免责声明:本站发布的内容(图片、视频和文字)以原创、转载和分享为主,文章观点不代表本网站立场,如果涉及侵权请联系站长邮箱:is@yisu.com进行举报,并提供相关证据,一经查实,将立刻删除涉嫌侵权内容。
原文链接:https://blog.csdn.net/qq_48085286/article/details/126219887