这篇文章将为大家详细讲解有关微信小程序scroll-view如何实现滚动到锚点左侧导航栏点餐功能?,小编觉得挺实用的,因此分享给大家做个参考,希望大家阅读完这篇文章后可以有所收获。
代码如下:
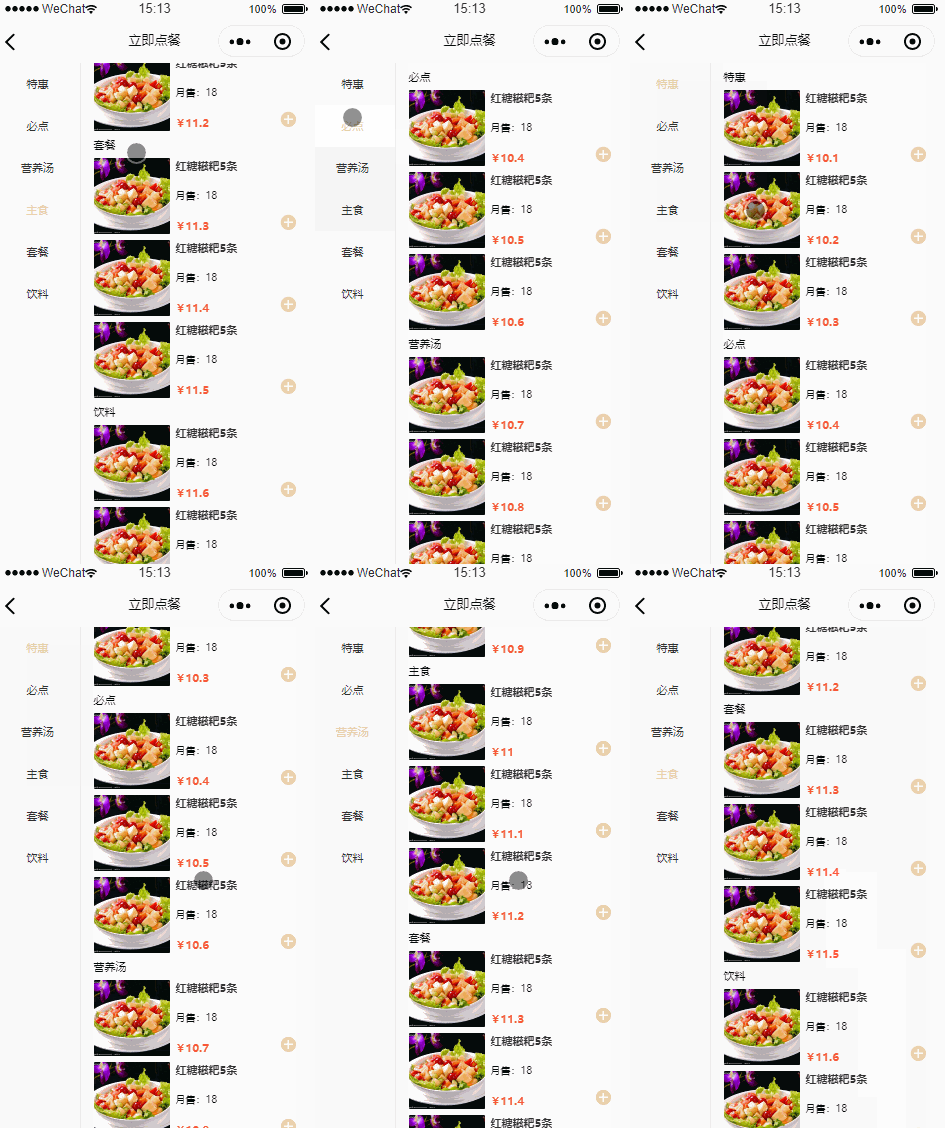
先上效果图

1.wxml代码:
<view class="page">
<import src="../../components/catering-item/catering-item.wxml" />
<!-- 左侧滚动栏 -->
<view class='under_line'></view>
<view class="body">
<view style='float: left' class='left'>
<scroll-view scroll-y scroll-with-animation scroll-left="{{scrollLength}}" class='scrollY' style='height: {{winHeight}}px'>
<view class='all clear'>
<block wx:key="tabs" wx:for="{{tabs}}">
<view bindtap='jumpIndex' data-menuindex='{{index}}'data-anchor='{{item.anchor}}'>
<view class="text-style {{indexId==index?' activeView':''}}">
<text class="{{indexId==index?'active1':''}}">{{item.title}}</text>
</view>
</view>
</block>
</view>
</scroll-view>
</view>
<view class="right" style='height: {{winHeight}}px'>
<scroll-view scroll-y scroll-with-animation scroll-left="{{scrollLength}}" bindscroll="scrollToLeft" scroll-into-view="{{toTitle}}" class='scrollRight' style='height: {{winHeight}}px'>
<block wx:key="tabs" wx:for="{{tabs}}">
<view id="view-{{item.anchor}}">
<view class="title" id="title-{{item.anchor}}">{{item.title}}</view>
<view class="orders" wx:for="{{tabsList[item.anchor]}}">
<template is="cateringItem" data="{{...item}}" />
</view>
</view>
</block>
</scroll-view>
</view>
</view>
</view>2.wxss代码:
@import "../../components/catering-item/catering-item.wxss";
/* pages/catering.wxss */
.page {
 display: flex;
 flex-direction: column;
 width: 100%;
 /* background: #F7F4F8; */
 background-image: linear-gradient(90deg, #FCFCFC 0%, #FCFCFC 99%);
 /* padding-top: 16px; */
}
.under_line{
 width: 100%;
 border-top: 1rpx solid #efefef;
}
::-webkit-scrollbar{
  width: 0;
  height: 0;
  color: transparent;
}

.body{
 display: flex;
 width: 100%;
}

.scrollY {
 width: 200rpx;
 /* position: fixed;
 left: 0;
 top: 0; */
 background: #F5F5F5;
 /* border-right: 1rpx solid #efefef; */
}

/* scrollRight{
 flex: 1;
} */
.right{
 flex: 1;
 /* height: 200rpx; */
 /* background: #00FF00; */
}

.left {
 border-top: 1rpx solid #efefef;
 border-right: 1rpx solid #efefef;
}

.text-style {
 width: 200rpx;
 height: 100rpx;
 line-height: 100rpx;
 text-align: center;
 font-size: 28rpx;
 font-family: PingFangSC-Semibold;
 color: rgba(51, 51, 51, 1);
}

.active1 {
 color: #E5D1A9;
 /* background: #FFF; */
}
.activeView{
  background: #FFF;
}

.active {
 display: block;
 width: 50rpx;
 height: 6rpx;
 background: #E5D1A9;
 position: relative;
 left: 75rpx;
 bottom: 30rpx;
}
.title{
 margin-left: 32rpx;
 padding-top: 16rpx;
 font-size: 28rpx;
 /* padding-bottom: 16rpx; */
}3.js代码
// pages/catering.js
Page({

 /**
  * 页面的初始数据
  */
 data: {
  tabs: [
   { title: '特惠', anchor: 'a', },
   { title: '必点', anchor: 'b', },
   { title: '营养汤', anchor: 'c', },
   { title: '主食', anchor: 'd', },
   { title: '套餐', anchor: 'e', },
   { title: '饮料', anchor: 'f', },
  ],
  tabsList: {
   a: [{
    price: 10.1, anchor: "a", index: 0, num: 0
   }, {
    price: 10.2, anchor: "a", index: 1, num: 0
   },
   {
    price: 10.3, anchor: "a", index: 2, num: 0
   },],
   b: [{
    price: 10.4, anchor: "b", index: 0, num: 0
   }, {
    price: 10.5, anchor: "b", index: 1, num: 0
   },
   {
    price: 10.6, anchor: "b", index: 2, num: 0
   },],
   c: [{
    price: 10.7, anchor: "c", index: 0, num: 0
   }, {
    price: 10.8, anchor: "c", index: 1, num: 0
   },
   {
    price: 10.9, anchor: "c", index: 2, num: 0
   },],
   d: [{
    price: 11.0, anchor: "d", index: 0, num: 0
   }, {
    price: 11.1, anchor: "d", index: 1, num: 0
   },
   {
    price: 11.2, anchor: "d", index: 2, num: 0
   },],
   e: [{
    price: 11.3, anchor: "e", index: 0, num: 0
   }, {
    price: 11.4, anchor: "e", index: 1, num: 0
   },
   {
    price: 11.5, anchor: "e", index: 2, num: 0
   },],
   f: [{
    price: 11.6, anchor: "f", index: 0, num: 0
   }, {
    price: 11.7, anchor: "f", index: 1, num: 0
   },
   {
    price: 11.8, anchor: "f", index: 2, num: 0
   },]
  },
   indexId: 0,
  toTitle:"title-c",
  scrollTop:0,
  top:[],
  },
  // 左侧点击事件
  jumpIndex(e) {
   let index = e.currentTarget.dataset.menuindex;
   let anchor = e.currentTarget.dataset.anchor;
   let that = this
   that.setData({
    indexId: index,
    toTitle: "title-" + anchor
   });
   //可以设置定位事件

  },

 scrollToLeft(res){
  console.log("scrollToLeft-res:" + JSON.stringify(res) + JSON.stringify(this.data.top));
  // let top=res.detail.scrollTop;
  this.setData({
   scrollTop: res.detail.scrollTop
  })
  var length = this.data.top.length;
  for(var i=0;i<this.data.top.length;i++){
   if (this.data.top[i] - this.data.top[0] <= this.data.scrollTop && (i < length - 1 && this.data.top[i + 1] - this.data.top[0] > this.data.scrollTop)){
    if(this.data.indexId!=i){
     this.setData({
      indexId: i,
     });
    }
   }
  }
  // console.log("top:"+top);
 },

  /**
   * 生命周期函数--监听页面加载
   */
  onLoad: function (options) {
   var that = this
   wx.getSystemInfo({
    success: function (res) {
     that.setData({
      winHeight: res.windowHeight
     });
     var top2=new Array();
     for(var i=0;i<that.data.tabs.length;i++){
      wx.createSelectorQuery().select('#view-' + that.data.tabs[i].anchor).boundingClientRect(function (rect) {

       var isTop=Number(rect.top);

       top2.push(isTop);
       console.log("view-c:" + JSON.stringify(rect));

      }).exec();

     }
     that.setData({
      top: top2
     });
    }

   });

  },

})说明:
wxml中的template是菜品的item,可根据自己的需求进行定义。
使用到scroll-view的scroll-into-view属性用于对左侧菜单种类点击定位到右侧菜单的具体位置,js中的jumpIndex为用户点击左侧菜单,对应选中位置改变,和对右侧菜单进行定位。
js中scrollToLeft用于实现用户滚动右侧菜单,对左侧菜单分类进行定位操作,主要思想是将右侧菜单中的种类标签的top位置记录下来,当右侧scroll-view滑动的位置小于等于某一个top,而大于下一个top时,则更换左侧种类菜单到指定位置。
关于微信小程序scroll-view如何实现滚动到锚点左侧导航栏点餐功能?就分享到这里了,希望以上内容可以对大家有一定的帮助,可以学到更多知识。如果觉得文章不错,可以把它分享出去让更多的人看到。
亿速云「云服务器」,即开即用、新一代英特尔至强铂金CPU、三副本存储NVMe SSD云盘,价格低至29元/月。点击查看>>
免责声明:本站发布的内容(图片、视频和文字)以原创、转载和分享为主,文章观点不代表本网站立场,如果涉及侵权请联系站长邮箱:is@yisu.com进行举报,并提供相关证据,一经查实,将立刻删除涉嫌侵权内容。