小编给大家分享一下vue中怎么利用iscroll.js解决pc端滚动问题,相信大部分人都还不怎么了解,因此分享这篇文章给大家参考一下,希望大家阅读完这篇文章后大有收获,下面让我们一起去了解一下吧!
Vue是一套用于构建用户界面的渐进式JavaScript框架,Vue与其它大型框架的区别是,使用Vue可以自底向上逐层应用,其核心库只关注视图层,方便与第三方库和项目整合,且使用Vue可以采用单文件组件和Vue生态系统支持的库开发复杂的单页应用。
项目中经常遇到区域超出部分会出现滚动条,滚动条在pc端可以通过鼠标滚轮控制上下,在移动端可以通过鼠标拖动页面进行滚动,这两种场景都是符合用户习惯,然而这种滚动条一般都是竖【vertical】项滚动条,如果pc端出现横向滚动条【horizontal】,在不做处理的情况下,你只能用鼠标拖动横向滚动条按钮【scrollerbar】展示滚动区域,而且为了美观,一般滚动条会进行样式编写或者隐藏,那么横向区域默认情况下就没法滚动。
二、描述
现为了解决pc端滚动区域能像移动端一样,能够通过鼠标拖动滚动区域直接进行滚动,如图所示
pc端滚动示例图
滚动实例用到知识点如下:
采用vue-cli3+iscroll.js组合的方式;
使用 vue 自定义指令实现 iscroll 实例化和参数配置;
实现横向滚动区域和竖向滚动区域之间的联动;
实现横向滚动条居中显示和使用scrollIntoView()方法的差别
三、自定义指令 v-iscroll
1、新建指令文件
这里使用 vue 自定义指令初始化 iscroll 实例,在 vue-cli3 项目目录下新建vIscroll.js,文件代码如下:
const IScroll = require('iscroll')
const VIScroll = {
 install: function (Vue, options) {
 Vue.directive('iscroll', {
 inserted: function (el, binding, vnode) {
 let callBack
 let iscrollOptions = options
 <!--vue组件中绑定的两个参数 option、instance-->
 const option = binding.value && binding.value.option
 const func = binding.value && binding.value.instance
 // 判断输入参数
 const optionType = option ? [].toString.call(option) : undefined
 const funcType = func ? [].toString.call(func) : undefined
 // 兼容 google 浏览器拖动
 el.addEventListener('touchmove', function (e) {
  e.preventDefault()
 })
 // 将参数配置到new IScroll(el, iscrollOptions)中
 if (optionType === '[object Object]') {
  iscrollOptions = option
 }
 if (funcType === '[object Function]') {
  callBack = func
 }
 // 使用vnode绑定iscroll是为了让iscroll对象能够夸状态传递,避免iscroll重复建立
 // 这里面跟官方网站 const myScroll = new IScroll('#wrapper',option) 初始化一样
 vnode.scroll = new IScroll(el, iscrollOptions)
 // 如果指令传递函数进来,把iscroll实例传递出去
 if (callBack) callBack(vnode.scroll)
 },
 componentUpdated: function (el, binding, vnode, oldVnode) {
 // 将scroll绑定到新的vnode上,避免多次绑定
 vnode.scroll = oldVnode.scroll
 // 使用 settimeout 让refresh跳到事件流结尾,保证refresh时数据已经更新完毕
 setTimeout(() => {
  vnode.scroll.refresh()
 }, 0)
 },
 unbind: function (el, binding, vnode, oldVnode) {
 // 解除绑定时要把iscroll销毁
 vnode.scroll = oldVnode.scroll
 vnode.scroll.destroy()
 vnode.scroll = null
 }
 })
 }
}
module.exports = VIScroll这里附上 iscroll.js 5 官方文档地址, iscroll npm 包地址,相关属性和方法自行查看。
2、加载引用指令
首先在 main.js 中加载指令:
import Vue from 'vue'
import App from './App.vue'
import "./assets/reset.css"
// 加载scroll指令
import VIscroll from './directive/vIscroll'
Vue.use(VIscroll)
Vue.config.productionTip = false

new Vue({
 render: h => h(App),
}).$mount('#app')使用指令,摘自 tabList.vue 组件部分代码如下:
<template>
 <div class="tab-container">
 <div
  class="scroll-container"
  v-iscroll="{
  option: iscrollConf,
  instance: getIscroll
  }"
  ref="scrollContainer"
 >
  <ul
  class="tab-li-container"
  ref="tabLiContainer"
  >
  <li
   class="tab-li-item"
   v-for="(item, index) in list"
   :key="item.id"
   :id="item.id"
   ref="tabItem"
   @click="tabEvent(item, index)"
  >
   <div
   class="item"
   :class="{
    'item-active': currentId == item.id
   }"
   >{{item.num}}</div>
  </li>
  </ul>
 </div>
 <div
  class="tab-left"
  @click="tabBtnEvent('left')"
 ><</div>
 <div
  class="tab-right"
  @click="tabBtnEvent('right')"
 >></div>
 </div>
</template>
<script>
export default {
 props: ['list'],
 data () {
 return {
  iscrollConf: {
  bounce: true,
  mouseWheel: true,
  click: true,
  scrollX: true,
  scrollY: false
  },
  currentId: null,
  currentIndex: 0,
  myScroll: null
 }
 },
 mounted () {
 this.$refs.tabLiContainer.style.width = this.$refs.tabItem[0].offsetWidth * this.list.length + 'px'
 this.$nextTick(() => {
  this.myScroll.refresh()
 })
 },
 methods: {
 tabEvent (item, currentIndex) {
  <!--点击某个li 按钮事件处理逻辑-->
 },
 tabBtnEvent (direction) {
  <!--左右切换逻辑事件-->
 },
 getIscroll (iscroll) {
  this.myScroll = iscroll
 }
 },
 watch: {
 list: {
  handler (l) {
  this.currentId = l[0].id
  },
  immediate: true,
  deep: true
 }
 }
}
</script>
<style scoped>
// 样式
</style>上述代码中 v-iscroll 指令传入两个字段参数:
option:配置iscroll参数,这里面注意scrollX,scrollY两个属性,代表的是横向还是竖向滚动;
instance:回调方法的调用, vIscroll.js 中执行回调方法,通过该组件方法 getIscroll() 获取到 iscroll 的实例。
3、上下滚动区域联动
上面的代码可以解决开篇场景中的问题,现在实现上下区域联动,通过点击横向滚动条某个按钮,使其变成选中状态,然后竖向滚动条对应的项跳到首位,如图所以:
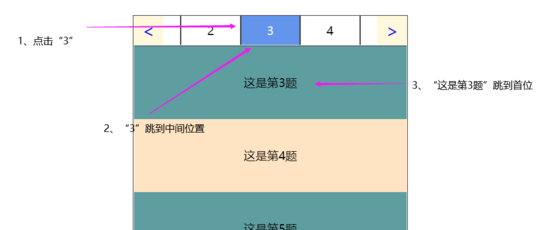
联动示例图
3-1、联动实现方法
点击按钮的方法:
tabEvent (item, currentIndex) {
 this.currentId = item.id
 this.currentIndex = currentIndex
 <!--这里实现按钮始终居中显示,暂时省略,下面补充-->
 ...
 <!--传给竖向滚动组件-->
 this.$emit("switchTab", this.currentId, this.currentIndex)
},竖向滚动区域组件【App.vue】代码部分如下,并对 switchTab() 方法进行详细注释:
<template>
 <div id="app">
 <TabList
  :list="list"
  @switchTab="switchTab"
 ></TabList>
 <!-- v-iscroll="defalutOption" -->
 <div
  v-iscroll="{
  option: defalutOption,
  instance: getIscroll
  }"
  class="tab-content-container"
  ref="detailItemContainer"
 >
  <ul class="tab-list-container">
  <li
   v-for="item in list"
   :key="item.id"
   class="list-item"
   ref="detailItem"
  >
   <div>{{item.value}}</div>
  </li>
  </ul>
 </div>
 </div>
</template>

<script>
import TabList from './components/tabList.vue'

export default {
 name: 'App',
 components: {
 TabList,
 },
 data () {
 return {
  list: [
  { id: 1, value: '这是第1题', num: 1 },
  <!--...省略数据展示-->
  { id: 16, value: '这是第16题', num: 16 }
  ],
  defalutOption: {
  bounce: true,
  mouseWheel: true,
  click: true,
  scrollX: false,
  scrollY: true
  },
  myScroll: null
 }
 },
 methods: {
 switchTab (currentId, currentIndex) {
  <!--对选中的当前项,这里就是“3”按钮对应的“这是第3题”,求出它距离父元素的上边距offsetTop值-->
  const offsetTop = this.$refs.detailItem[currentIndex].offsetTop
  <!--滚动的范围不能超过这个滚动体的底部,这里面用到iscroll的属性maxScrollY-->
  const y = offsetTop >= Math.abs(this.myScroll.maxScrollY) ? this.myScroll.maxScrollY : -offsetTop
  <!--调用iscroll的方法进行滚动到相应的位置-->
  this.myScroll.scrollTo(0, y)
 },
 <!--获取实例-->
 getIscroll (iscroll) {
  this.myScroll = iscroll
 }
 }
}
</script>
<style scoped>
<!--样式-->
...
</style>
这里面用到的都是 iscroll 插件自带的属性和方法进行滚动边界的判断和滚动,比用 JavaScript 方法方便的多,而且用了iscroll作为滚动容器,已经在vIscroll.js禁用了相关浏览器默认事件。
3-2、居中显示
这里 JavaScript 有个 scrollIntoView() 方法, 官方文档链接 ,这个方法让当前的元素滚动到浏览器窗口的可视区域内。关键缺点是,如果横向滚动和竖向滚动都同时用到这个方法,只能保证一个滚动区域有效,另一个会不滚动。
使用 scrollIntoView() 方法配置如下:
this.$refs.tabItem[this.currentIndex].scrollIntoView({
 behavior: "smooth",
 inline: "center",
 block: 'nearest'
})这里在横向滚动区域添加了一对左右按钮,实现切换功能,如图所示:
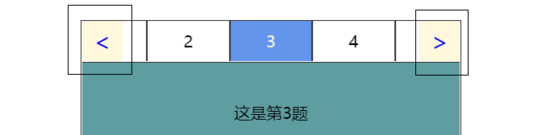
切换按钮示例图
切换按钮事件方法就是通过改变上一个、下一个按钮下标,调用方法,实现切换功能,切换事件方法逻辑如下:
tabBtnEvent (direction) {
 const max = this.$refs.tabItem.length
 if (direction === 'left' && this.currentIndex > 0) {
 this.currentIndex--
 }
 if (direction === 'right' && this.currentIndex < max - 1) {
 this.currentIndex++
 }
 <!--调用单击按钮事件-->
 this.tabEvent(this.$refs.tabItem[this.currentIndex], this.currentIndex)
},下面对 单击按钮事件 添加居中逻辑,详细代码和解析图如下,可以对比查看:

居中计算图
tabEvent (item, currentIndex) {
 this.currentId = item.id
 this.currentIndex = currentIndex
 // 获取滚动容器的长度的一半,即中间点
 const scrollContainerHalfWidth = this.$refs.scrollContainer.offsetWidth / 2
 // 获取单个item的一半长度
 const tabItemHalfWidth = this.$refs.tabItem[currentIndex].offsetWidth / 2
 // 求取插值,就是开始到中间开始位置的距离
 const halfDistance = scrollContainerHalfWidth - tabItemHalfWidth
 // 求取当前item的相对总长度的偏移量
 const currentItemOffsetLeft = this.$refs.tabItem[currentIndex].offsetLeft
 // scroll 移动到中间的值
 const x = halfDistance - currentItemOffsetLeft
 this.myScroll.scrollTo(x, 0)
 this.$emit("switchTab", this.currentId, this.currentIndex)
},4、总结
1、整个实例用的都是iscroll插件相关属性实现的滚动,避免同时使用JavaScript方法造成的代码混乱;
2、利用自定义指令的方式有效的避免了传统实例化iscroll带来的代码冗余,使其方便简洁;
3、本实例滚动选项都是字符串,如果出现图片的情况,合理使用iscroll.refresh() 方法,在正确的时期重新计算滚动区域,避免滚动边界受限;
以上是“vue中怎么利用iscroll.js解决pc端滚动问题”这篇文章的所有内容,感谢各位的阅读!相信大家都有了一定的了解,希望分享的内容对大家有所帮助,如果还想学习更多知识,欢迎关注亿速云行业资讯频道!
亿速云「云服务器」,即开即用、新一代英特尔至强铂金CPU、三副本存储NVMe SSD云盘,价格低至29元/月。点击查看>>
免责声明:本站发布的内容(图片、视频和文字)以原创、转载和分享为主,文章观点不代表本网站立场,如果涉及侵权请联系站长邮箱:is@yisu.com进行举报,并提供相关证据,一经查实,将立刻删除涉嫌侵权内容。


 计算
计算 安全
安全 数据库
数据库 网络和加速
网络和加速 企业服务
企业服务


