这篇文章给大家介绍怎么在Spring Boot中利用netty实现客户端服务端交互,内容非常详细,感兴趣的小伙伴们可以参考借鉴,希望对大家能有所帮助。
首先,当然是在SpringBoot项目里添加netty的依赖了,注意不要用netty5的依赖,因为已经废弃了
<!--netty-->
<dependency>
 <groupId>io.netty</groupId>
 <artifactId>netty-all</artifactId>
 <version>4.1.32.Final</version>
</dependency>
将端口和IP写入application.yml文件里,我这里是我云服务器的内网IP,如果是本机测试,用127.0.0.1就ok
netty:
 port: 7000
 url: 172.16.0.7
在这之后,开始写netty的服务器,这里服务端的逻辑就是将客户端发来的信息返回回去
因为采用依赖注入的方法实例化netty,所以加上@Component注释
package com.safelocate.app.nettyServer;

import io.netty.bootstrap.ServerBootstrap;
import io.netty.channel.*;
import io.netty.channel.nio.NioEventLoopGroup;
import io.netty.channel.socket.nio.NioServerSocketChannel;
import org.apache.log4j.Logger;
import org.springframework.stereotype.Component;

import java.net.InetSocketAddress;

@Component
public class NettyServer {
 //logger
 private static final Logger logger = Logger.getLogger(NettyServer.class);
 public void start(InetSocketAddress address){
 EventLoopGroup bossGroup = new NioEventLoopGroup(1);
 EventLoopGroup workerGroup = new NioEventLoopGroup();
 try {
  ServerBootstrap bootstrap = new ServerBootstrap()
   .group(bossGroup,workerGroup)
   .channel(NioServerSocketChannel.class)
   .localAddress(address)
   .childHandler(new ServerChannelInitializer())
   .option(ChannelOption.SO_BACKLOG, 128)
   .childOption(ChannelOption.SO_KEEPALIVE, true);
  // 绑定端口,开始接收进来的连接
  ChannelFuture future = bootstrap.bind(address).sync();
  logger.info("Server start listen at " + address.getPort());
  future.channel().closeFuture().sync();
 } catch (Exception e) {
  e.printStackTrace();
  bossGroup.shutdownGracefully();
  workerGroup.shutdownGracefully();
 }
 }

}
当然,这里的ServerChannelInitializer是我自己定义的类,这个类是继承ChannelInitializer<SocketChannel>的,里面设置出站和入站的编码器和解码器
package com.safelocate.app.nettyServer;

import io.netty.channel.ChannelInitializer;
import io.netty.channel.socket.SocketChannel;
import io.netty.handler.codec.string.StringDecoder;
import io.netty.handler.codec.string.StringEncoder;
import io.netty.util.CharsetUtil;
public class ServerChannelInitializer extends ChannelInitializer<SocketChannel> {
 @Override
 protected void initChannel(SocketChannel channel) throws Exception {
 channel.pipeline().addLast("decoder",new StringDecoder(CharsetUtil.UTF_8));
 channel.pipeline().addLast("encoder",new StringEncoder(CharsetUtil.UTF_8));
 channel.pipeline().addLast(new ServerHandler());
 }
}
最好注意被别decoder和encoder写成了一样的,不然会出问题(我之前就是不小心都写成了StringDecoder...)
在这之后就是设置ServerHandler来处理一些简单的逻辑了
package com.safelocate.app.nettyServer;

import io.netty.channel.ChannelHandlerContext;
import io.netty.channel.ChannelInboundHandlerAdapter;
import io.netty.channel.SimpleChannelInboundHandler;

import java.io.IOException;
import java.io.OutputStream;
import java.io.PrintWriter;
import java.net.InetAddress;
import java.net.Socket;

public class ServerHandler extends ChannelInboundHandlerAdapter {
 @Override
 public void channelActive(ChannelHandlerContext ctx) {
 System.out.println("channelActive----->");
 }


 @Override
 public void channelRead(ChannelHandlerContext ctx, Object msg) throws Exception {
 System.out.println("server channelRead......");
 System.out.println(ctx.channel().remoteAddress()+"----->Server :"+ msg.toString());
 //将客户端的信息直接返回写入ctx
 ctx.write("server say :"+msg);
 //刷新缓存区
 ctx.flush();
 }

 @Override
 public void exceptionCaught(ChannelHandlerContext ctx, Throwable cause) throws Exception {
 cause.printStackTrace();
 ctx.close();
 }
}
准备工作到这里,现在要做到就是去启动这个程序
将AppApplication实现CommandLineRunner这个接口,这个接口可以用来再启动SpringBoot时同时启动其他功能,比如配置,数据库连接等等
然后重写run方法,在run方法里启动netty服务器,Server类用@AutoWired直接实例化
package com.safelocate.app;

import com.safelocate.app.nettyServer.NettyServer;
import io.netty.channel.ChannelFuture;
import org.springframework.beans.factory.annotation.Autowired;
import org.springframework.beans.factory.annotation.Value;
import org.springframework.boot.CommandLineRunner;
import org.springframework.boot.SpringApplication;
import org.springframework.boot.autoconfigure.SpringBootApplication;

import java.net.InetAddress;
import java.net.InetSocketAddress;
@SpringBootApplication
public class AppApplication implements CommandLineRunner {

 @Value("${netty.port}")
 private int port;

 @Value("${netty.url}")
 private String url;

 @Autowired
 private NettyServer server;

 public static void main(String[] args) {
 SpringApplication.run(AppApplication.class, args);
 }
 @Override
 public void run(String... args) throws Exception {
 InetSocketAddress address = new InetSocketAddress(url,port);
 System.out.println("run .... . ... "+url);
 server.start(address);
 }
}
ok,到这里服务端已经写完,本地我也已经测试完,现在需要打包部署服务器,当然这个程序只为练手...
控制台输入mvn clean package -D skipTests 然后将jar包上传服务器,在这之后,需要在腾讯云/阿里云那边配置好安全组,将之前yml文件里设定的端口的入站
规则设置好,不然访问会被拒绝
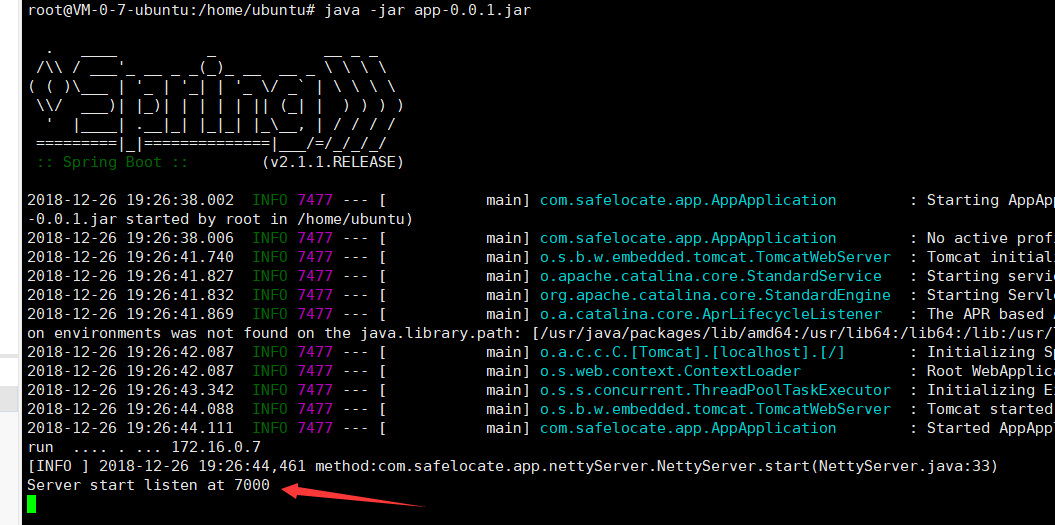
之后java -jar命令运行,如果需保持后台一直运行 就用nohup命令,可以看到程序已经跑起来了,等待客户端连接交互

之后就是写客户端了,客户端其实是依葫芦画瓢,跟上面类似
Handler
package client;

import io.netty.channel.ChannelHandlerContext;
import io.netty.channel.ChannelInboundHandlerAdapter;

public class ClientHandler extends ChannelInboundHandlerAdapter {
 @Override
 public void channelActive(ChannelHandlerContext ctx) {
 System.out.println("ClientHandler Active");
 }

 @Override
 public void channelRead(ChannelHandlerContext ctx, Object msg) {
 System.out.println("--------");
 System.out.println("ClientHandler read Message:"+msg);
 }


 @Override
 public void exceptionCaught(ChannelHandlerContext ctx, Throwable cause) {
 cause.printStackTrace();
 ctx.close();
 }

}
ChannelInitializer
package client;

import io.netty.channel.ChannelInitializer;
import io.netty.channel.ChannelPipeline;
import io.netty.channel.socket.SocketChannel;
import io.netty.handler.codec.string.StringDecoder;
import io.netty.handler.codec.string.StringEncoder;
import io.netty.util.CharsetUtil;

public class ClientChannelInitializer extends ChannelInitializer<SocketChannel> {
 protected void initChannel(SocketChannel channel) throws Exception {
 ChannelPipeline p = channel.pipeline();
 p.addLast("decoder", new StringDecoder(CharsetUtil.UTF_8));
 p.addLast("encoder", new StringEncoder(CharsetUtil.UTF_8));
 p.addLast(new ClientHandler());
 }
}
主函数所在类,即客户端
package client;

import io.netty.bootstrap.Bootstrap;
import io.netty.channel.*;
import io.netty.channel.nio.NioEventLoopGroup;
import io.netty.channel.socket.SocketChannel;
import io.netty.channel.socket.nio.NioSocketChannel;
import io.netty.handler.codec.string.StringDecoder;
import io.netty.handler.codec.string.StringEncoder;

public class Client {
 static final String HOST = System.getProperty("host", "服务器的IP地址");
 static final int PORT = Integer.parseInt(System.getProperty("port", "7000"));
 static final int SIZE = Integer.parseInt(System.getProperty("size", "256"));

 public static void main(String[] args) throws Exception {
 sendMessage("hhhh");
 }
 public static void sendMessage(String content) throws InterruptedException{
 // Configure the client.
 EventLoopGroup group = new NioEventLoopGroup();
 try {
  Bootstrap b = new Bootstrap();
  b.group(group)
   .channel(NioSocketChannel.class)
   .option(ChannelOption.TCP_NODELAY, true)
   .handler(new ChannelInitializer<SocketChannel>() {
   @Override
   public void initChannel(SocketChannel ch) throws Exception {
    ChannelPipeline p = ch.pipeline();
    p.addLast("decoder", new StringDecoder());
    p.addLast("encoder", new StringEncoder());
    p.addLast(new ClientHandler());
   }
   });

  ChannelFuture future = b.connect(HOST, PORT).sync();
  future.channel().writeAndFlush(content);
  future.channel().closeFuture().sync();
 } finally {
  group.shutdownGracefully();
 }
 }

}
启动客户端,这里就是简单发送一条"hhhh",可以看到客户端已经收到服务器发来的信息
 |
然后再看服务端,也有相应的信息打印

关于怎么在Spring Boot中利用netty实现客户端服务端交互就分享到这里了,希望以上内容可以对大家有一定的帮助,可以学到更多知识。如果觉得文章不错,可以把它分享出去让更多的人看到。
免责声明:本站发布的内容(图片、视频和文字)以原创、转载和分享为主,文章观点不代表本网站立场,如果涉及侵权请联系站长邮箱:is@yisu.com进行举报,并提供相关证据,一经查实,将立刻删除涉嫌侵权内容。