Android 自定义EditText输入框带清空按钮
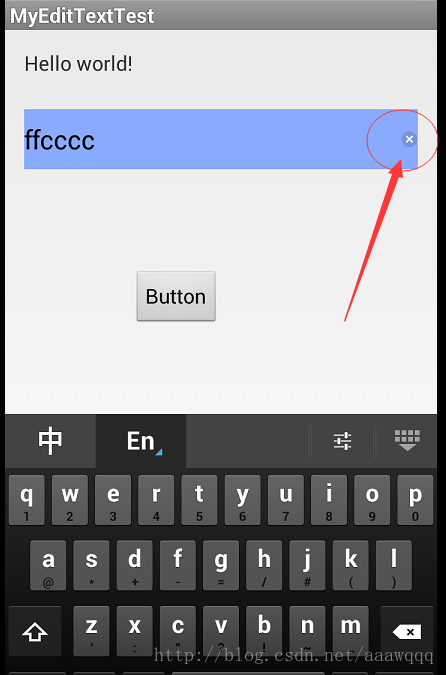
当用户输入字符后 EditText会自动在输入框的内部右侧出现删除按钮
重写EditText达到简化布局的效果
效果图:

继承EditText
package com.example.myedittexttest;

import android.content.Context;
import android.graphics.Rect;
import android.graphics.drawable.Drawable;
import android.text.Editable;
import android.text.TextWatcher;
import android.util.AttributeSet;
import android.view.MotionEvent;
import android.widget.EditText;

public class MyEditText extends EditText {
	private final String TAG = "MyEditText";
	private Drawable dRight;
	private Rect rBounds;

	public MyEditText(Context paramContext) {
		super(paramContext);
		initEditText();
	}

	public MyEditText(Context paramContext, AttributeSet paramAttributeSet) {
		super(paramContext, paramAttributeSet);
		initEditText();
	}

	public MyEditText(Context paramContext, AttributeSet paramAttributeSet, int paramInt) {
		super(paramContext, paramAttributeSet, paramInt);
		initEditText();
	}

	// 初始化edittext 控件
	private void initEditText() {
		setEditTextDrawable();
		addTextChangedListener(new TextWatcher() { // 对文本内容改变进行监听
			@Override
			public void afterTextChanged(Editable paramEditable) {
			}

			@Override
			public void beforeTextChanged(CharSequence paramCharSequence, int paramInt1, int paramInt2, int paramInt3) {
			}

			@Override
			public void onTextChanged(CharSequence paramCharSequence, int paramInt1, int paramInt2, int paramInt3) {
				MyEditText.this.setEditTextDrawable();
			}
		});
	}

	// 控制图片的显示
	public void setEditTextDrawable() {
		if (getText().toString().length() == 0) {
			setCompoundDrawables(null, null, null, null);
		} else {
			setCompoundDrawables(null, null, this.dRight, null);
		}
	}

	@Override
	protected void onDetachedFromWindow() {
		super.onDetachedFromWindow();
		this.dRight = null;
		this.rBounds = null;

	}

	/**
	 * 添加触摸事件 点击之后 出现 清空editText的效果
	 */
	@Override
	public boolean onTouchEvent(MotionEvent paramMotionEvent) {
		if ((this.dRight != null) && (paramMotionEvent.getAction() == 1)) {
			this.rBounds = this.dRight.getBounds();
			int i = (int) paramMotionEvent.getRawX();// 距离屏幕的距离
			// int i = (int) paramMotionEvent.getX();//距离边框的距离
			if (i > getRight() - 3 * this.rBounds.width()) {
				setText("");
				paramMotionEvent.setAction(MotionEvent.ACTION_CANCEL);
			}
		}
		return super.onTouchEvent(paramMotionEvent);
	}

	/**
	 * 显示右侧X图片的
	 *
	 * 左上右下
	 */
	@Override
	public void setCompoundDrawables(Drawable paramDrawable1, Drawable paramDrawable2, Drawable paramDrawable3, Drawable paramDrawable4) {
		if (paramDrawable3 != null)
			this.dRight = paramDrawable3;
		super.setCompoundDrawables(paramDrawable1, paramDrawable2, paramDrawable3, paramDrawable4);
	}
}
XML布局:
<RelativeLayout xmlns:android="http://schemas.android.com/apk/res/android"
  xmlns:tools="http://schemas.android.com/tools"
  android:layout_width="match_parent"
  android:layout_height="match_parent"
  android:paddingBottom="@dimen/activity_vertical_margin"
  android:paddingLeft="@dimen/activity_horizontal_margin"
  android:paddingRight="@dimen/activity_horizontal_margin"
  android:paddingTop="@dimen/activity_vertical_margin"
  tools:context=".MainActivity" >

  <com.example.myedittexttest.MyEditText
    android:id="@+id/edit_text"
    android:layout_width="fill_parent"
    android:layout_height="50dp"
    android:layout_marginTop="50dp"
    android:background="#88aaff"
    android:drawableRight="@drawable/edit_clear"
    android:textCursorDrawable="@null" />

  <Button
    android:id="@+id/button1"
    android:layout_width="wrap_content"
    android:layout_height="wrap_content"
    android:layout_below="@+id/edit_text"
    android:layout_marginTop="84dp"
    android:layout_toRightOf="@+id/textView1"
    android:text="Button" />

</RelativeLayout>
XML中的属性简介:
显示右侧的X 按钮:
android:drawableRight="@drawable/edit_clear"
设置光标的颜色 设置@null 表示光标的颜色和输入框的字体颜色相同
android:textCursorDrawable="@null"
显示隐藏光标
android:cursorVisible="true"//显示

android:cursorVisible="false"//隐藏
感谢阅读,希望能帮助到大家,谢谢大家对本站的支持!
免责声明:本站发布的内容(图片、视频和文字)以原创、转载和分享为主,文章观点不代表本网站立场,如果涉及侵权请联系站长邮箱:is@yisu.com进行举报,并提供相关证据,一经查实,将立刻删除涉嫌侵权内容。