前言
在平时的开发过程中,我们经常会用LayoutInflater这个类,比如说在Fragment$onCreateView和RecyclerView.Adapter$onCreateViewHolder中都会用到。它的用法也无非就是LayoutInflater.inflate(resourceId, root, attachToRoot),第一个参数没什么好说的,但第二个和第三个参数结合起来会带来一定的迷惑性。之前有时候会发现界面布局上出了一些问题,查了很久之后偶然的改动了这两个参数,发现问题解决了,然后也就过去了,并没有去思考这是为什么,然后下次可能又重复这种困境了。
所以想在这里总结一下,避免以后继续掉坑。
先来看看inflate方法的注释:
/**
 * Inflate a new view hierarchy from the specified xml resource. Throws
 * {@link InflateException} if there is an error.
 *
 * @param resource ID for an XML layout resource to load (e.g.,
 *  <code>R.layout.main_page</code>)
 * @param root Optional view to be the parent of the generated hierarchy (if
 *  <em>attachToRoot</em> is true), or else simply an object that
 *  provides a set of LayoutParams values for root of the returned
 *  hierarchy (if <em>attachToRoot</em> is false.)
 * @param attachToRoot Whether the inflated hierarchy should be attached to
 *  the root parameter? If false, root is only used to create the
 *  correct subclass of LayoutParams for the root view in the XML.
 * @return The root View of the inflated hierarchy. If root was supplied and
 *   attachToRoot is true, this is root; otherwise it is the root of
 *   the inflated XML file.
 */
public View inflate(@LayoutRes int resource, @Nullable ViewGroup root, boolean attachToRoot)
首先需要了解的一点是,一个View的测量结果并不只是由它自己的layout_width和layout_height(即LayoutParams)所决定的,而是由父容器给它的约束(MeasureSpec)和它自身的LayoutParams共同决定的。
达成这个共识之后,我们再来看看它的参数。
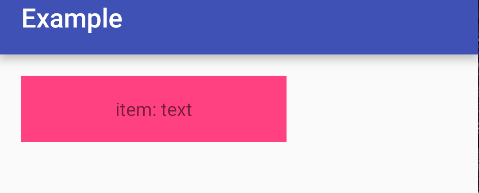
root != null && attachToRoot,返回的View就是传进来的root,否则返回由布局文件所创建的View对象。用几个例子来说明一下会比较好理解。Activity的布局是一个LinearLayout,要添加的布局如下:
<?xml version="1.0" encoding="utf-8"?>
<TextView xmlns:android="http://schemas.android.com/apk/res/android"
  android:id="@+id/item_text"
  android:layout_width="200dp"
  android:layout_height="50dp"
  android:layout_marginLeft="16dp"
  android:layout_marginTop="16dp"
  android:background="@color/colorAccent"
  android:gravity="center"
  android:text="item: text"/>
正常的情况
// 第一种方法
View inflatedView = LayoutInflater.from(this).inflate(R.layout.item_text, mLinearLayout, true);
Log.d(TAG, "inflated view is " + inflatedView);

// 第二种方法
View inflatedView = LayoutInflater.from(this).inflate(R.layout.item_text, mLinearLayout, false);
Log.d(TAG, "inflated view is " + inflatedView);
mLinearLayout.addView(inflatedView);
视觉上的结果都是一样的

但是Log就有一点不一样了,这就是attachToRoot不同的值所导致的。
第一种方法的Log
D/MainActivity: inflated view is android.widget.LinearLayout{36e9aac V.E...... ......I. 0,0-0,0 #7f0c0051 app:id/linear}
第二种方法的Log
D/MainActivity: inflated view is android.support.v7.widget.AppCompatTextView{3c9d37b V.ED..... ......ID 0,0-0,0 #7f0c0054 app:id/item_text}
还有一个需要注意的地方是:如果在第一种方法的基础上再加上mLinearLayout.addView(inflatedView)就会造成报错
IllegalStateException: The specified child already has a parent.... 。
而如果第二种方法没有这句话,界面上是看不到任何东西的。
root为null的情况
mLinearLayout = (LinearLayout) findViewById(R.id.linear);
View inflatedView = LayoutInflater.from(this).inflate(R.layout.item_text, null);
Log.d(TAG, "inflated view is " + inflatedView);
mLinearLayout.addView(inflatedView);

此时再看看它的布局文件:
<?xml version="1.0" encoding="utf-8"?>
<TextView xmlns:android="http://schemas.android.com/apk/res/android"
  android:id="@+id/item_text"
  android:layout_width="200dp"
  android:layout_height="50dp"
  android:layout_marginLeft="16dp"
  android:layout_marginTop="16dp"
  android:background="@color/colorAccent"
  android:gravity="center"
  android:text="item: text"/>
不难发现,所有layout_xxx的属性全都失效了。
RecyclerView中的Inflater
上面说了,在创建布局的时候,要把布局添加到root中去,并且有两种方法,但是我们在onCreateViewHolder中添加布局的时候却是这样写的:
@Override
public MyViewHolder onCreateViewHolder(ViewGroup parent, int viewType) {
 View view = LayoutInflater.from(parent.getContext()).inflate(R.layout.item_text, parent, false);
 return new MyViewHolder(view);
}
如果第三个参数传了true还会报错,这又是为什么呢?
java.lang.IllegalStateException: The specified child already has a parent.
直观上来解释就是,子View的添加与删除是由RecyclerView来管理的,不需要我们来添加。但我们还是从RecyclerView的代码来理解一下会好一些。
以LinearLayoutManager为例,RecyclerView在创建子View的时候会调用到LinearLayoutManager$layoutChunk方法:
void layoutChunk(RecyclerView.Recycler recycler, RecyclerView.State state,
  LayoutState layoutState, LayoutChunkResult result) {
 // 在这里会调用到Adapter$onCreateViewHolder
 View view = layoutState.next(recycler);
 if (view == null) {
  if (DEBUG && layoutState.mScrapList == null) {
   throw new RuntimeException("received null view when unexpected");
  }
  // if we are laying out views in scrap, this may return null which means there is
  // no more items to layout.
  result.mFinished = true;
  return;
 }
 LayoutParams params = (LayoutParams) view.getLayoutParams();
 if (layoutState.mScrapList == null) {
  if (mShouldReverseLayout == (layoutState.mLayoutDirection
    == LayoutState.LAYOUT_START)) {
   addView(view);
  } else {
   addView(view, 0);
  }
 } else {
  if (mShouldReverseLayout == (layoutState.mLayoutDirection
    == LayoutState.LAYOUT_START)) {
   addDisappearingView(view);
  } else {
   addDisappearingView(view, 0);
  }
 }

 // 省略其它大部分代码
}
在初始化的时候,View view = layoutState.next(recycler)里面会调用到我们熟悉的onCreateViewHolder方法,然后我们在里面inflate的过程中第三个参数传了true,将子View添加到了RecyclerView中去了。然而,获得View之后,调用到了addView(因为是初始化,不可能调用addDisappearingView) ,这里又会去添加一次,所以报出了上面的IllegalStateException异常。
总结
以上就是这篇文章的全部内容了,希望本文的内容对各位Android开发者们能带来一定的帮助,如果有疑问大家可以留言交流,谢谢大家对亿速云的支持。
免责声明:本站发布的内容(图片、视频和文字)以原创、转载和分享为主,文章观点不代表本网站立场,如果涉及侵权请联系站长邮箱:is@yisu.com进行举报,并提供相关证据,一经查实,将立刻删除涉嫌侵权内容。