жӮЁеҘҪпјҢзҷ»еҪ•еҗҺжүҚиғҪдёӢи®ўеҚ•е“ҰпјҒ
жӮЁеҘҪпјҢзҷ»еҪ•еҗҺжүҚиғҪдёӢи®ўеҚ•е“ҰпјҒ
е°Ҹзј–з»ҷеӨ§е®¶еҲҶдә«дёҖдёӢеҰӮдҪ•еҲ©з”ЁеүҚз«ҜеҹәзЎҖеҲ¶дҪңhtmlејҖе…іеӣҫж ҮпјҢеёҢжңӣеӨ§е®¶йҳ…иҜ»е®ҢиҝҷзҜҮж–Үз« еҗҺеӨ§жүҖ收иҺ·пјҢдёӢйқўи®©жҲ‘们дёҖиө·еҺ»жҺўи®Ёеҗ§пјҒ
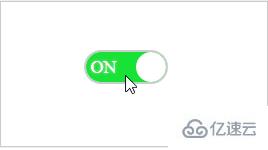
жҲ‘们е…ҲжқҘзңӢдёӢж•Ҳжһңеӣҫпјҡ

htmlд»Јз Ғпјҡ
<html xmlns="http://www.w3.org/1999/xhtml">
<head>
<title>ејҖе…іеӣҫж Ү</title>
</head>
<body>
<div>
<div>
<input type="checkbox" id="toggle-button" name="switch" Оҝnclick="SwitchClick()" checked>
<label for="toggle-button">
<span></span>
<span class="text on">ON</span>
<span class="text off">OFF</span>
</label>
</div>
</div>
</body>
</html>cssж ·ејҸпјҡ
<style type="text/css">
        body {
            text-align: center
        }
        .SwitchIcon {
            margin: 200px auto;
        }
        #toggle-button {
            display: none;
        }
        .button-label {
            position: relative;
            display: inline-block;
            width: 80px;
            height: 30px;
            background-color: #ccc;
            box-shadow: #ccc 0px 0px 0px 2px;
            border-radius: 30px;
            overflow: hidden;
        }
        .circle {
            position: absolute;
            top: 0;
            left: 0;
            width: 30px;
            height: 30px;
            border-radius: 50%;
            background-color: #fff;
        }
        .button-label .text {
            line-height: 30px;
            font-size: 18px;
            text-shadow: 0 0 2px #ddd;
        }
        .on {
            color: #fff;
            display: none;
            text-indent: -45px;
        }
        .off {
            color: #fff;
            display: inline-block;
            text-indent: 34px;
        }
        .button-label .circle {
            left: 0;
            transition: all 0.3s;
        }
        #toggle-button:checked + label.button-label .circle {
            left: 50px;
        }
        #toggle-button:checked + label.button-label .on {
            display: inline-block;
        }
        #toggle-button:checked + label.button-label .off {
            display: none;
        }
        #toggle-button:checked + label.button-label {
            background-color: #19e236;
        }
        .div {
            height: 20px;
            width: 30px;
            background: #51ccee;
        }
</style>jsйҖ»иҫ‘пјҡ
<script type="text/javascript">
//зӘ—дҪ“еҠ иҪҪ
window.onload = function () {
var onoffswitch = document.getElementById("toggle-button");
onoffswitch.checked = true;
}
//жөӢиҜ•ејҖе§Ӣ
function SwitchClick() {
var onoffswitch = document.getElementById("toggle-button");
var label = document.getElementById("batteryIconContent");
if (onoffswitch.checked) {
//и°ғз”ЁеҗҺеҸ°
}
else {
//и°ғз”ЁеҗҺеҸ°
}
}
</script>зңӢе®ҢдәҶиҝҷзҜҮж–Үз« пјҢзӣёдҝЎдҪ еҜ№еҰӮдҪ•еҲ©з”ЁеүҚз«ҜеҹәзЎҖеҲ¶дҪңhtmlејҖе…іеӣҫж ҮжңүдәҶдёҖе®ҡзҡ„дәҶи§ЈпјҢжғідәҶи§ЈжӣҙеӨҡзӣёе…ізҹҘиҜҶпјҢж¬ўиҝҺе…іжіЁдәҝйҖҹдә‘иЎҢдёҡиө„и®Ҝйў‘йҒ“пјҢж„ҹи°ўеҗ„дҪҚзҡ„йҳ…иҜ»пјҒ
е…ҚиҙЈеЈ°жҳҺпјҡжң¬з«ҷеҸ‘еёғзҡ„еҶ…е®№пјҲеӣҫзүҮгҖҒи§Ҷйў‘е’Ңж–Үеӯ—пјүд»ҘеҺҹеҲӣгҖҒиҪ¬иҪҪе’ҢеҲҶдә«дёәдё»пјҢж–Үз« и§ӮзӮ№дёҚд»ЈиЎЁжң¬зҪ‘з«ҷз«ӢеңәпјҢеҰӮжһңж¶үеҸҠдҫөжқғиҜ·иҒ”зі»з«ҷй•ҝйӮ®з®ұпјҡis@yisu.comиҝӣиЎҢдёҫжҠҘпјҢ并жҸҗдҫӣзӣёе…іиҜҒжҚ®пјҢдёҖз»ҸжҹҘе®һпјҢе°Ҷз«ӢеҲ»еҲ йҷӨж¶үе«ҢдҫөжқғеҶ…е®№гҖӮ