这篇文章主要介绍“Spring Boot如何实现国际化”,在日常操作中,相信很多人在Spring Boot如何实现国际化问题上存在疑惑,小编查阅了各式资料,整理出简单好用的操作方法,希望对大家解答”Spring Boot如何实现国际化”的疑惑有所帮助!接下来,请跟着小编一起来学习吧!
在开发中,国际化(Internationalization),也叫本地化,指的是一个网站(或应用)可以支持多种不同的语言,即可以根据用户所在的语言类型和国家/地区,显示不同的文字。能够让不同国家,不同语种的用户方便使用,提高用户体验性。
实现国际化,比较简单的实现方案就是根据不同的国家和语言开发不同的程序,分别用相应的语言文字显示,例如Oracle英文官网地址:https://www.oracle.com/index.html,中文官网地址:https://www.oracle.com/cn/index.html。
一般比较大型的公司会使用这种根据不同的国家和语言开发不同的程序的形式实现国家化,其一人家公司有资源投入开发,其二可以根据不同国家,不同语种用户习惯开发更加符合当地人的布局样式,交互等。
还有另外一种国家化实现方案,就是开发一套程序,可以根据用户所在区域显示不同的语言文字,但是网站/应用的布局样式等不会发生很大变化。这个方案也是我们要将的i18n国际化实现,i18n其实就是英文单词Internationalization(国际化)的缩写,i和n代表单词首尾字母,18代表中间的18个字母。
在Java中,通过java.util.Locale类表示本地化对象,它通过语言类型和国家/地区等元素来确定创建一个本地化对象 。Locale对象表示具体的地理,时区,语言,政治等。
我们可以通过以下方法,获取本地系统的语言,国家等信息;以及获取代表指定地区的语言,国家信息Local对象。当然你也可以调用 Locale.getAvailableLocales() 方法查看所有可用的Local对象。
package com.nobody;

import java.util.Locale;

/**
 * @Description
 * @Author Mr.nobody
 * @Date 2021/4/15
 * @Version 1.0
 */
public class LocalTest {
    public static void main(String[] args) {
        Locale defaultLocale = Locale.getDefault();
        Locale chinaLocale = Locale.CHINA;
        Locale usLocale = Locale.US;
        Locale usLocale1 = new Locale("en", "US");
        System.out.println(defaultLocale);
        System.out.println(defaultLocale.getLanguage());
        System.out.println(defaultLocale.getCountry());
        System.out.println(chinaLocale);
        System.out.println(usLocale);
        System.out.println(usLocale1);
    }
}

// 输出结果
zh_CN
zh
CN
zh_CN
en_US
en_US
我们一般会将不同的语言的属性值存放在不同的配置文件中,ResourceBundle类可以根据指定的baseName和Local对象,就可以找到相应的配置文件,从而读取到相应的语言文字,从而构建出ResourceBundle对象,然后我们可以通过ResourceBundle.getString(key)就可以取得key在不同地域的语言文字了。
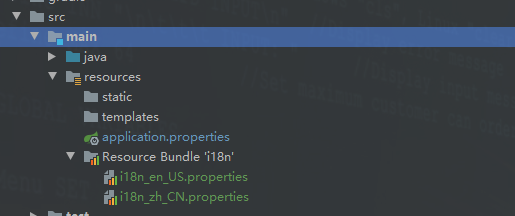
Properties配置文件命名规则:baseName_local.properties
假如baseName为i18n,则相应的配置文件应该命名为如下:
中文的配置文件:i18n_zh_CN.properties
英文的配置文件:i18n_en_US.properties

然后在两个配置文件中,存放着键值对,对应不同的语言文字
# 在i18n_zh_CN.properties文件中
userName=陈皮

# 在i18n_en_US.properties文件中
userName=Peel
我们通过如下方式,就可以获取相应语言环境下的信息了,如下:
Locale chinaLocale = Locale.CHINA;
ResourceBundle resourceBundle = ResourceBundle.getBundle("i18n", chinaLocale);
String userName = resourceBundle.getString("userName");
System.out.println(userName);

Locale usLocale = Locale.US;
resourceBundle = ResourceBundle.getBundle("i18n", usLocale);
userName = resourceBundle.getString("userName");
System.out.println(userName);

// 输出结果
陈皮
Peel
对于不同地域语言环境的用户,我们是如何处理国际化呢?其实原理很简单,假设客户端发送一个请求到服务端,在请求头中设置了键值对,“Accept-Language”:“zh-CN”,根据这个信息,可以构建出一个代表这个区域的本地化对象Locale,根据配置文件的baseName和Locale对象就可以知道读取哪个配置文件的属性,将要显示的文字格式化处理,最终返回给客户端进行显示。
在Springboot中,我们会使用到一个MessageSource接口,用于访问国际化信息,此接口定义了几个重载的方法。code即国际化资源的属性名(键);args即传递给格式化字符串中占位符的运行时参数值;local即本地化对象;resolvable封装了国际化资源属性名,参数,默认信息等。
String getMessage(String code, @Nullable Object[] args, @Nullable String defaultMessage, Locale locale)
String getMessage(String code, @Nullable Object[] args, Locale locale)
String getMessage(MessageSourceResolvable resolvable, Locale locale)
Springboot提供了国际化信息自动配置类MessageSourceAutoConfiguration,它可以生成MessageSource接口的实现类ResourceBundleMessageSource,注入到Spring容器中。MessageSource配置生效依靠ResourceBundleCondition条件,从环境变量中读取spring.messages.basename的值(默认值messages),这个值就是MessageSource对应的资源文件名称,资源文件扩展名是.properties,然后通过PathMatchingResourcePatternResolver从classpath*:目录下读取对应的资源文件,如果能正常读取到资源文件,则加载配置类。源码如下:
package org.springframework.boot.autoconfigure.context;

@Configuration
@ConditionalOnMissingBean(value = MessageSource.class, search = SearchStrategy.CURRENT)
@AutoConfigureOrder(Ordered.HIGHEST_PRECEDENCE)
@Conditional(ResourceBundleCondition.class)
@EnableConfigurationProperties
public class MessageSourceAutoConfiguration {

    private static final Resource[] NO_RESOURCES = {};

    // 我们可以在application.properties文件中修改spring.messages前缀的默认值,比如修改basename的值
    @Bean
    @ConfigurationProperties(prefix = "spring.messages")
    public MessageSourceProperties messageSourceProperties() {
        return new MessageSourceProperties();
    }

    // 生成ResourceBundleMessageSource实例,注入容器中
    @Bean
    public MessageSource messageSource(MessageSourceProperties properties) {
        ResourceBundleMessageSource messageSource = new ResourceBundleMessageSource();
        if (StringUtils.hasText(properties.getBasename())) {
            messageSource.setBasenames(StringUtils
                                       .commaDelimitedListToStringArray(StringUtils.trimAllWhitespace(properties.getBasename())));
        }
        if (properties.getEncoding() != null) {
            messageSource.setDefaultEncoding(properties.getEncoding().name());
        }
        messageSource.setFallbackToSystemLocale(properties.isFallbackToSystemLocale());
        Duration cacheDuration = properties.getCacheDuration();
        if (cacheDuration != null) {
            messageSource.setCacheMillis(cacheDuration.toMillis());
        }
        messageSource.setAlwaysUseMessageFormat(properties.isAlwaysUseMessageFormat());
        messageSource.setUseCodeAsDefaultMessage(properties.isUseCodeAsDefaultMessage());
        return messageSource;
    }

    protected static class ResourceBundleCondition extends SpringBootCondition {

        private static ConcurrentReferenceHashMap<String, ConditionOutcome> cache = new ConcurrentReferenceHashMap<>();

        @Override
        public ConditionOutcome getMatchOutcome(ConditionContext context, AnnotatedTypeMetadata metadata) {
            String basename = context.getEnvironment().getProperty("spring.messages.basename", "messages");
            ConditionOutcome outcome = cache.get(basename);
            if (outcome == null) {
                outcome = getMatchOutcomeForBasename(context, basename);
                cache.put(basename, outcome);
            }
            return outcome;
        }

        private ConditionOutcome getMatchOutcomeForBasename(ConditionContext context, String basename) {
            ConditionMessage.Builder message = ConditionMessage.forCondition("ResourceBundle");
            for (String name : StringUtils.commaDelimitedListToStringArray(StringUtils.trimAllWhitespace(basename))) {
                for (Resource resource : getResources(context.getClassLoader(), name)) {
                    if (resource.exists()) {
                        return ConditionOutcome.match(message.found("bundle").items(resource));
                    }
                }
            }
            return ConditionOutcome.noMatch(message.didNotFind("bundle with basename " + basename).atAll());
        }

        // 读取classpath*:路径下的配置文件
        private Resource[] getResources(ClassLoader classLoader, String name) {
            String target = name.replace('.', '/');
            try {
                return new PathMatchingResourcePatternResolver(classLoader)
                    .getResources("classpath*:" + target + ".properties");
            }
            catch (Exception ex) {
                return NO_RESOURCES;
            }
        }

    }

}以下这个类是Spring国际化处理的属性配置类,我们可以在application.properties文件中自定义修改这些默认值,例如:spring.messages.basename=i18n。
package org.springframework.boot.autoconfigure.context;

/**
 * Configuration properties for Message Source.
 *
 * @author Stephane Nicoll
 * @author Kedar Joshi
 * @since 2.0.0
 */
public class MessageSourceProperties {

    /**
  * Comma-separated list of basenames (essentially a fully-qualified classpath
  * location), each following the ResourceBundle convention with relaxed support for
  * slash based locations. If it doesn't contain a package qualifier (such as
  * "org.mypackage"), it will be resolved from the classpath root.
  */
    private String basename = "messages";

    /**
  * Message bundles encoding.
  */
    private Charset encoding = StandardCharsets.UTF_8;

    /**
  * Loaded resource bundle files cache duration. When not set, bundles are cached
  * forever. If a duration suffix is not specified, seconds will be used.
  */
    @DurationUnit(ChronoUnit.SECONDS)
    private Duration cacheDuration;

    /**
  * Whether to fall back to the system Locale if no files for a specific Locale have
  * been found. if this is turned off, the only fallback will be the default file (e.g.
  * "messages.properties" for basename "messages").
  */
    private boolean fallbackToSystemLocale = true;

    /**
  * Whether to always apply the MessageFormat rules, parsing even messages without
  * arguments.
  */
    private boolean alwaysUseMessageFormat = false;

    /**
  * Whether to use the message code as the default message instead of throwing a
  * "NoSuchMessageException". Recommended during development only.
  */
    private boolean useCodeAsDefaultMessage = false;

    // 省略get/set
}
我们在类路径下创建好国际化配置文件之后,就可以注入MessageSource实例,进行国际化处理了:
i18n.properties文件是默认文件,当找不到语言的配置的时候,使用该文件进行展示。
@Autowired
private MessageSource messageSource;

@GetMapping("test")
public GeneralResult<String> test() {
    // 获取客户端的语言环境Locale对象,即取的请求头Accept-Language键的值来判断,我们也可以自定义请求头键,来获取语言标识
    Locale locale = LocaleContextHolder.getLocale();
    String userName = messageSource.getMessage("userName", null, locale);
    System.out.println(userName);
    return GeneralResult.genSuccessResult(userName);
}
上面我们是利用Spirng自带的LocaleContextHolder来获取本地对象Locale,它是取的请求头Accept-Language键的语言值来判断生成相应Locale对象。我们也可以根据其他方式,例如请求头中自定义键的值,来生成Locale对象,然后再通过messageSource.getMessage()方法来实现最终的国家化。
到此,关于“Spring Boot如何实现国际化”的学习就结束了,希望能够解决大家的疑惑。理论与实践的搭配能更好的帮助大家学习,快去试试吧!若想继续学习更多相关知识,请继续关注亿速云网站,小编会继续努力为大家带来更多实用的文章!
免责声明:本站发布的内容(图片、视频和文字)以原创、转载和分享为主,文章观点不代表本网站立场,如果涉及侵权请联系站长邮箱:is@yisu.com进行举报,并提供相关证据,一经查实,将立刻删除涉嫌侵权内容。