本文小编为大家详细介绍“nginx读写分离怎么配置”,内容详细,步骤清晰,细节处理妥当,希望这篇“nginx读写分离怎么配置”文章能帮助大家解决疑惑,下面跟着小编的思路慢慢深入,一起来学习新知识吧。
nginx之读写分离
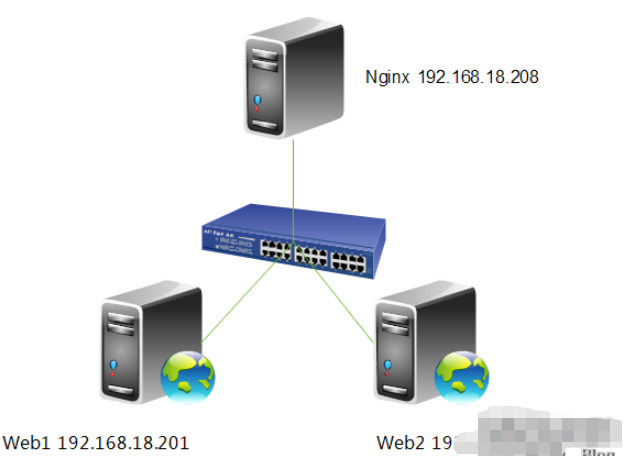
1.实验拓扑

需求分析,前端一台nginx做负载均衡反向代理,后面两台httpd服务器。整个架构是提供bbs(论坛)服务,有一需求得实现读写分离,就是上传附件的功能,我们上传的附件只能上传到web1,然后在web1上利用rsync+inotify实现附件同步,大家都知道rsync+inotify只能是主向从同步,不能双向同步。所以web1可进行写操作,而web2只能进行读操作,这就带来读写分离的需求,下面我们就来说一下,读写分离怎么实现。
2.webdav功能说明
webdav (web-based distributed authoring and versioning) 一种基于 http 1.1协议的通信协议。它扩展了http 1.1,在get、post、head等几个http标准方法以外添加了一些新的方法,使应用程序可直接对web server直接读写,并支持写文件锁定(locking)及解锁(unlock),还可以支持文件的版本控制。这样我们就能配置读写分离功能了,下面我们来具体配置一下。
3.修改配置文件
[root@nginx nginx]# vim /etc/nginx/nginx.conf
server {
    listen    80;
    server_name localhost;
    #charset koi8-r;
    #access_log logs/host.access.log main;
    location / {
        proxy_pass http://192.168.18.202;
        if ($request_method = "put"){
            proxy_pass http://192.168.18.201;
        }
    }
}
4.重新加载一下配置文件
[root@nginx ~]# service nginx reload
nginx: the configuration file /etc/nginx/nginx.conf syntax is ok
nginx: configuration file /etc/nginx/nginx.conf test is successful
重新载入 nginx:                      [确定]
5.配置httpd的webdav功能
[root@web1 ~]# vim /etc/httpd/conf/httpd.conf

注,在<directory "/var/www/html">下启用就行。
6.重新启动一下httpd
[root@web1 ~]# service httpd restart
停止 httpd:                        [确定]
正在启动 httpd:                      [确定]
7.测试一下
[root@nginx ~]# curl http://192.168.18.201
<h1>web1.test.com</h1>
[root@nginx ~]# curl http://192.168.18.202
<h1>web2.test.com</h1>
注,web1与web2访问都没问题。
[root@nginx ~]# curl -t /etc/issue http://192.168.18.202
<!doctype html public "-//ietf//dtd html 2.0//en">
<html><head>
<title>405 method not allowed</title>
</head><body>
<h1>method not allowed</h1>
the requested method put is not allowed for the url /issue.
<hr>
<address>apache/2.2.15 (centos) server at 192.168.18.202 port 80</address>
</body></html>
注,我们上传文件到,web2上时,因为web2只人读功能,所以没有开户webdav功能,所以显示是405 method not allowed。
[root@nginx ~]# curl -t /etc/issue http://192.168.18.201
<!doctype html public "-//ietf//dtd html 2.0//en">
<html><head>
<title>403 forbidden</title>
</head><body>
<h1>forbidden</h1>
you don't have permission to access /issue
on this server.
<hr>
<address>apache/2.2.15 (centos) server at 192.168.18.201 port 80</address>
</body></html>
注,我们在web1开启了webdav功能,但我们目录是root目录是不允许apache用户上传的,所以显示的是403 forbidden。下面我们给apache授权,允许上传。
[root@web1 ~]# setfacl -m u:apache:rwx /var/www/html/
下面我们再来测试一下,
[root@nginx ~]# curl -t /etc/issue http://192.168.18.201
<!doctype html public "-//ietf//dtd html 2.0//en">
<html><head>
<title>201 created</title>
</head><body>
<h1>created</h1>
resource /issue has been created.
<hr />
<address>apache/2.2.15 (centos) server at 192.168.18.201 port 80</address>
</body></html>
注,大家可以看到我们成功的上传了文件,说明nginx读写分离功能配置完成。最后,我们来查看一下上传的文件。
[root@web1 ~]# cd /var/www/html/
[root@web1 html]# ll
总用量 12
drwxr-xr-x 2 root  root  4096 9月  4 13:16 forum
-rw-r--r-- 1 root  root   23 9月  3 23:37 index.html
-rw-r--r-- 1 apache apache  47 9月  4 14:06 issue
读到这里,这篇“nginx读写分离怎么配置”文章已经介绍完毕,想要掌握这篇文章的知识点还需要大家自己动手实践使用过才能领会,如果想了解更多相关内容的文章,欢迎关注亿速云行业资讯频道。
免责声明:本站发布的内容(图片、视频和文字)以原创、转载和分享为主,文章观点不代表本网站立场,如果涉及侵权请联系站长邮箱:is@yisu.com进行举报,并提供相关证据,一经查实,将立刻删除涉嫌侵权内容。