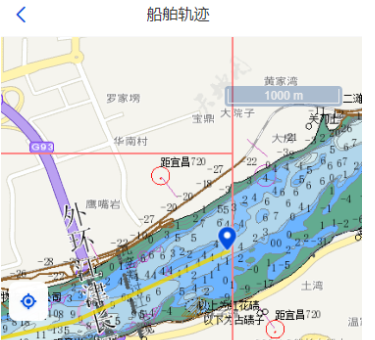
这篇文章主要介绍了vue怎么使用天地图和openlayers实现多个底图叠加显示效果的相关知识,内容详细易懂,操作简单快捷,具有一定借鉴价值,相信大家阅读完这篇vue怎么使用天地图和openlayers实现多个底图叠加显示效果文章都会有所收获,下面我们一起来看看吧。
实现效果:

需求:根据返回的经纬度列表通过天地图、openlayers实现底图添加(航道图层、线图层、水深图层)
tk:自己申请的密钥
安装opelayers
cnpm i -S ol
#或者
npm install ol<script>
// openlayers地图
import "ol/ol.css";
import {
Icon,
Style,
Stroke
} from "ol/style";
import 'ol/ol.css'
import Map from "ol/Map";
import View from "ol/View";
import TileLayer from "ol/layer/Tile";
import XYZ from "ol/source/XYZ";
import { get as getProjection } from "ol/proj.js";
import { getBottomLeft, getTopRight } from 'ol/extent.js'
import { Vector as SourceVec } from 'ol/source';
import { Vector as LayerVec } from 'ol/layer';
import Overlay from "ol/Overlay";//弹窗
import {Point} from "ol/geom";
import {Feature} from "ol";
import { defaults as defaultControls } from "ol/control";//默认缩放
import {FullScreen,ScaleLine} from "ol/control";//全屏,比例尺控件
import TileGrid from 'ol/tilegrid/TileGrid';
import { LineString, Polygon } from 'ol/geom.js'
import { setTimeout } from 'timers';
import {Polyline} from "ol/format";
// import { vectorContext } from "ol/render";
import { getVectorContext } from "ol/render";
import {defaults as defaultInteractions} from 'ol/interaction';//旋转
export default {
data(){
tk:"密钥",
center:{
longitude:"",
latitude:""
},
map:null,
},
methods:{
initMap() {
let defaultsMap = {
tileUrl1:"图层地址1",
tileUrl2:"图层地址2",
tileUrl3:"图层地址3",
origin: [-400, 400],
zoom: 5,
resolutions: [
//根据项目需要设置
],
fullExtent: [
//根据项目需要设置
],
inters: [1000, 100],
center: [this.center.longitude, this.center.latitude],
projection: getProjection("EPSG:4326")
};
// let projection = getProjection('EPSG:4326');
// 底图天地图注记 cta——道路+中文注记
let baseLayer = new TileLayer({
title: "天地图",
source: new XYZ({
url:"http://t4.tianditu.com/DataServer?T=cva_w&x={x}&y={y}&l={z}&tk=" +this.tk
}),
zIndex: 2
});
//天地图路网
let roadLayer = new TileLayer({
title: "天地图路网",
source: new XYZ({
projection: defaultsMap.projection,
url:"http://t4.tianditu.com/DataServer?T=vec_c&x={x}&y={y}&l={z}&tk=" +this.tk
}),
zIndex: 1
});
// 加载地图层mapservice
let tileGrid = new TileGrid({
tileSize: 256,
origin: defaultsMap.origin,
extent: defaultsMap.fullExtent,
resolutions: defaultsMap.resolutions
});
// 航道图层
let cjinobeaconMap = new TileLayer({
source: new XYZ({
tileGrid: tileGrid,
projection: defaultsMap.projection,
url: defaultsMap.tileUrl1
}),
zIndex: 9
});
// 线图层
let framesMap = new TileLayer({
source: new XYZ({
tileGrid: tileGrid,
projection: defaultsMap.projection,
url: defaultsMap.tileUrl2
}),
zIndex: 10
});
// 水深图层
let soundgMap = new TileLayer({
source: new XYZ({
tileGrid: tileGrid,
projection: defaultsMap.projection,
url: defaultsMap.tileUrl3
}),
zIndex: 11
});
// 加载地图
this.map = new Map({
target: "trajecttoryMap",
controls: defaultControls().extend([
new FullScreen(),
new ScaleLine({
units: "metric"
})
// new ZoomSlider()
]),
interactions: defaultInteractions({
pinchRotate: false // 移动端禁止地图旋转
}),
loadTilesWhileAnimating: true,
layers: [baseLayer, roadLayer, cjinobeaconMap, framesMap, soundgMap],
//overlays: [this.overlay], // 把弹窗加入地图
view: new View({
projection: defaultsMap.projection,
center: defaultsMap.center,
extent: defaultsMap.fullExtent,
// resolutions: defaultsMap.resolutions,
zoom: 14,
minZoom: 7,
maxZoom:17
})
});
},
},
mounted(){
this.initMap();
}
}
</script>关于“vue怎么使用天地图和openlayers实现多个底图叠加显示效果”这篇文章的内容就介绍到这里,感谢各位的阅读!相信大家对“vue怎么使用天地图和openlayers实现多个底图叠加显示效果”知识都有一定的了解,大家如果还想学习更多知识,欢迎关注亿速云行业资讯频道。
亿速云「云服务器」,即开即用、新一代英特尔至强铂金CPU、三副本存储NVMe SSD云盘,价格低至29元/月。点击查看>>
免责声明:本站发布的内容(图片、视频和文字)以原创、转载和分享为主,文章观点不代表本网站立场,如果涉及侵权请联系站长邮箱:is@yisu.com进行举报,并提供相关证据,一经查实,将立刻删除涉嫌侵权内容。