今天小编给大家分享一下Android怎么实现保存QQ账号与密码功能的相关知识点,内容详细,逻辑清晰,相信大部分人都还太了解这方面的知识,所以分享这篇文章给大家参考一下,希望大家阅读完这篇文章后有所收获,下面我们一起来了解一下吧。
1)垂直线性布局为整体框架
2)头像获取
3)子线性布局编辑框和密码框
4)登录button按钮
<?xml version="1.0" encoding="utf-8"?>
<LinearLayout xmlns:android="http://schemas.android.com/apk/res/android"
    android:layout_width="match_parent"
    android:layout_height="match_parent"
    android:background="#E6E6E6"
    android:orientation="vertical"
    android:padding="10dp">
    <ImageView
        android:layout_width="70dp"
        android:layout_height="70dp"
        android:layout_centerHorizontal="true"
        android:layout_gravity="center_horizontal"
        android:layout_marginTop="30dp"
        android:src="@drawable/head" />
    <LinearLayout
        android:layout_width="match_parent"
        android:layout_height="wrap_content"
        android:layout_marginTop="15dp"
        android:background="@android:color/white"
        android:orientation="horizontal">
        <TextView
            android:layout_width="wrap_content"
            android:layout_height="wrap_content"
            android:padding="10dp"
            android:text="账号:"
            android:textColor="#000"
            android:textSize="20sp" />
        <EditText
            android:id="@+id/et_account"
            android:layout_width="match_parent"
            android:layout_height="wrap_content"
            android:layout_marginLeft="5dp"
            android:background="@null"
            android:padding="10dp" />
    </LinearLayout>
    <LinearLayout
        android:layout_width="match_parent"
        android:layout_height="wrap_content"
        android:layout_marginTop="10dp"
        android:background="@android:color/white"
        android:orientation="horizontal">
        <TextView
            android:id="@+id/tv_password"
            android:layout_width="wrap_content"
            android:layout_height="wrap_content"
            android:padding="10dp"
            android:text="密码:"
            android:textColor="#000"
            android:textSize="20sp" />
        <EditText
            android:id="@+id/et_password"
            android:layout_width="match_parent"
            android:layout_height="wrap_content"
            android:layout_marginLeft="5dp"
            android:background="@null"
            android:inputType="textPassword"
            android:padding="10dp" />
    </LinearLayout>
    <Button
        android:id="@+id/btn_login"
        android:layout_width="match_parent"
        android:layout_height="wrap_content"
        android:layout_marginTop="25dp"
        android:background="#3C8DC4"
        android:text="登录"
        android:textColor="@android:color/white"
        android:textSize="20sp" />
</LinearLayout>1)将数据存入文件
Android开发中,内部存储使用的是Context提供的openFileOutput()方法这个方法能够返回进行写操作的FileOutputStream对象,示例如下:
FileOutputStream fos = openFileOutput(String name, int mode);其中参数name表示文件名,mode表示文件的操作模式,也就是读写文件的方式。mode的取值有4种,具体如下:
MODE_PRIVATE:该文件只能被当前程序读写
MODE_APPEND:该文件的内容可以追加
MODE_WORLD_READABLE:该文件的内容可以被其他程序读
MODE_WORLD_WRITEABLE:该文件的内容可以被其他程序写
存储数据时,使用FileOutputStream对象将数据存储到文件中,创建了一个saveUserInfo()方法,用于将QQ账号和密码保存到data.txt文件中。
    //保存QQ账号和登录密码到data.txt文件中
    public static boolean saveUserInfo(Context context, String account, String
            password) {
        FileOutputStream fos = null;
        try {
            //获取文件的输出流对象fos
            fos = context.openFileOutput("data.txt",
                    Context.MODE_PRIVATE);
            //将数据转换为字节码的形式写入data.txt文件中
            fos.write((account + ":" + password).getBytes());
            return true;
        } catch (Exception e) {
            e.printStackTrace();
            return false;
        }finally {
            try {
                if(fos != null){
                    fos.close();
                }
            } catch (IOException e) {
                e.printStackTrace();
            }
        }
}2)从文件中读取数据
使用Context提供的openFileOutput()方法这个方法能够返回进行写操作的FileInputStream对象,示例如下:
FileInputStream fos = openFileInput(String name);创建了一个getUserInfo()方法,用于从data.txt文件中获取QQ账号和密码。
需要注意的是,这里的存储和获取都是需要用字节码的形式,所以存取完再改为String类型。
 //从data.txt文件中获取存储的QQ账号和密码
    public static Map<String, String> getUserInfo(Context context) {
        String content = "";
        FileInputStream fis = null;
        try {
            //获取文件的输入流对象fis
            fis = context.openFileInput("data.txt");
            //将输入流对象中的数据转换为字节码的形式
            byte[] buffer = new byte[fis.available()];
            fis.read(buffer);//通过read()方法读取字节码中的数据
            content = new String(buffer); //将获取的字节码转换为字符串
            Map<String, String> userMap = new HashMap<String, String>();
            String[] infos = content.split(":");//将字符串以“:”分隔后形成一个数组的形式
            userMap.put("account", infos[0]);   //将数组中的第一个数据放入userMap集合中
            userMap.put("password", infos[1]); //将数组中的第二个数据放入userMap集合中
            return userMap;
        } catch (Exception e) {
            e.printStackTrace();
            return null;
        }finally {
            try {
                if(fis != null){
                    fis.close();
                }
            } catch (IOException e) {
                e.printStackTrace();
            }
        }
}1)读取文件
通过工具类FileSaveQQ中的getUserInfo()方法获取QQ账号和密码信息
        Map<String, String> userInfo = FileSaveQQ.getUserInfo(this);

        if (userInfo != null) {
            et_account.setText(userInfo.get("account"));   //将获取的账号显示到界面上
            et_password.setText(userInfo.get("password")); //将获取的密码显示到界面上
}2)按钮监听事件
创建一个initView()方法,用于初始化界面控件。再对onClick()方法重写,添加点击登录事件后的响应。
    private EditText et_account;   //账号输入框
    private EditText et_password;  //密码输入框
    private Button btn_login;       //登录按钮
	private void initView() {
        et_account =  findViewById(R.id.et_account);
        et_password =  findViewById(R.id.et_password);
        btn_login = findViewById(R.id.btn_login);
        //设置按钮的点击监听事件
        btn_login.setOnClickListener(this);
    }
    @Override
    public void onClick(View v) {
        switch (v.getId()) {
            case R.id.btn_login:
                //当点击登录按钮时,获取界面上输入的QQ账号和密码
                String account = et_account.getText().toString().trim();
                String password = et_password.getText().toString();
                //检验输入的账号和密码是否为空
                if (TextUtils.isEmpty(account)) {
                    Toast.makeText(this, "请输入QQ账号", Toast.LENGTH_SHORT).show();
                    return;
                }
                if (TextUtils.isEmpty(password)) {
                    Toast.makeText(this, "请输入密码", Toast.LENGTH_SHORT).show();
                    return;
                }
                Toast.makeText(this, "登录成功", Toast.LENGTH_SHORT).show();
                break;
        }
}3)保存登录信息
调用工具类FileSaveQQ中的saveUserInfo()方法将登录信息保存到本地文件中。
 boolean isSaveSuccess = FileSaveQQ.saveUserInfo(this, account,password);

                if (isSaveSuccess) {
                    Toast.makeText(this, "保存成功", Toast.LENGTH_SHORT).show();
                } else {
                    Toast.makeText(this, "保存失败", Toast.LENGTH_SHORT).show();
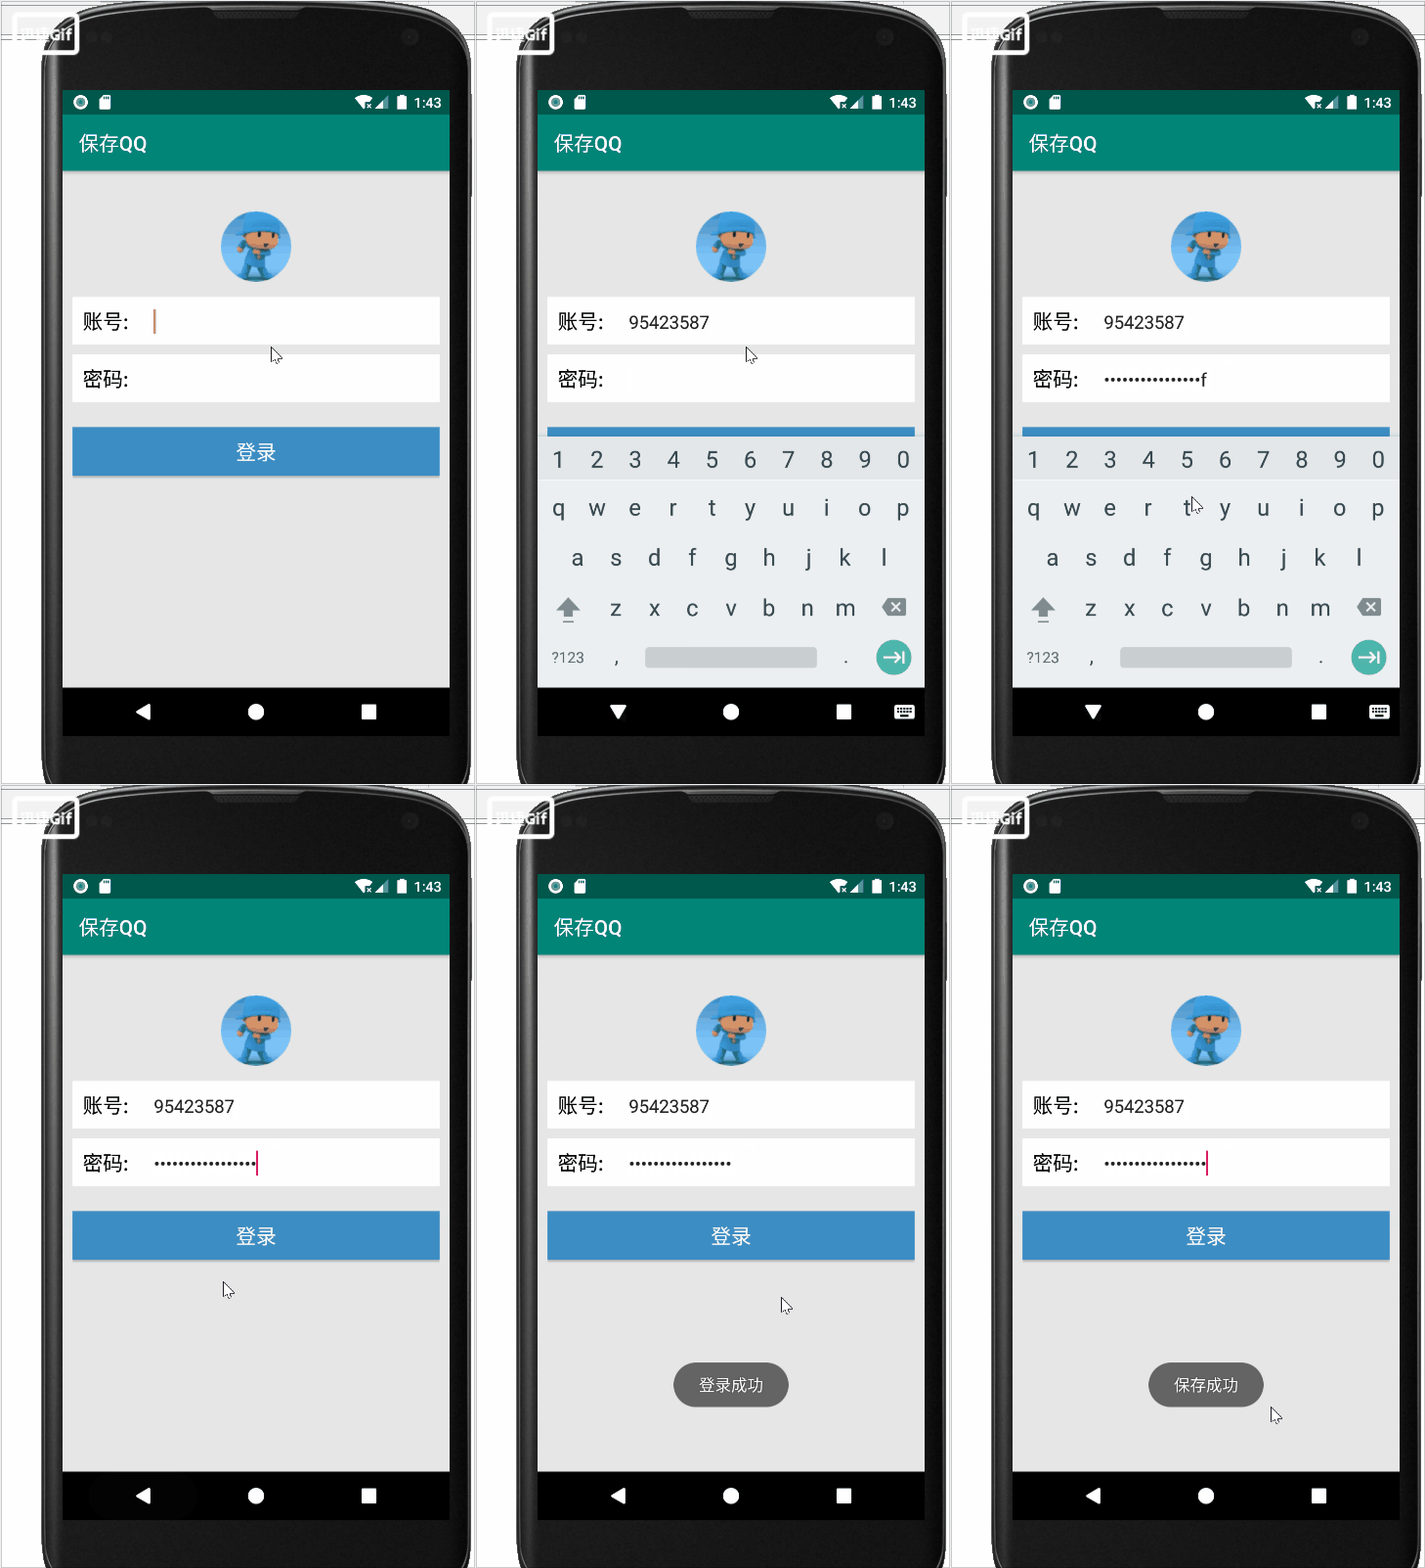
}在界面中输入账号和密码,点击“登录”按钮,会弹出“登录成功”与”保存成功“的提示信息

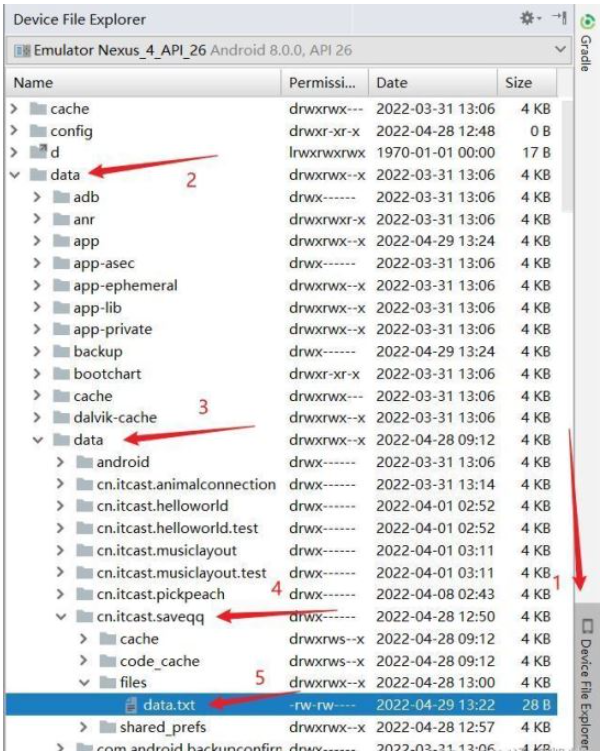
5.查看文件所处位置
1)View——Tool Windows ——Device

2)右侧的Device File Explorer ——data ——data ——项目包名——files

以上就是“Android怎么实现保存QQ账号与密码功能”这篇文章的所有内容,感谢各位的阅读!相信大家阅读完这篇文章都有很大的收获,小编每天都会为大家更新不同的知识,如果还想学习更多的知识,请关注亿速云行业资讯频道。
亿速云「云服务器」,即开即用、新一代英特尔至强铂金CPU、三副本存储NVMe SSD云盘,价格低至29元/月。点击查看>>
免责声明:本站发布的内容(图片、视频和文字)以原创、转载和分享为主,文章观点不代表本网站立场,如果涉及侵权请联系站长邮箱:is@yisu.com进行举报,并提供相关证据,一经查实,将立刻删除涉嫌侵权内容。