жӮЁеҘҪпјҢзҷ»еҪ•еҗҺжүҚиғҪдёӢи®ўеҚ•е“ҰпјҒ
жӮЁеҘҪпјҢзҷ»еҪ•еҗҺжүҚиғҪдёӢи®ўеҚ•е“ҰпјҒ
иҝҷзҜҮвҖңAndroidзҡ„BottomSheetDialog组件еҰӮдҪ•дҪҝз”ЁвҖқж–Үз« зҡ„зҹҘиҜҶзӮ№еӨ§йғЁеҲҶдәәйғҪдёҚеӨӘзҗҶи§ЈпјҢжүҖд»Ҙе°Ҹзј–з»ҷеӨ§е®¶жҖ»з»“дәҶд»ҘдёӢеҶ…е®№пјҢеҶ…е®№иҜҰз»ҶпјҢжӯҘйӘӨжё…жҷ°пјҢе…·жңүдёҖе®ҡзҡ„еҖҹйүҙд»·еҖјпјҢеёҢжңӣеӨ§е®¶йҳ…иҜ»е®ҢиҝҷзҜҮж–Үз« иғҪжңүжүҖ收иҺ·пјҢдёӢйқўжҲ‘们дёҖиө·жқҘзңӢзңӢиҝҷзҜҮвҖңAndroidзҡ„BottomSheetDialog组件еҰӮдҪ•дҪҝз”ЁвҖқж–Үз« еҗ§гҖӮ
BottomSheetDialogжҳҜеә•йғЁж“ҚдҪңжҺ§д»¶пјҢеҸҜеңЁеұҸ幕еә•йғЁеҲӣе»әдёҖдёӘж”ҜжҢҒж»‘еҠЁе…ій—ӯи§ҶеӣҫгҖӮ
зӣ®еүҚдҫқиө–дҪҝз”ЁеҰӮдёӢпјҡ
implementation 'com.google.android.material:material:1.4.0'
BottomSheetDialogйңҖиҰҒдёәе®ғж·»еҠ и§ҶеӣҫеҶ…е®№пјҢзұ»дјјDialogпјҢдё”BottomSheetDialogзҡ„й«ҳеәҰз”ұиҮӘе®ҡд№үи§ҶеӣҫеҶіе®ҡгҖӮ
         var text = TextView(this@UIBottomSheetAC)
         text.text = "BottomSheetDialog"
         var linearLayout = LinearLayout(this@UIBottomSheetAC)
         linearLayout.addView(text)
         linearLayout.setBackgroundColor(Color.YELLOW)
         linearLayout.layoutParams = LinearLayout.LayoutParams(-1,500)
         val bottomSheetDialog =
             BottomSheetDialog(context, R.style.bottom_sheet_dialog)
         bottomSheetDialog.setContentView(linearLayout)
         bottomSheetDialog.show()
BottomSheetDialogе®ҳж–№й»ҳи®Өж ·ејҸжҳҜзҹ©еҪўеј№зӘ—并дёҚеёҰеңҶи§’и®ҫзҪ®гҖӮдҪҶеңЁж—ҘеёёејҖеҸ‘дёӯдјҡйҒҮеҲ°йңҖиҰҒеңҶи§’еј№зӘ—и®ҫи®ЎиҰҒжұӮйңҖиҰҒеҜ№BottomSheetDialogй»ҳи®Өж ·ејҸеҒҡдёҖдәӣи°ғж•ҙжүҚиғҪе®һзҺ°гҖӮ
BottomSheetDialogж ·ејҸж–Ү件
<style name="bottom_sheet_dialog" parent="Theme.Design.Light.BottomSheetDialog">
    <item name="bottomSheetStyle">@style/bottom_sheet_style_wrapper</item>
</style>
<style name="bottom_sheet_style_wrapper" parent="Widget.Design.BottomSheet.Modal">
    <item name="android:background">@android:color/transparent</item>
</style>
еёғеұҖиғҢжҷҜеңҶи§’
<shape xmlns:android="http://schemas.android.com/apk/res/android">
    <solid android:color="@android:color/holo_blue_light" />
    <corners
        android:topLeftRadius="15dp"
        android:topRightRadius="15dp" />
</shape>
д»Јз Ғй…ҚзҪ®
// и§ҶеӣҫиғҢжҷҜеўһеҠ еңҶи§’ж ·ејҸ linearLayout.background = getDrawable(R.drawable.ui_shape_top_radius15) // bottomSheetDialogи®ҫзҪ®йҖҸжҳҺиғҢжҷҜж ·ејҸ val bottomSheetDialog = BottomSheetDialog(context, R.style.bottom_sheet_dialog)

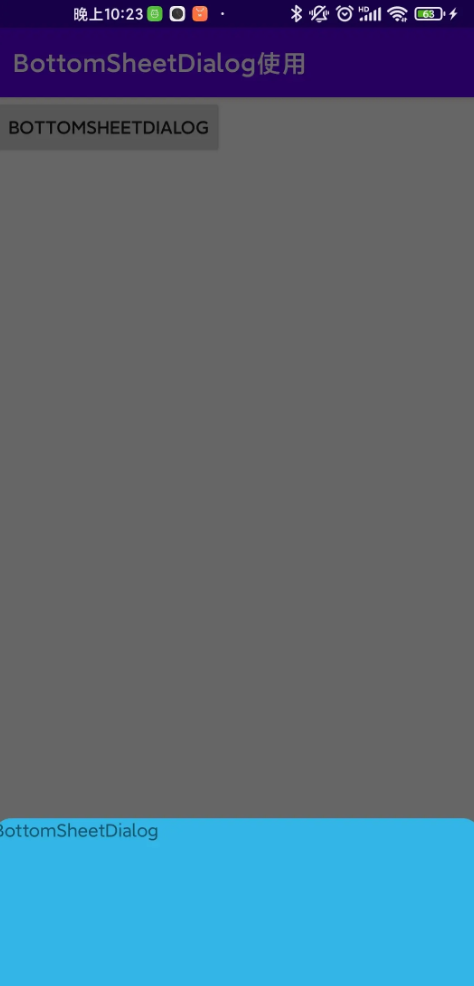
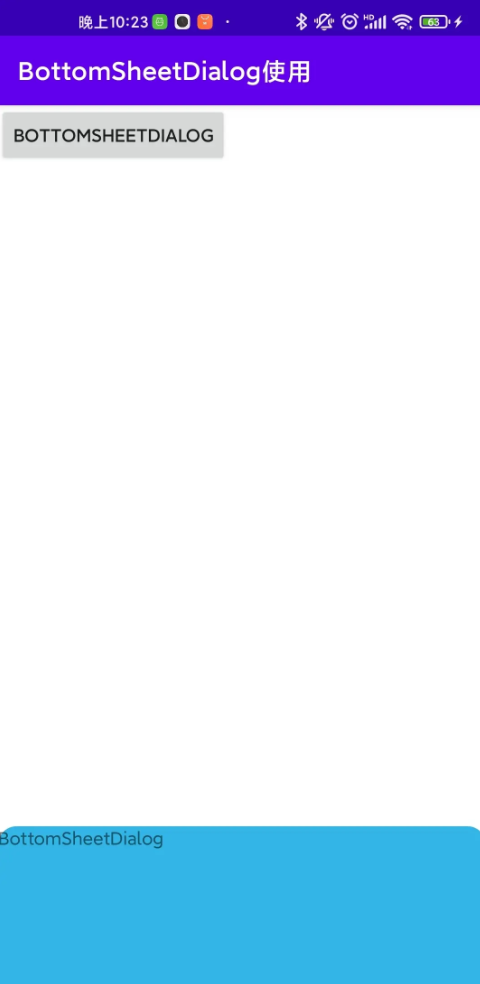
еўһеҠ android:backgroundDimEnabledеұһжҖ§дёәfalseе®һзҺ°ж— иғҢжҷҜйҳҙеҪұйҒ®зҪ©ж•ҲжһңгҖӮ
<style name="bottom_sheet_dialog" parent="Theme.Design.Light.BottomSheetDialog">
    <item name="bottomSheetStyle">@style/bottom_sheet_style_wrapper</item>
    <item name="android:backgroundDimEnabled">false</item>
</style>

еёҰйҳҙеҪұ

дёҚеёҰйҳҙеҪұ
жҳҜеҗҰж”ҜжҢҒжӢ–жӢҪе…ій—ӯйҖҡиҝҮи®ҫзҪ®setCancelableж–№жі•е®һзҺ°гҖӮ
жҳҜеҗҰж”ҜжҢҒзӮ№еҮ»и§ҶеӣҫеӨ–йғЁе…ій—ӯеј№зӘ—йҖҡиҝҮsetCanceledOnTouchOutsideж–№жі•е®һзҺ°
bottomSheetDialog.setCancelable(false)
bottomSheetDialog.setCanceledOnTouchOutside(true)
дҪҝз”ЁеҲ—иЎЁеҠҹиғҪд№ҹжҳҜеҸҜд»ҘзӣҙжҺҘе®һзҺ°пјҢж·»еҠ ListViewеҚіеҸҜпјҢеҲ—иЎЁй«ҳеәҰеҸҜи®ҫзҪ®ViewGroup.LayoutParamsе®һзҺ°пјҲй»ҳи®Өжғ…еҶөдёӢиӢҘеҲ—иЎЁж•°жҚ®иҫғеӨҡдјҡж’‘ж»Ўж•ҙдёӘеұҸ幕пјүгҖӮ
Button(this).run {
    it.addView(this)
    text = "BottomSheetListDialog"
    setOnClickListener {
        var listView = ListView(this@UIBottomSheetAC)
        listView.adapter =
            ArrayAdapter<String>(
                this@UIBottomSheetAC,
                android.R.layout.simple_list_item_1,
                values
            )
        var coordinatorLayout = CoordinatorLayout(this@UIBottomSheetAC)
        val params = ViewGroup.LayoutParams(
            resources.displayMetrics.widthPixels,
            resources.displayMetrics.heightPixels
        )
        coordinatorLayout.addView(listView)
        val bottomSheetDialog =
            BottomSheetDialog(context, R.style.bottom_sheet_dialog)
        bottomSheetDialog.setContentView(coordinatorLayout,params)
        bottomSheetDialog.show()
    }
}дҪҶдҪҝз”ЁBottomSheetBehaviorиҰҒжұӮж №еёғеұҖеҝ…йЎ»жҳҜCoordinatorLayoutеҗҰеҲҷдјҡжҠҘй”ҷгҖӮ

 val bottomSheetBehavior = BottomSheetBehavior.from(coordinatorLayout)
        bottomSheetBehavior.peekHeight = resources.displayMetrics.heightPixels * 3 / 4
        bottomSheetBehavior.addBottomSheetCallback(object :
            BottomSheetBehavior.BottomSheetCallback() {
            override fun onSlide(bottomSheet: View, slideOffset: Float) {

            }

            override fun onStateChanged(bottomSheet: View, newState: Int) {
                if (newState == BottomSheetBehavior.STATE_HIDDEN) {
                    bottomSheetDialog.dismiss()
                }
            }
})д»ҘдёҠе°ұжҳҜе…ідәҺвҖңAndroidзҡ„BottomSheetDialog组件еҰӮдҪ•дҪҝз”ЁвҖқиҝҷзҜҮж–Үз« зҡ„еҶ…е®№пјҢзӣёдҝЎеӨ§е®¶йғҪжңүдәҶдёҖе®ҡзҡ„дәҶи§ЈпјҢеёҢжңӣе°Ҹзј–еҲҶдә«зҡ„еҶ…е®№еҜ№еӨ§е®¶жңүеё®еҠ©пјҢиӢҘжғідәҶи§ЈжӣҙеӨҡзӣёе…ізҡ„зҹҘиҜҶеҶ…е®№пјҢиҜ·е…іжіЁдәҝйҖҹдә‘иЎҢдёҡиө„и®Ҝйў‘йҒ“гҖӮ
е…ҚиҙЈеЈ°жҳҺпјҡжң¬з«ҷеҸ‘еёғзҡ„еҶ…е®№пјҲеӣҫзүҮгҖҒи§Ҷйў‘е’Ңж–Үеӯ—пјүд»ҘеҺҹеҲӣгҖҒиҪ¬иҪҪе’ҢеҲҶдә«дёәдё»пјҢж–Үз« и§ӮзӮ№дёҚд»ЈиЎЁжң¬зҪ‘з«ҷз«ӢеңәпјҢеҰӮжһңж¶үеҸҠдҫөжқғиҜ·иҒ”зі»з«ҷй•ҝйӮ®з®ұпјҡis@yisu.comиҝӣиЎҢдёҫжҠҘпјҢ并жҸҗдҫӣзӣёе…іиҜҒжҚ®пјҢдёҖз»ҸжҹҘе®һпјҢе°Ҷз«ӢеҲ»еҲ йҷӨж¶үе«ҢдҫөжқғеҶ…е®№гҖӮ