本文小编为大家详细介绍“iOS开发之UIMenuController如何使用”,内容详细,步骤清晰,细节处理妥当,希望这篇“iOS开发之UIMenuController如何使用”文章能帮助大家解决疑惑,下面跟着小编的思路慢慢深入,一起来学习新知识吧。
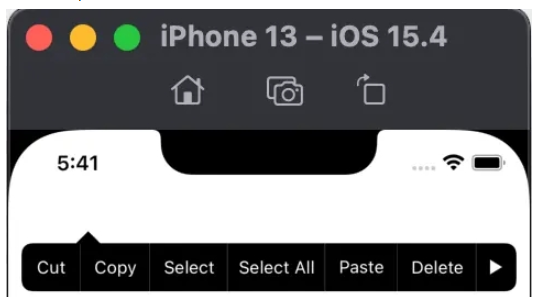
UIMenuController 是一个菜单编辑界面,在很多地方都能用到,通常用于剪切、复制、粘贴、选择、全选和删除命令等,也可以自定义想要的操作,它长这样:

open class UIMenuController : NSObject {
    open class var shared: UIMenuController { get }
    open var isMenuVisible: Bool // default is NO
    @available(iOS, introduced: 3.0, deprecated: 13.0, message: "Use showMenuFromView:rect: or hideMenuFromView: instead.")
    open func setMenuVisible(_ menuVisible: Bool, animated: Bool)
    @available(iOS, introduced: 3.0, deprecated: 13.0, message: "Use showMenuFromView:rect: instead.")
    open func setTargetRect(_ targetRect: CGRect, in targetView: UIView)
    @available(iOS 13.0, *)
    open func showMenu(from targetView: UIView, rect targetRect: CGRect)
    @available(iOS 13.0, *)
    open func hideMenu(from targetView: UIView)
    @available(iOS 13.0, *)
    open func hideMenu()
    @available(iOS 3.2, *)
    open var arrowDirection: UIMenuController.ArrowDirection // default is UIMenuControllerArrowDefault
    @available(iOS 3.2, *)
    open var menuItems: [UIMenuItem]? // default is nil. these are in addition to the standard items
    open func update()
    open var menuFrame: CGRect { get }
}
open class UIMenuItem : NSObject {
    public init(title: String, action: Selector)
    open var title: String
    open var action: Selector
}
从接口中可以看出 UIMenuController 应该使用它的单例对象,具体应该怎么使用它呢?我们先来看一下 API 文档对 UIMenuController 的说明:
The singleton UIMenuController instance is referred to as the editing menu. When you make this menu visible, UIMenuController positions it relative to a target rectangle on the screen; this rectangle usually defines a selection. The menu appears above the target rectangle or, if there is not enough space for it, below it. The menu’s pointer is placed at the center of the top or bottom of the target rectangle, as appropriate. Be sure to set the tracking rectangle before you make the menu visible. You are also responsible for detecting, tracking, and displaying selections.
The UIResponderStandardEditActions informal protocol declares methods that are invoked when the user taps a menu command. The canPerformAction(_:withSender:) method of UIResponder is also related to the editing menu. A responder implements this method to enable and disable commands of the editing menu just before the menu is displayed. You can force this updating of menu commands’ enabled state by calling the update() method.
You can also provide your own menu items via the menuItems property. When you modify the menu items, you can use the update() method to force the menu to update its display.
翻译如下:
UIMenuController 单例称为编辑菜单。当你使这个菜单可见时,UIMenuController 将它相对于屏幕上的目标矩形定位;这个矩形通常定义一个选择。菜单显示在目标矩形上方,如果没有足够的空间,则显示在其下方。菜单指针放置在目标矩形顶部或底部的中心,视情况而定。确保在使菜单可见之前设置跟踪矩形。您还负责检测、跟踪和显示选择。
UIResponderStandardEditActions 协议声明了在用户点击菜单命令时调用的方法。 UIResponder 的 canPerformAction(_:withSender:) 方法也和编辑菜单有关。响应者实现此方法以在菜单显示之前启用和禁用编辑菜单的命令。您可以通过调用 update() 方法强制更新菜单命令的启用状态。
您还可以通过 menuItems 属性提供您自己的菜单项。修改菜单项时,可以使用 update() 方法强制菜单更新其显示。
根据 API 说明可知
UIMenuController 显示位置可以通过设置一个矩形来定位
要想显示 UIMenuController,需要成为响应者
如果没有设置 menuItems 时有自己默认的菜单,也可以通过 menuItems 添加自己的菜单
首先,API 说的很清楚,UIMenuController 是单例,直接使用 UIMenuController.shared 即可,然后调用 open func showMenu(from targetView: UIView, rect targetRect: CGRect) 方法来显示,
override func touchesBegan(_ touches: Set<UITouch>, with event: UIEvent?) {
    let menu = UIMenuController.shared
    menu.showMenu(from: view, rect: CGRect(x: 50, y: 50, width: 20, height: 20))
}
运行代码发现并没有什么反应,回看 API,还需要设置第一响应者
override var canBecomeFirstResponder: Bool {
    true
}
// 上文提到的其他代码忽略
运行代码还是没反应,回看 API,UIResponder 的 canPerformAction(_:withSender:) 方法也和编辑菜单有关。响应者实现此方法以在菜单显示之前启用和禁用编辑菜单的命令,我们实现一下试试
override func canPerformAction(_ action: Selector, withSender sender: Any?) -> Bool {
    true
}
// 上文提到的其他代码忽略
当当当当,成功了!!!

接下来,我鼠标轻轻的点在了菜单上 Cut,结果奔溃了:
*** Terminating app due to uncaught exception 'NSInvalidArgumentException', reason: '-[SwiftTestiOS.ViewController cut:]: unrecognized selector sent to instance 0x7fec7300d480'
根据提示,我们实现 cut 方法。
override func cut(_ sender: Any?) {
    print("cut cut cut !!!")
}
// 上文提到的其他代码忽略
nice,没有奔溃,成功打印 cut cut cut !!!
其他的菜单也可以添加对应的实现,哈哈哈...搞定!!!
问题:我不需要这么多菜单,咋整?
之前没有因为没有实现 canPerformAction(_:withSender:) 方法时,UIMenuController 无法出现,实现了之后就出现了一大堆菜单,此方法有一个action参数,是不是此方法决定了哪些action可以显示呢,试试看:
override func canPerformAction(_ action: Selector, withSender sender: Any?) -> Bool {
    let actions = [#selector(cut(_:)), #selector(copy(_:)),
                   #selector(paste(_:)), #selector(delete(_:))]
    return actions.contains(action)
}
// 上文提到的其他代码忽略
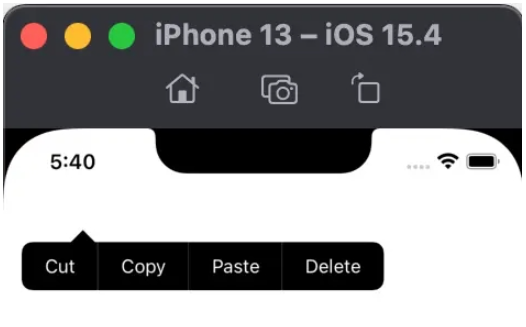
也就是说,canPerformAction(_:withSender:) 决定设置的哪些菜单可以生效。敲黑板,这点很重要!!!
根据 API 说明,UIResponderStandardEditActions 协议定义了 UIMenuController 的一些系统默认方法,内容如下
public protocol UIResponderStandardEditActions : NSObjectProtocol {
    @available(iOS 3.0, *)
    optional func cut(_ sender: Any?)
    @available(iOS 3.0, *)
    optional func copy(_ sender: Any?)
    @available(iOS 3.0, *)
    optional func paste(_ sender: Any?)
    @available(iOS 3.0, *)
    optional func select(_ sender: Any?)
    @available(iOS 3.0, *)
    optional func selectAll(_ sender: Any?)
    @available(iOS 3.2, *)
    optional func delete(_ sender: Any?)
    //... 其他方法略
}
而且上文实现 cut 方法的时候有override,也就是 UIViewController 有这个方法,根据线索可以查到对应关系
UIViewController
UIResponder
UIResponderStandardEditActions
如果系统提供的菜单不满足我们自己的需求,可以通过 menuItems 添加自定义菜单
override func touchesBegan(_ touches: Set<UITouch>, with event: UIEvent?) {
    let menu = UIMenuController.shared
    let item1 = UIMenuItem(title: "hello", action: #selector(helloAction))
    let item2 = UIMenuItem(title: "world", action: #selector(worldAction))
    menu.menuItems = [item1, item2]
    menu.showMenu(from: view, rect: CGRect(x: 50, y: 50, width: 20, height: 20))
}
@objc func helloAction() {
    print(#function)
}
@objc func worldAction() {
    print(#function)
}
override func canPerformAction(_ action: Selector, withSender sender: Any?) -> Bool {
    let actions = [#selector(cut(_:)), #selector(copy(_:)),
                   #selector(paste(_:)), #selector(delete(_:)),
                   #selector(helloAction), #selector(worldAction)]
    return actions.contains(action)
}
// 上文提到的其他代码忽略
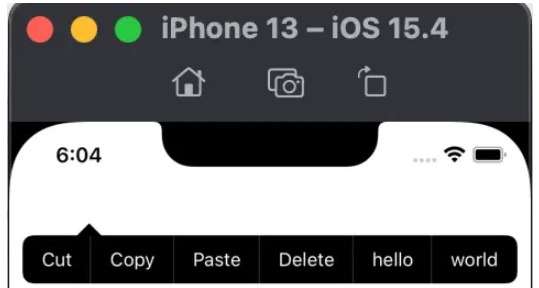
添加之后效果如下:

UIMenuController 有个arrowDirection 属性,用于设置箭头的位置,它是ArrowDirection 类型的枚举
extension UIMenuController {
    public enum ArrowDirection : Int, @unchecked Sendable {
        case `default` = 0
        case up = 1
        case down = 2
        case left = 3
        case right = 4
    }
}
默认的时候,会根据需要调整箭头方向,而箭头的位置根据 API 描述(菜单指针放置在目标矩形顶部或底部的中心,视情况而定)是在设置的矩形区域的上下边的中间位置。
注意:如果强制设定了一个方向的话,而在该方向没有足够的空间,则不会显示菜单
在显示 UIMenuController 的时候有一个方法 open func showMenu(from targetView: UIView, rect targetRect: CGRect),此方法主要是用来设置显示位置的,targetView 指明位置参照对象,rect 表示参照 targetView 的位置,如:
let position = label.bounds
menu.showMenu(from: label, rect: position)
上述代码可以理解成:菜单显示在相对于 label 的 position 处
读到这里,这篇“iOS开发之UIMenuController如何使用”文章已经介绍完毕,想要掌握这篇文章的知识点还需要大家自己动手实践使用过才能领会,如果想了解更多相关内容的文章,欢迎关注亿速云行业资讯频道。
免责声明:本站发布的内容(图片、视频和文字)以原创、转载和分享为主,文章观点不代表本网站立场,如果涉及侵权请联系站长邮箱:is@yisu.com进行举报,并提供相关证据,一经查实,将立刻删除涉嫌侵权内容。