这篇文章主要介绍“Vue3怎么编写气泡对话框组件”,在日常操作中,相信很多人在Vue3怎么编写气泡对话框组件问题上存在疑惑,小编查阅了各式资料,整理出简单好用的操作方法,希望对大家解答”Vue3怎么编写气泡对话框组件”的疑惑有所帮助!接下来,请跟着小编一起来学习吧!
Vue3气泡对话框组件,使用 TypeScript枚举限定类型,样式用到了 TailwindCSS
组件代码
<template>
  <div class="mt-5 mb-5 p-2 bg-white border-solid border-gray-300 border-l border-t border-r border-b border-light-blue-500 rounded-md relative">
    <div :class="{
      'w-2.5 h-2.5 border-gray-300 bg-white transform absolute': true,
      'border-l border-t rotate-45 -top-1.5 left-4': placement === 'top-start',
      'border-l border-t rotate-45 -top-1.5 inset-x-2/4 -translate-x-1.5': placement === 'top',
      'border-l border-t rotate-45 -top-1.5 right-4': placement === 'top-end',
      'border-l border-t -rotate-45 top-4 -left-1.5': placement === 'left-start',
      'border-l border-t -rotate-45 inset-y-2/4 -left-1.5 -translate-y-1.5': placement === 'left',
      'border-l border-t -rotate-45 bottom-4 -left-1.5': placement === 'left-end',
      'border-r border-b rotate-45 -bottom-1.5 left-4': placement === 'bottom-start',
      'border-r border-b rotate-45 -bottom-1.5 inset-x-2/4 -translate-x-1.5': placement === 'bottom',
      'border-r border-b rotate-45 -bottom-1.5 right-4': placement === 'bottom-end',
      'border-r border-b -rotate-45 top-4 -right-1.5': placement === 'right-start',
      'border-r border-b -rotate-45 inset-y-2/4 -right-1.5 -translate-y-1.5': placement === 'right',
      'border-r border-b -rotate-45 bottom-4 -right-1.5': placement === 'right-end',
    }"></div>
    <slot></slot>
  </div>
</template>

<script lang="ts">
import {
  defineComponent,
  PropType
} from 'vue';

enum EnumPlacement {
  TopStart = "top-start",
  Top = "top",
  TopEnd = "top-end",
  LeftStart = "left-start",
  Left = "left",
  LeftEnd = "left-end",
  BottomStart = "bottom-start",
  Bottom = "bottom",
  BottomEnd = "bottom-end",
  RightStart = "right-start",
  Right = "right",
  RightEnd = "right-end"
}

export default defineComponent({
  name: 'popover-warpper',
  props: {
    placement:{
      type: String as PropType<EnumPlacement>,
      default: 'top-start'
    }
  }
});
</script>
所有样式均使用 TailwindCSS。
枚举类型 EnumPlacement 定义了气泡对话框的箭头位置。
组件接收参数 placement,并用 PropType 结合枚举类型限制该参数的值。
参数 placement 可以不传,默认值是 top-start,即箭头指向上方,位置在左端。
使用组件
<template>
  <PopoverWarpper>
    <div class="text-black text-lg">标题</div>
    <div class="mt-2">内容内容内容内容</div>
    <div class="mt-2">内容内容内容内容</div>
  </PopoverWarpper>
</template>
<script>
import { defineComponent } from 'vue';
import PopoverWarpper from '@/components/PopoverWarpper.vue';
export default defineComponent({
  components:{ PopoverWarpper }
})
</script>
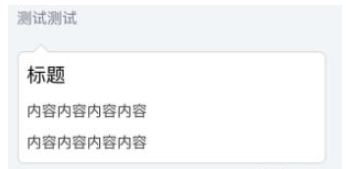
展示效果

给组件传参 <PopoverWarpper placement=“right-end”> 可以控制箭头位置。

到此,关于“Vue3怎么编写气泡对话框组件”的学习就结束了,希望能够解决大家的疑惑。理论与实践的搭配能更好的帮助大家学习,快去试试吧!若想继续学习更多相关知识,请继续关注亿速云网站,小编会继续努力为大家带来更多实用的文章!
免责声明:本站发布的内容(图片、视频和文字)以原创、转载和分享为主,文章观点不代表本网站立场,如果涉及侵权请联系站长邮箱:is@yisu.com进行举报,并提供相关证据,一经查实,将立刻删除涉嫌侵权内容。