这篇文章主要介绍了React怎么更新流程驱动的相关知识,内容详细易懂,操作简单快捷,具有一定借鉴价值,相信大家阅读完这篇React怎么更新流程驱动文章都会有所收获,下面我们一起来看看吧。
首先我们书写的函数式组件、类组件、jsx等代码全部会被babel-react编译成react.createElement()的调用或者jsx()调用(取决于react版本)。
举个栗子:
<div>
    <ul>
    <li key='1'>1</li>
    <li key='2'>2</li>
    <li key='3'>3</li>
    </ul>
</div>转换成
React.createElement(
	'div',
	null,
	React.createElement(
		'ul',
		null,
		React.createElement(
                'li',
                {
                  key: '1'
                },
                '1'
		),
		React.createElement(
                'li',
                {
                 key: '2'
                },
                '2'
		),
		React.createElement(
                'li',
                {
                        key: '3'
                },
                '3'
		)
	)
);接下来我们需要知道React.createElement内部到底做了什么?源码位置
内部的实现其实很简单,就是处理传入的type/config/children等参数,再返回一个新的对象。
从config中分离出特殊属性 key 和 ref
将普通属性以及children添加到props中
最后返回一个对象,这个对象我们称之为ReactElement元素
ReactElement数据结构如下:
  const element = {
    $$typeof: REACT_ELEMENT_TYPE,
    type,
    key,
    ref,
    props,
};'$$typeof':ReactElement的标识
'type':可能是'div' 'span'这样的字符串标签,也可以是个函数(函数式组件)、类(类组件)
'key/ref/props': ReactElement的属性
所以上述栗子的调用结果是下面的树形结构:
{
    type: 'div',
    key: null,
    ref: null,
    props: {
        children: {
                    type: 'ul',
                    key: null,
                    ref: null,
                    props: {
                        children: [
                                    {
                                        type: 'li',
                                        key: null,
                                        ref: null,
                                        props: {
                                            children: '1'
                                        }
                                    },
                                    {
                                        type: 'li',
                                        key: null,
                                        ref: null,
                                        props: {
                                                children: '2'
                                        }
                                    },
                                    {
                                        type: 'li',
                                        key: null,
                                        ref: null,
                                        props: {
                                               children: '3'
                                        }
                                    }
                                ]
                    }
        }
    }
}到这里就已经完成第一个和第二个小目标。
不过在这里要多提一下,上述的树形结构,在react15版本及以前就可以直接拿来diff以及生成页面,不过正如第一篇文章所说,这样会遇到很大的问题(任务过重js执行时间久,影响渲染)。
所以16之后做的事情,就是依据上述的树形结构进行重构,重构出来的fiber数据结构用于满足异步渲染之需。
上篇文章中已经介绍了fiber节点的数据结构,这里我们再介绍下fiberRoot以及rootFiber。 fiberRoot源码位置
FiberRoot数据结构:
class FiberRootNode {
  current: FiberNode;
  container: any | null;
  finishedWork: FiberNode | null;
  pendingLanes: Lanes;
  finishedLane: Lane;
  pendingPassiveEffects: PendingPassiveEffects;
  constructor(container: any | null, hostRootFiber: FiberNode) {
    this.current = hostRootFiber;
    this.container = container;
    hostRootFiber.stateNode = this;
    this.finishedWork = null;
    this.pendingLanes = NoLanes;
    this.finishedLane = NoLane;
    this.pendingPassiveEffects = {
      unmount: [],
      update: []
    };
  }
}其中很多属性我们暂时无视,后续涉及到的时候会详细讲解,这里重点关注节点的关系。 rootFiber的数据结构和普通的FiberNode节点区别不大,这里不再赘述~
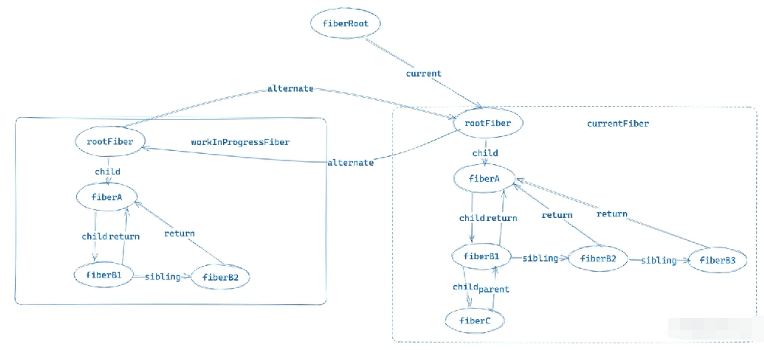
整个React应用有且只有一个fiberRoot
整个应用中同时存在两棵rootFiber树
当前页面对应的称为currentFiber,另外一颗在内存中构建的称为workInProgressFiber,它们通过alternate属性连接。
fiberRoot中的current指针指向了currentFiber树。
当整个应用更新完成,fiberRoot会修改current指针指向内存中构建好的workInProgressFiber。
图形描述如下:
在mount阶段的时候,应用是需要一个执行函数的,而这个函数就是(源码位置)
react.createRoot(root).render(<App/>)root: 模版文件中的id为root的div
<App>: 整个应用的根组件
源码简化后的代码如下:
    const createRoot = (container: Container) => {
            const root = createContainer(container);
            return {
                render(element: ReactElementType) {
                        return updateContainer(element, root);
                }
            };
};createRoot会返回一个对象,其中包含了render函数,我们具体看看createContainer做了哪些事情。
const createContainer = (container: Container) => {
    // 创建rootFiber
    const hostRootFiber = new FiberNode(HostRoot, {}, null);
    // 创建fiberRoot
    const root = new FiberRootNode(container, hostRootFiber);
    hostRootFiber.updateQueue = createUpdateQueue();
    return root;
};react.createRoot()在内部会去创建整个应用唯一的fiberRoot和rootFiber,并进行关联。(如上述图形结构)
render内部执行的是updateContainer(),我们查看下内部实现:
const updateContainer = (
	element: ReactElementType,
	root: FiberRootNode
) => {
	// mount时
	const hostRootFiber = root.current;
	// 添加update任务
	const lane = requestUpdateLane();
	const update = createUpdate<ReactElementType | null>(element, lane);
	enqueueUpdate(
		hostRootFiber?.updateQueue as UpdateQueue<ReactElementType | null>,
		update
	);
	scheduleUpdateOnFiber(hostRootFiber, lane);
	return element;
};其中有很多地方我们此时无须关心,但是我们看到内部调用了scheduleUpdateOnFiber, 而这个就是更新流程(schedule(调度)->reconciler(协调)->commit (渲染))的入口。
而这个入口不仅仅在初始化执行函数中render调用会唤起,还有其他的方式:
类组件中setState -> scheduleUpdateOnFiber()
函数组件useState -> scheduleUpdateOnFiber()
关于“React怎么更新流程驱动”这篇文章的内容就介绍到这里,感谢各位的阅读!相信大家对“React怎么更新流程驱动”知识都有一定的了解,大家如果还想学习更多知识,欢迎关注亿速云行业资讯频道。
亿速云「云服务器」,即开即用、新一代英特尔至强铂金CPU、三副本存储NVMe SSD云盘,价格低至29元/月。点击查看>>
免责声明:本站发布的内容(图片、视频和文字)以原创、转载和分享为主,文章观点不代表本网站立场,如果涉及侵权请联系站长邮箱:is@yisu.com进行举报,并提供相关证据,一经查实,将立刻删除涉嫌侵权内容。
原文链接:https://juejin.cn/post/7221497108007452732


 计算
计算 安全
安全 数据库
数据库 网络和加速
网络和加速 企业服务
企业服务


