这篇文章主要讲解了“Vue中使用和移除总线Bus要注意什么”,文中的讲解内容简单清晰,易于学习与理解,下面请大家跟着小编的思路慢慢深入,一起来研究和学习“Vue中使用和移除总线Bus要注意什么”吧!
在main.js中对bus进行初始化, Bus是一个不具备 DOM 的组件,它具有的仅仅只是它实例方法
Vue.prototype.$bus = new Vue({
  methods: {
    emit(event, ...args) {
      this.$emit(event, ...args);
    },
    on(event, callback) {
      this.$on(event, callback);
    },
    off(event, callback) {
      this.$off(event, callback);
    }
  }
});主要是用on代替$on,也可以使用简化的初始化,如下,组件中也带$即可
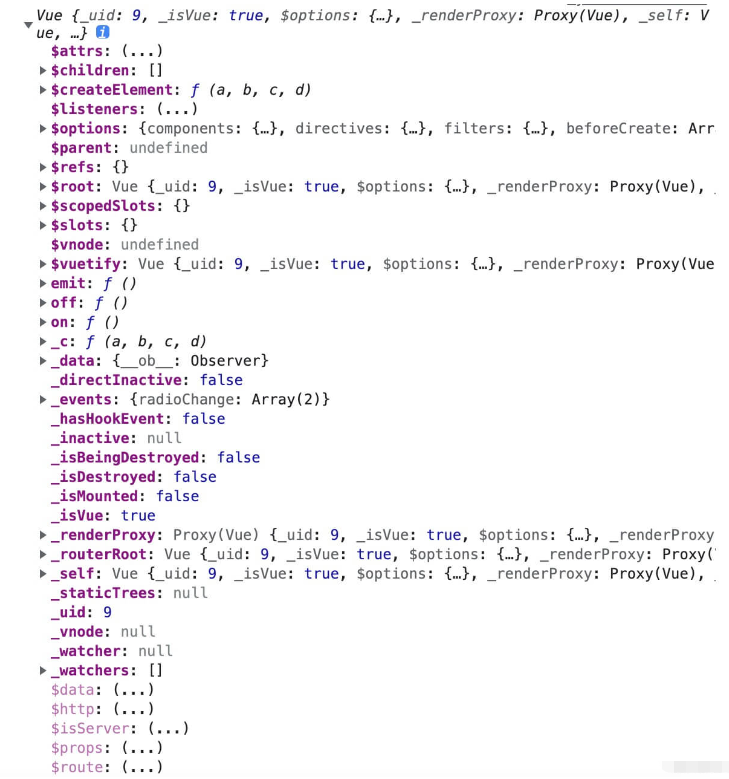
Vue.prototype.$bus = new Vue();组件中可以使用this.$bus可以查看bus的实例
console.log(this.$bus);
两个参数,前一个是事件标识,后一个是发送的内容
this.$bus.emit("radioChange", "test");方式一(推荐)
this.$bus.on('radioChange', this.Aaa);
Aaa(ii){
  console.log("radioChange", ii)
}方式二(不推荐)
this.$bus.on('radioChange', res => {
  console.log("radioChange", res)
})如果不移除,每次进入组件都会新建一个bus监听,导致不断重复
在组件的beforeDestroy阶段执行
方式一:只移除本组件的bus监听
beforeDestroy() {
  this.$bus.off("radioChange", this.Aaa);
},尽管组件 A 和组件 B 的事件处理器名称可能相同,但它们是不同的函数实例。这是因为在每个组件中,这些方法都是组件实例的成员。因此,当一个组件在销毁时调用 off,它不会影响其他组件的事件监听器。
实际上,每个组件都有自己独立的作用域,this.Aaa() 在组件 A 和组件 B 的上下文中都是指向组件自己的方法。因此,在组件销毁时使用 this.$bus.off('radioChange', this.Aaa) 只会移除当前组件的监听器,不会影响其他组件的监听器。
如果接收事件使用方式二,是无法使用此方法进行移除的
方式二
会移除所有事件标识为radioChange的bus事件监听
this.$bus.off("radioChange");如果要使用这种方式,需要为每个组件都制定名称不同的事件标识
要避免这种情况,需要为每个组件提供唯一的事件处理函数(发送和接收均使用方式一)
方式三
移除全部监听,慎用
this.$bus.off();发送组件
<template>
  <div class="page-all">
    <el-button @click="sendBus">sendBus</el-button>
    <el-button @click="showA = !showA">Turn showA</el-button>
    <el-row >
      <el-col :span="12" v-if="showA">
        <Ar></Ar>
      </el-col>
      <el-col :span="12">
        <Br></Br>
      </el-col>
    </el-row>
  </div>
</template>
<script>
export default {
  data() {
    return {
      showA: true,
    }
  },
  methods: {
    sendBus(){
      // console.log(this.$bus);
      console.log("send");
      this.$bus.emit("radioChange", "test");
    },
  },
  mounted() {},
}
</script>
<style scoped></style>
<style></style>组件A
<template>
  ...
</template>
<script>
export default {
  data() {
    return {}
  },
  components: {},
  methods: {
    Aaa(ii){
      console.log("radioChange", ii)
    }
  },
  mounted() {
    this.$bus.on('radioChange', this.Aaa);
  },
  beforeDestroy(){
    this.$bus.off("radioChange", this.Aaa);
  },
}
</script>组件B
<template>
  ...
</template>
<script>
export default {
  ...
  methods: {
    Aaa(ii){
      console.log("radioChange", ii)
    }
  },
  mounted() {
    this.$bus.on('radioChange', this.Aaa);
  },
  beforeDestroy() {
    this.$bus.off("radioChange", this.Aaa);
  },
}
</script>
...
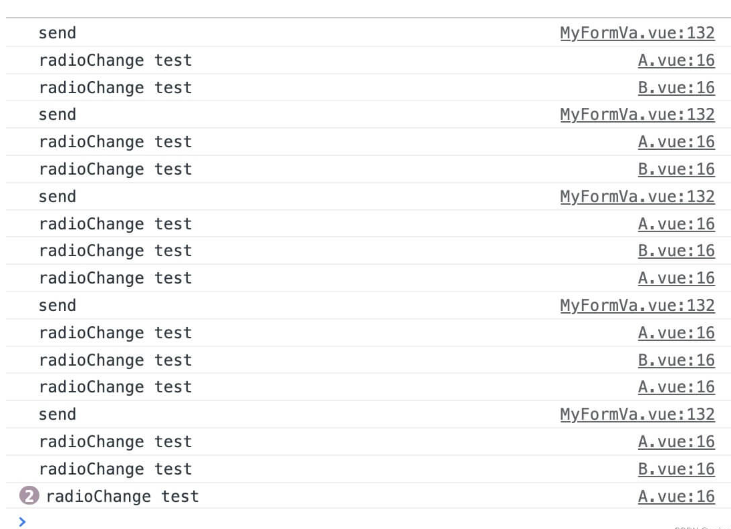
先发送radioChange销毁A组件,发送radioChange,只有B组件能接收生成A组件,发送radioChange,A和B都能收到

如果A组件没有在销毁前移除事件监听,则经过多次组件的销毁和生成之后,会有多个重复的事件监听,可能造成内存泄漏

感谢各位的阅读,以上就是“Vue中使用和移除总线Bus要注意什么”的内容了,经过本文的学习后,相信大家对Vue中使用和移除总线Bus要注意什么这一问题有了更深刻的体会,具体使用情况还需要大家实践验证。这里是亿速云,小编将为大家推送更多相关知识点的文章,欢迎关注!
亿速云「云服务器」,即开即用、新一代英特尔至强铂金CPU、三副本存储NVMe SSD云盘,价格低至29元/月。点击查看>>
免责声明:本站发布的内容(图片、视频和文字)以原创、转载和分享为主,文章观点不代表本网站立场,如果涉及侵权请联系站长邮箱:is@yisu.com进行举报,并提供相关证据,一经查实,将立刻删除涉嫌侵权内容。
原文链接:https://blog.csdn.net/qq_23858785/article/details/130394438