如何进行kafka connector 监听sqlserver的尝试,针对这个问题,这篇文章详细介绍了相对应的分析和解答,希望可以帮助更多想解决这个问题的小伙伴找到更简单易行的方法。
之前拿canal监听mysql的binlog并将消息递给kafka topic,但是canal只能监听mysql,假如数据库是sqlserver\orcale\mongodb那么完全无能为力.看了一下网上的资料,主流是用kafka connect来监听sqlserver,下面分享一下我尝试的过程.
现在简单说说,配置过程中涉及到kafka connector,confluent,kafka. kafka connector是kafka自带特性,用来创建和管理数据流管道,是个和其它系统交换数据的简单模型;
confluent是一家围绕kafka做产品的公司,不但提供数据传输的系统,也提供数据传输的工具,内部封装了kafka.在这里我们只用它下载kafka链接sqlserver的connector组件.
我使用的kafka是用CDH cloudera manager安装的,因此kafka的bin目录\配置目录\日志什么的都不在一起,也没有$KAFKA_HOME.虽然这次是测试功能,但是为了以后下载更多connector组件考虑,我还是下载了confluent.建议在官网下载,没翻&墙,网速还可以.
confluent下载地址 https://www.confluent.io/download/ 选择下面的Download Confluent Platform,填写邮件地址和用途下载.
5.2版本下载地址: http://packages.confluent.io/archive/5.2/
在准备下载和解压的位置,开始下载和解压:
wget http://packages.confluent.io/archive/5.2/confluent-5.2.3-2.11.zip
tar -zxvf confluent-5.2.3-2.11.zip  confluent-5.2.3-2.11
解压出来应该是有一下几个文件夹(usr是我自己创建的,用来存储用户的配置文件和语句):

将CONFLUENT_HOME配置进环境变量里:
vi /etc/profile
export CONFLUENT_HOME=/usr/software/confluent-5.2.3
export PATH=$PATH:$JAVA_HOME/bin:$JRE_HOME:$CONFLUENT_HOME/bin路径是我自己的,大家改成自己的文件路径.
下载connector连接器组件,每个组件连接jdbc的配置文件都可能不一样,注意看官方文档.我选择的是 debezium-connector-sqlserver .先进入bin目录,能够看到有confluent-hub 指令,我们靠它来下载组件.

[root@centos04 bin]# confluent-hub install debezium/debezium-connector-sqlserver:latest
The component can be installed in any of the following Confluent Platform installations:
  1. /usr/software/confluent-5.2.3 (based on $CONFLUENT_HOME)
  2. /usr/software/confluent-5.2.3 (where this tool is installed)
Choose one of these to continue the installation (1-2): 2
Do you want to install this into /usr/software/confluent-5.2.3/share/confluent-hub-components? (yN) y^H
Do you want to install this into /usr/software/confluent-5.2.3/share/confluent-hub-components? (yN) y


Component's license:
Apache 2.0
https://github.com/debezium/debezium/blob/master/LICENSE.txt
I agree to the software license agreement (yN) y输入指令后先问你安装组件位置,是$CONFLUENT_HOME目录下还是confluent目录下,再问你组件是否安装在{$confluent}/share/confluent-hub-components这个默认位置,选择n的话可以自己输入文件位置,再问是否同意许可,以及是否更新组件.假如没有特别需求的话,直接选择y就可以了.
其它组件可以在https://www.confluent.io/hub/里面挑选,还有官方文档教你如何配置,很重要.光看网上教程怎么做没有理解为什么这么做很容易走弯路,根本不知道哪里做错了.我看了很多篇都是一模一样,用的组件是 Confluent MSSQL Connector .但是这个组件已经没有了,换其它组件的话配置需要更改.我就在这里花费了很长时间.注意看官方文档.
Debezium SQL Server的说明文档地址:https://docs.confluent.io/current/connect/debezium-connect-sqlserver/index.html#sqlserver-source-connector
下载完成后就可以在{$confluent}/share/confluent-hub-components目录下面看见下载好的组件了.接下来配置kafka.
进入kafka的配置目录,kafka单独安装的话位置是$KAFKA_HOME/config,CDH版本的配置文件在/opt/cloudera/parcels/CDH-6.3.0-1.cdh7.3.0.p0.1279813/etc/kafka/conf.dist下面.不知道安装位置的话直接搜文件名connect-distributed.properties.假如这都没有那说明你的kafka可能版本太低,没有这个特性.
修改其中的connect-distributed.properties文件.
##
# Licensed to the Apache Software Foundation (ASF) under one or more
# contributor license agreements.  See the NOTICE file distributed with
# this work for additional information regarding copyright ownership.
# The ASF licenses this file to You under the Apache License, Version 2.0
# (the "License"); you may not use this file except in compliance with
# the License.  You may obtain a copy of the License at
#
#    http://www.apache.org/licenses/LICENSE-2.0
#
# Unless required by applicable law or agreed to in writing, software
# distributed under the License is distributed on an "AS IS" BASIS,
# WITHOUT WARRANTIES OR CONDITIONS OF ANY KIND, either express or implied.
# See the License for the specific language governing permissions and
# limitations under the License.
##

# This file contains some of the configurations for the Kafka Connect distributed worker. This file is intended
# to be used with the examples, and some settings may differ from those used in a production system, especially
# the `bootstrap.servers` and those specifying replication factors.

# A list of host/port pairs to use for establishing the initial connection to the Kafka cluster.
#kafka集群位置,需要配置
bootstrap.servers=centos04:9092,centos05:9092,centos06:9092

# unique name for the cluster, used in forming the Connect cluster group. Note that this must not conflict with consumer group IDs
#group.id,默认都是connect-cluster,保持一致就行
group.id=connect-cluster

# The converters specify the format of data in Kafka and how to translate it into Connect data. Every Connect user will
# need to configure these based on the format they want their data in when loaded from or stored into Kafka
key.converter=org.apache.kafka.connect.json.JsonConverter
value.converter=org.apache.kafka.connect.json.JsonConverter
# Converter-specific settings can be passed in by prefixing the Converter's setting with the converter we want to apply
# it to
key.converter.schemas.enable=true
value.converter.schemas.enable=true

# Topic to use for storing offsets. This topic should have many partitions and be replicated and compacted.
# Kafka Connect will attempt to create the topic automatically when needed, but you can always manually create
# the topic before starting Kafka Connect if a specific topic configuration is needed.
# Most users will want to use the built-in default replication factor of 3 or in some cases even specify a larger value.
# Since this means there must be at least as many brokers as the maximum replication factor used, we'd like to be able
# to run this example on a single-broker cluster and so here we instead set the replication factor to 1.
offset.storage.topic=connect-offsets
offset.storage.replication.factor=3
offset.storage.partitions=1

# Topic to use for storing connector and task configurations; note that this should be a single partition, highly replicated,
# and compacted topic. Kafka Connect will attempt to create the topic automatically when needed, but you can always manually create
# the topic before starting Kafka Connect if a specific topic configuration is needed.
# Most users will want to use the built-in default replication factor of 3 or in some cases even specify a larger value.
# Since this means there must be at least as many brokers as the maximum replication factor used, we'd like to be able
# to run this example on a single-broker cluster and so here we instead set the replication factor to 1.
config.storage.topic=connect-configs
config.storage.replication.factor=3

# Topic to use for storing statuses. This topic can have multiple partitions and should be replicated and compacted.
# Kafka Connect will attempt to create the topic automatically when needed, but you can always manually create
# the topic before starting Kafka Connect if a specific topic configuration is needed.
# Most users will want to use the built-in default replication factor of 3 or in some cases even specify a larger value.
# Since this means there must be at least as many brokers as the maximum replication factor used, we'd like to be able
# to run this example on a single-broker cluster and so here we instead set the replication factor to 1.
status.storage.topic=connect-status
status.storage.replication.factor=3
#status.storage.partitions=1

offset.storage.file.filename=/var/log/confluent/offset-storage-file

# Flush much faster than normal, which is useful for testing/debugging
offset.flush.interval.ms=10000

# These are provided to inform the user about the presence of the REST host and port configs
# Hostname & Port for the REST API to listen on. If this is set, it will bind to the interface used to listen to requests.
#rest.host.name=
#kafka connector端口号,可以修改
rest.port=8083

# The Hostname & Port that will be given out to other workers to connect to i.e. URLs that are routable from other servers.
#rest.advertised.host.name=
#rest.advertised.port=

# Set to a list of filesystem paths separated by commas (,) to enable class loading isolation for plugins
# (connectors, converters, transformations). The list should consist of top level directories that include
# any combination of:
# a) directories immediately containing jars with plugins and their dependencies
# b) uber-jars with plugins and their dependencies
# c) directories immediately containing the package directory structure of classes of plugins and their dependencies
# Examples:
# plugin.path=/usr/local/share/java,/usr/local/share/kafka/plugins,/opt/connectors,
# Replace the relative path below with an absolute path if you are planning to start Kafka Connect from within a
# directory other than the home directory of Confluent Platform.
#组件位置,把confluent组件下载位置加上去
plugin.path=/usr/software/confluent-5.2.3/share/java/confluent-hub-client,,/usr/software/confluent-5.2.3/share/confluent-hub-client,/usr/software/confluent-5.2.3/share/confluent-hub-components先创建使用connector要用到的特殊topic,避免在启动kafka connector的时候创建失败导致kafka connector启动失败.特殊topic有三个:
kafka-topics --create --zookeeper 192.168.49.104:2181 --topic connect-offsets --replication-factor 3 --partitions 1
kafka-topics --create --zookeeper 192.168.49.104:2181 --topic connect-configs --replication-factor 3 --partitions 1
kafka-topics --create --zookeeper 192.168.49.104:2181 --topic connect-status --replication-factor 3 --partitions 1再进入kafka的bin目录,CDH版本的是/opt/cloudera/parcels/CDH-6.3.0-1.cdh7.3.0.p0.1279813/lib/kafka/bin.
执行connect-distributed.sh指令:
sh connect-distributed.sh /opt/cloudera/parcels/CDH-6.3.0-1.cdh7.3.0.p0.1279813/etc/kafka/conf.dist/connect-distributed.properties说一点,CDH安装的kafka在执行指令的时候会报错找不到日志文件,原因是CDH安装的kafka各个部分都不在一起.直接修改connect-distributed.sh ,把里面的地址写死就好了.
vi connect-distributed.sh

#修改的地方
base_dir=$(dirname $0)

if [ "x$KAFKA_LOG4J_OPTS" = "x" ]; then
    export KAFKA_LOG4J_OPTS="-Dlog4j.configuration=file:/opt/cloudera/parcels/CDH-6.3.0-1.cdh7.3.0.p0.1279813/etc/kafka/conf.dist/connect-log4j.properties"
fi这样执行起来就没有问题了.
以上执行的时候是在前台执行,前台停止退出的话kafka connector也就停止了,这种情况适合调试.在后台运行需要加上 -daemon 参数.
sh connect-distributed.sh -daemon /opt/cloudera/parcels/CDH-6.3.0-1.cdh7.3.0.p0.1279813/etc/kafka/conf.dist/connect-distributed.properties使用Debezium SQL Server来监听的话需要开启sqlserver的CDC功能.CDC功能要先开启库的捕获,再开启表的捕获,才能监听到表的变化.
我使用的是navicat来连接数据库,大家用自己合适的工具来就可以了.
开启库的捕获:
use database;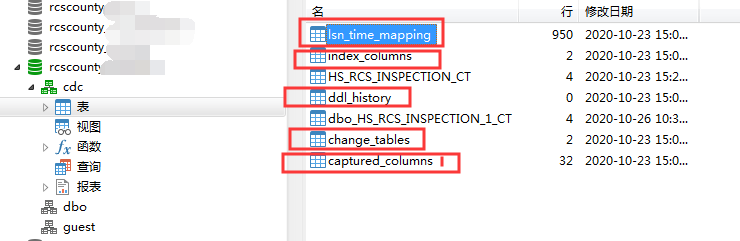
EXEC sys.sp_cdc_enable_db这一步后数据库会多出一个叫cdc的模式,下面有5张表.
查询哪些数据库开启了CDC功能:
select * from sys.databases where is_cdc_enabled = 1启用表的CDC功能:
use database;
EXEC sys.sp_cdc_enable_table
    @source_schema = 'dbo',
    @source_name = 'table_name',
@role_name = null;查看哪些表启用了CDC功能:
use database;
select name, is_tracked_by_cdc from sys.tables where is_tracked_by_cdc = 1以上就开启了对表监听的CDC功能.
当我们启动KafkaConnector后,就能够通过接口的形式来访问和提交信息.
查看kafka connector信息:
[root@centos04 huishui]# curl -s centos04:8083 | jq
{
  "version": "2.2.1-cdh7.3.0",
  "commit": "unknown",
  "kafka_cluster_id": "GwdoyDpbT5uP4k2CN6zbrw"
}8083是上面配置的端口号,同样也可以通过web页面来访问.

查看安装了哪些connector连接器:
[root@centos04 huishui]# curl -s centos04:8083 | jq
{
  "version": "2.2.1-cdh7.3.0",
  "commit": "unknown",
  "kafka_cluster_id": "GwdoyDpbT5uP4k2CN6zbrw"
}
[root@centos04 huishui]# curl -s centos04:8083/connector-plugins | jq
[
  {
    "class": "io.confluent.connect.elasticsearch.ElasticsearchSinkConnector",
    "type": "sink",
    "version": "10.0.2"
  },
  {
    "class": "io.confluent.connect.jdbc.JdbcSinkConnector",
    "type": "sink",
    "version": "5.5.1"
  },
  {
    "class": "io.confluent.connect.jdbc.JdbcSourceConnector",
    "type": "source",
    "version": "5.5.1"
  },
  {
    "class": "io.debezium.connector.sqlserver.SqlServerConnector",
    "type": "source",
    "version": "1.2.2.Final"
  },
  {
    "class": "org.apache.kafka.connect.file.FileStreamSinkConnector",
    "type": "sink",
    "version": "2.2.1-cdh7.3.0"
  },
  {
    "class": "org.apache.kafka.connect.file.FileStreamSourceConnector",
    "type": "source",
    "version": "2.2.1-cdh7.3.0"
  }
]我安装了很多,有io.debezium.connector.sqlserver.SqlServerConnector就说明没问题.
查看当前运行的任务/Task:
[root@centos04 huishui]# curl -s centos04:8083/connectors | jq
[]由于我们还没有提交任何用户配置,所以也就没有任务,返回就是一个空的json.到这里说明kafka connector启动成功,能够正常进行用户配置.接下来才是有关业务的操作,编写一个用户配置的json,通过接口进行提交:
#我选择把用户配置保存下来.由于我的kafka都不在一个文件夹下面,所以我把配置文件都存在confluent/usr中.其实存不存都无所谓的.按照官方文档,我选择存下来.
#当创建好kafka connector之后,会自动创建kafka topic.名称为 ${server.name}.$tableName.debezium不能监听单独一张表,所有表都会有对应的topic.
cd $CONFLUENT
mkdir usr
cd usr
vi register-sqlserver.json
{
 "name": "inventory-connector",
 "config": {
     "connector.class" : "io.debezium.connector.sqlserver.SqlServerConnector",
     "tasks.max" : "1",
     "database.server.name" : "server.name",
     "database.hostname" : "localhost",
     "database.port" : "1433",
     "database.user" : "sa",
     "database.password" : "password!",
     "database.dbname" : "rcscounty_quannan",
     "database.history.kafka.bootstrap.servers" : "centos04:9092",
     "database.history.kafka.topic": "schema-changes.inventory"
     }
 }

curl -i -X POST -H "Accept:application/json" -H "Content-Type:application/json" http://centos04:8083/connectors/ -d @register-sqlserver.json提交失败会有错误信息.看看错误信息是什么然后跟着改就可以了.当提交成功后,再查看当前运行的Task,就会出现有一个connector:
[root@centos04 huishui]# curl -s centos04:8083/connectors | jq
[
  "inventory-connector"
]查看kafka topic:
kafka-topics --list --zookeeper centos04:2181会看见kafka创建好了topic,假如没有对应的topic,那么可能是connector在运行时出现了问题.查看当时创建的connector状态:
[root@centos04 usr]# curl -s centos04:8083/connectors/inventory-connector/status | jq
{
  "name": "inventory-connector",
  "connector": {
    "state": "RUNNING",
    "worker_id": "192.168.49.104:8083"
  },
  "tasks": [
    {
      "id": 0,
      "state": "RUNNING",
      "worker_id": "192.168.49.104:8083"
    }
  ],
  "type": "source"
}我这个是运行良好的状态.运行没有问题,就开始监听开启了CDC功能的表对应的topic,看看是否能够成功监听表的改动:
kafka-console-consumer --bootstrap-server centos04:9092 --topic server.name.tableName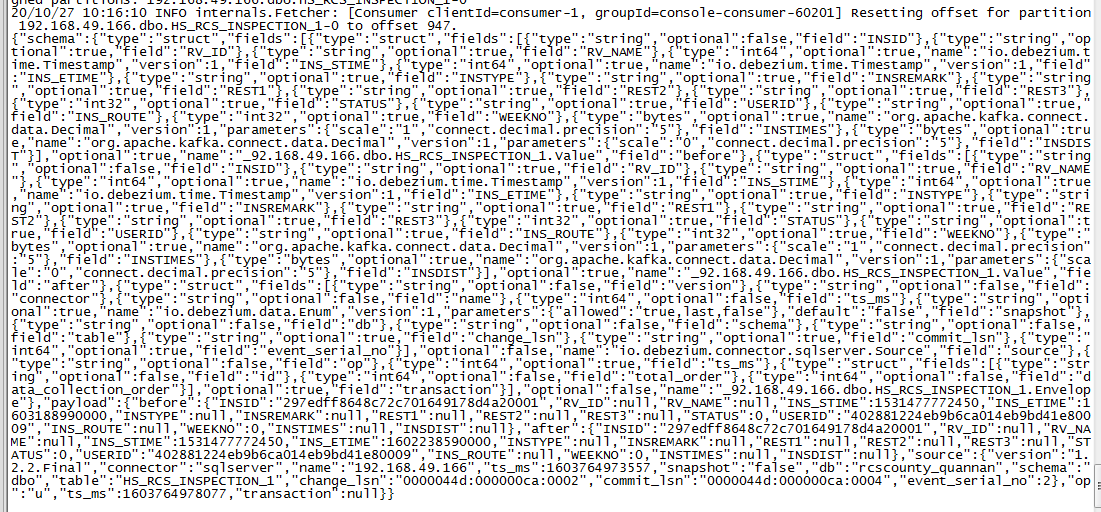
可以看到一次Debezium connector 创建的topic传递的消息非常多,可能需要修改kafka最大消息体.我之前设置的是9M,所以这里没遇到问题.
Debezium 传递的数据库变动,新增\修改\删除\模式更改的json都有所不同,具体详情请看用于SQL Server的Debezium连接器.
总之能看到变动就说明调试成功。
关于如何进行kafka connector 监听sqlserver的尝试问题的解答就分享到这里了,希望以上内容可以对大家有一定的帮助,如果你还有很多疑惑没有解开,可以关注亿速云行业资讯频道了解更多相关知识。
亿速云「云数据库 MySQL」免部署即开即用,比自行安装部署数据库高出1倍以上的性能,双节点冗余防止单节点故障,数据自动定期备份随时恢复。点击查看>>
免责声明:本站发布的内容(图片、视频和文字)以原创、转载和分享为主,文章观点不代表本网站立场,如果涉及侵权请联系站长邮箱:is@yisu.com进行举报,并提供相关证据,一经查实,将立刻删除涉嫌侵权内容。
原文链接:https://my.oschina.net/u/4422377/blog/4690618


 计算
计算 安全
安全 数据库
数据库 网络和加速
网络和加速 企业服务
企业服务


