本篇文章给大家分享的是有关如何分析NumPy广播机制与C语言扩展,小编觉得挺实用的,因此分享给大家学习,希望大家阅读完这篇文章后可以有所收获,话不多说,跟着小编一起来看看吧。
重点介绍广播机制以及针对高维数组的轴操作,最后对 NumPy 的 C 语言扩展作了介绍。
NumPy 运算通常是在两个数组的元素级别上进行的。最简单情况就是,两个具有完全相同 shape 的数组运算,如下面例子所示,

a = np.array([1.0, 2.0, 3.0])b = np.array([2.0, 2.0, 2.0])a * bnumpy 的广播机制是指在执行算术运算时处理不同 shape 的数组的方式。在一定规则下,较小的数组在较大的数组上广播,从而使得数组具有兼容的 shape。
a = np.array([1.0, 2.0, 3.0])b = 2.0a * b在两个数组上执行运算时,NumPy 比较它们的形状。它从 shape 的最右边开始往左一一比较。如果所有位子比较下来都是下面两种情况之一,
那么这两个数组可以运算。如果不满足这些条件,则将引发 ValueError,表明数组的 shape 不兼容。
可见,数组的 shape 好比人的八字,两个人如果八字不合,那是不能在一起滴。
在下面这些示例中,A 和 B 数组中长度为 1 的那些轴(缺失的轴自动补 1),在广播期间会扩展为另一个数组相同位子上更大的长度,
A (3d array): 15 x 3 x 5B (3d array): 15 x 1 x 5Result (3d array): 15 x 3 x 5A (3d array): 15 x 3 x 5B (2d array): 3 x 5Result (3d array): 15 x 3 x 5A (3d array): 15 x 3 x 5B (2d array): 3 x 1Result (3d array): 15 x 3 x 5 A (4d array): 8 x 1 x 6 x 1B (3d array): 7 x 1 x 5Result (4d array): 8 x 7 x 6 x 5下面例子中第一个数组的 shape 为 (3,3),第二个数组的 shape 为 (3,),此时相当于 (1,3),因此先将第二个数组的 shape 改为 (3,3),相当于原来数组沿着 0 轴再复制 2 份。

MatA = np.array([[1, 2, 3],[4,5,6],[7,8,9]])MatB = np.array([1, 2, 3])MatA + MatB为了更好地理解这个机制,下面再给出几个例子。下图共三行,分别对应三种广播方式,请对照后面代码。
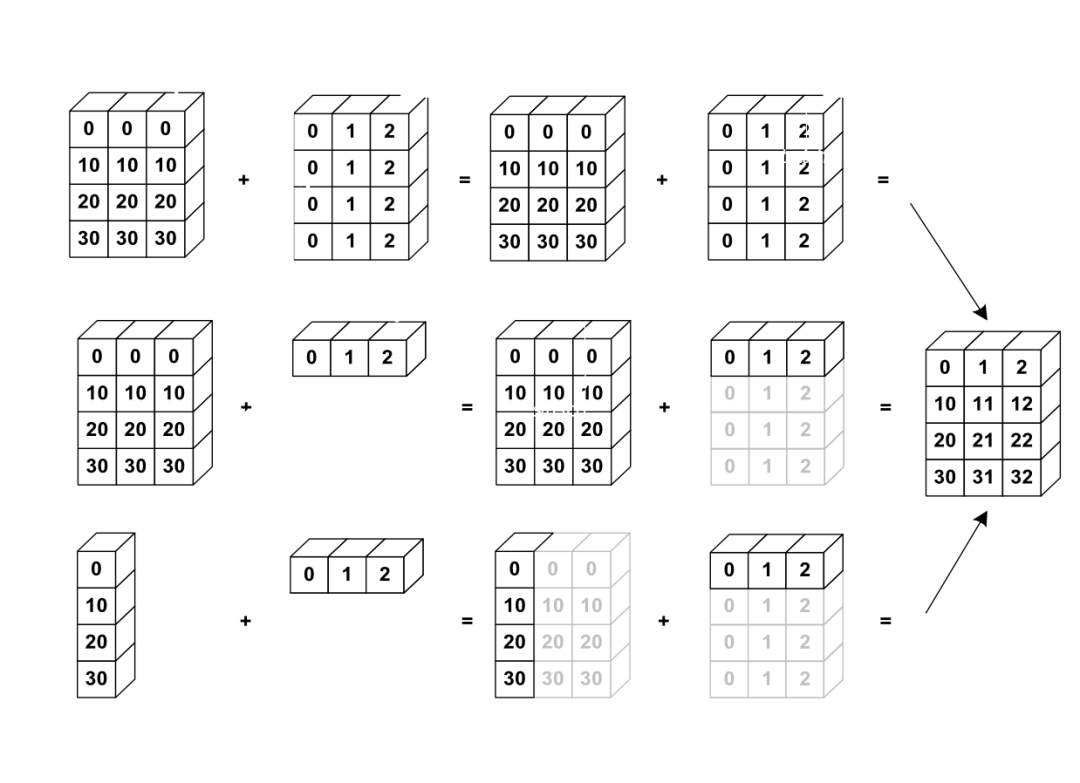
a = np.array([0,10,20,30])b = np.array([0,1,2])A = np.stack((a,a,a), axis=1)B = np.stack((b,b,b,b))# 对应第一种情况A + B# 对应第二种情况A + ba1 = np.array([[0,10,20,30]]).T# 对应第三种情况a1 + b而下面例子不满足广播规则,因而不能执行运算。
A (1d array): 3B (1d array): 4 # 倒数最后的轴长度不兼容A (2d array): 4 x 3B (1d array): 4 # 倒数最后的轴长度不兼容 A (2d array): 2 x 1B (3d array): 8 x 4 x 3 # 倒数第二个轴长度不兼容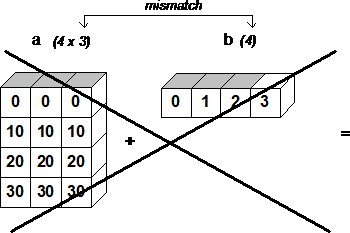
在需要增加轴的位子使用 np.newaxis 或者 None。
x = np.arange(6).reshape(2,3)x, x.shapex1 = x[:,np.newaxis,:]x1, x1.shape# 或者x2 = x[:,None,:]x2, x2.shapenumpy.squeeze( )x = np.arange(6).reshape(2,1,3)y = x.squeeze()xd = x.__array_interface__['data'][0] yd = y.__array_interface__['data'][0] 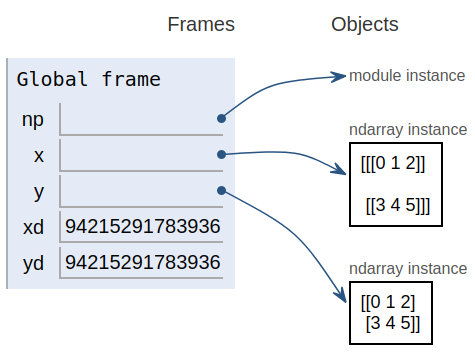
x = np.arange(9).reshape(3, 3)y = np.transpose(x) # 或者 y = x.transpose() 或者 x.Ty = np.transpose(x, [1, 0])x = np.array([3,2,1,0,4,5,6,7,8,9,10,11,12,13,14,15]).reshape(2, 2, 4)y1 = np.transpose(x, [1, 0, 2])请对照下图理解这个三维数组在内存中的样子以及对它的不同视图(view)。关于这点,文末附上的进阶篇有详细解读。
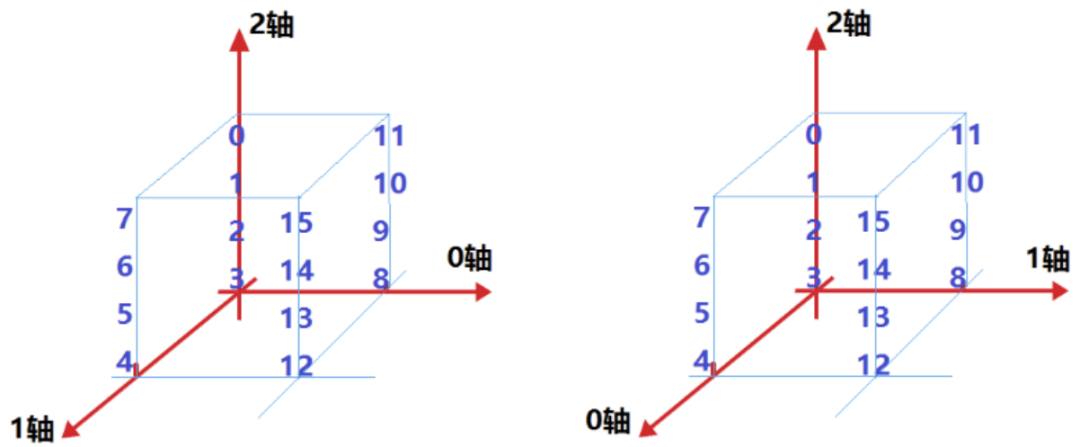
y2 = np.transpose(x, [2, 0, 1])# 代码放一起x = np.array([3,2,1,0,4,5,6,7,8,9,10,11,12,13,14,15]).reshape(2, 2, 4)y0 = np.transpose(x, [1, 2, 0])y1 = np.transpose(x, [1, 0, 2])y2 = np.transpose(x, [2, 0, 1])看看变轴后各个数组的元素具体是怎样的,注意,它们都指向同一份数据。

这是怎么实现对内存中同一份数据使用不同的轴序呢?实际上,数据还是那些数据,更改的是各个轴上的步长 stride。
x.strides, y1.strides, y2.strides
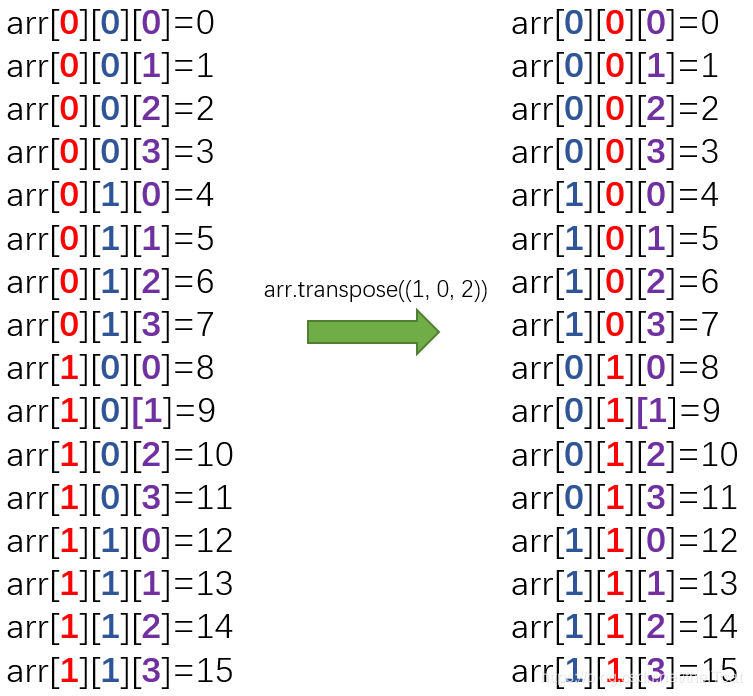
# 数据还是同一份id(x.data), id(y1.data), id(y2.data)再看一个例子,三维数组有三个轴,注意换轴后每个轴的步长。
x = np.arange(16).reshape(2, 2, 4)y = x.transpose((1, 0, 2))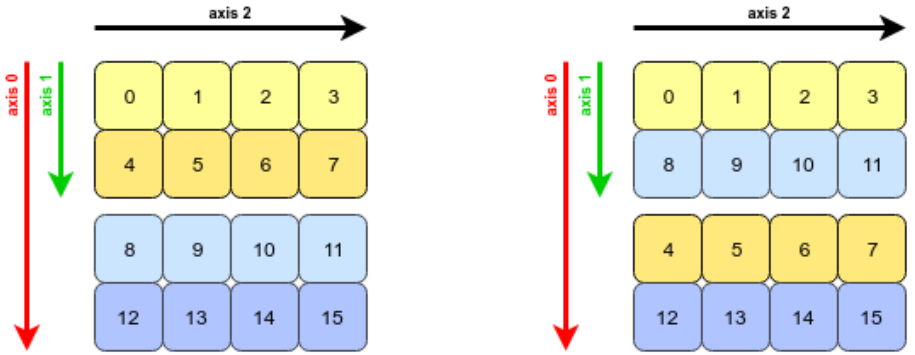
两个数组三个轴对应的步长不同了。

轴更换后,下标也跟着换了,所以换轴前后相同下标指向的数据是不同的。
RGB 图像数据
32×32 的二维数组
看下图,从左到右,分别对应图像数据在内存中的存放,将一维数组转化为三维数组,更换轴。
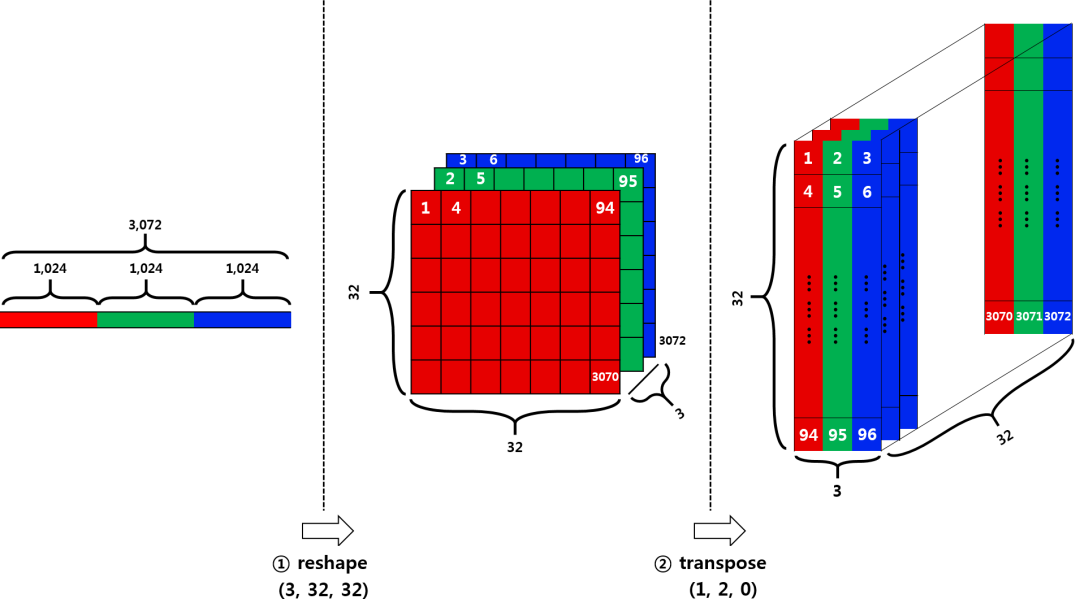
那么,为什么要换轴呢?因为不同程序包对数据的要求不同,我们为了使用它们,需要按照它们对参数的要求来对数据作相应调整。
而有时候,并不需要换轴,只需要更换某个轴上元素的次序即可,例如,
# 变换某个轴上元素的次序z = x[..., (3, 2, 1, 0)]x = np.linspace(0, 2*np.pi, 5)y, z = np.sin(x), np.cos(x)# 将结果直接传给输入 xnp.sin(x, x)import timeimport mathimport numpy as npx = [i for i in range(1000000)]# math.sinstart = time.process_time()for i, t in enumerate(x): x[i] = math.sin(t)math_time = time.process_time()-start # numpy.sinx = np.array(x, dtype=np.float64)start = time.process_time()np.sin(x, x)numpy_time = time.process_time()-start# comparisonmath_time, numpy_time, math_time/numpy_time<op>
插入到沿轴的所有子数组或者元素当中。<op>.reduce (array=, axis=0, dtype=None)np.add.reduce([1,2,3])np.add.reduce([[1,2,3],[4,5,6]], axis=1)np.multiply.reduce([[1,2,3],[4,5,6]], axis=1)这也是 NumPy 内置的通用函数,如果需要这样的计算,建议直接使用,不要自己实现。
np.add.accumulate([1,2,3])np.add.accumulate([[1,2,3],[4,5,6]], axis=1)# 定义一个 python 函数def ufunc_diy(x): c, c0, hc = 0.618, 0.518, 1.0 x = x - int(x) if x >= c: r = 0.0 elif x < c0: r = x / c0 * hc else: r = (c-x) / (c-c0) * hc return rx = np.linspace(0, 2, 1000000)ufunc_diy(x)start = time.process_time()y1 = np.array([ufunc_diy(t) for t in x])time_1 = time.process_time()-starttime_1ufunc = np.frompyfunc(ufunc_diy, 1, 1)start = time.process_time()y2 = ufunc(x)time_2 = time.process_time()-starttime_2本文主要介绍两种扩展方式,
#ufunc.c'''void ufunc_diy(double <em>x, double </em>y, int size) { double xx,r,c=0.618,c0=0.518,hc=1.0; for(int i=0;i<size;i++) { xx = x[i]-(int)(x[i]); if (xx>=c) r=0.0; else if (xx<c0) r=xx/c0*hc; else r=(c-xx)/(c-c0)*hc; y[i]=r; }}'''#ufunc.py""" Example of wrapping a C library function that accepts a C double array as input using the numpy.ctypeslib. """import numpy as npimport numpy.ctypeslib as npctfrom ctypes import c_intarray_1d_double = npct.ndpointer(dtype=np.double, ndim=1, flags='CONTIGUOUS')# load the library, using numpy mechanismslib = npct.load_library("lib_ufunc", ".")# setup the return types and argument typeslib.ufunc_diy.restype = Nonelib.ufunc_diy.argtypes = [array_1d_double, array_1d_double, c_int]def ufunc_diy_func(in_array, out_array): return lib.ufunc_diy(in_array, out_array, len(in_array))# 编译# gcc -shared -fPIC -O2 ufunc.c -ldl -o lib_ufunc.soimport timeimport numpy as npimport ufuncstart = time.process_time() ufunc.ufunc_diy_func(x, x)end = time.process_time()print("ufunc_diy time: ", end-start)# python test_ufunc.py # ufunc_diy time: 0.003 - 0.008# ufunc_diy.hvoid ufunc_diy(double <em> in_array, double </em> out_array, int size);# ufunc_diy.cvoid ufunc_diy(double <em>x, double </em>y, int size) { double xx,r,c=0.618,c0=0.518,hc=1.0; for(int i=0;i<size;i++) { xx = x[i]-(int)(x[i]); if (xx>=c) r=0.0; else if (xx<c0) r=xx/c0*hc; else r=(c-xx)/(c-c0)*hc; y[i]=r; }}# Cython支持 NumPy# 在代码中声明 a = np.array([0,10,20,30])b = np.array([0,1,2])cimport numpy,使用函数。#_ufunc_cython.pyx_""" Example of wrapping a C function that takes C double arrays as input using the Numpy declarations from Cython """# cimport the Cython declarations for numpycimport numpy as np# if you want to use the Numpy-C-API from Cython# (not strictly necessary for this example, but good practice)np.import_array()# cdefine the signature of our c functioncdef extern from "ufunc_diy.h": void ufunc_diy (double <em> in_array, double </em> out_array, int size)# create the wrapper code, with numpy type annotationsdef ufunc_diy_func(np.ndarray[double, ndim=1, mode="c"] in_array not Noa = np.array([0,10,20,30])b = np.array([0,1,2])ne, np.ndarray[double, ndim=1, mode="c"] out_array not None): ufunc_diy(<double*> np.PyArray_DATA(in_array), <double*> np.PyArray_DATA(out_array), in_array.shape[0])# setup.pyfrom distutils.core import setup, Extensionimport numpyfrom Cython.Distutils import build_extsetup( cmdclass={'build_ext': build_ext}, ext_modules=[Extension("ufunc_cython", sources=["_ufunc_cython.pyx", "ufunc_diy.c"], include_dirs=[numpy.get_include()])],)# 或者from distutils.core import setupimport numpyfrom Cython.Build import cythonize setup( ext_modules=cythonize("_ufunc_cython.pyx", annotate=True), include_dirs=[numpy.get_include()])# 编译python setup.py build_ext --inplace可以看到多了两个文件,一个是 _ufunc_cython.c,一个是 ufunc_cython.so(如果是 windows,则是 .pyd)。
c
文件就是
cython
将
pyx
文件解析成一个
c
文件,它不依赖平台,而
so
或者
pyd
文件,则是将
c
文件进行编译后的动态链接库,依赖于平台。 import timeimport numpy as npimport ufunc_cythonstart = time.process_time() ufunc_cython.ufunc_diy_func(x, x)end = time.process_time()print("ufunc_diy time: ", end-start)以上就是如何分析NumPy广播机制与C语言扩展,小编相信有部分知识点可能是我们日常工作会见到或用到的。希望你能通过这篇文章学到更多知识。更多详情敬请关注亿速云行业资讯频道。
亿速云「云服务器」,即开即用、新一代英特尔至强铂金CPU、三副本存储NVMe SSD云盘,价格低至29元/月。点击查看>>
免责声明:本站发布的内容(图片、视频和文字)以原创、转载和分享为主,文章观点不代表本网站立场,如果涉及侵权请联系站长邮箱:is@yisu.com进行举报,并提供相关证据,一经查实,将立刻删除涉嫌侵权内容。
原文链接:https://my.oschina.net/mathinside/blog/4672783


 计算
计算 安全
安全 数据库
数据库 网络和加速
网络和加速 企业服务
企业服务


