这篇文章主要介绍“Flutter如何实现Text完美封装”,在日常操作中,相信很多人在Flutter如何实现Text完美封装问题上存在疑惑,小编查阅了各式资料,整理出简单好用的操作方法,希望对大家解答”Flutter如何实现Text完美封装”的疑惑有所帮助!接下来,请跟着小编一起来学习吧!
使用惯了android的布局,对Flutter的组件和布局简直深恶痛绝啊,于是下定决心,一点一点封装Flutter的基础组件,今天封装的是Text组件,自认为封装的非常完美,完全可以用android布局的写法来写Text了,而且可以直接设置margin,padding,color,font,等等所有的属性,只需要一行代码就能实现,废话不多说,先看效果
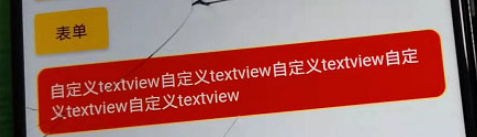
我们可以看到,颜色,边框,圆角通通都设置完成了,还有其他的属性,就不都一一展示了,实现这个效果需要哪些代码呢?看下面
TextView(
            "自定义textview自定义textview自定义textview自定义textview自定义textview",
            backgroundColor: Colors.red,
            textColor: Colors.white,
            padding: 10,
            cornerRadius: 10,
            borderColor: Colors.yellow,
            borderWidth: 1,
            marginTop: 5,
            singleLine: false,
)是的,跟android布局的方法完全一样,再也不用嵌套container再也不要写什么style了!!!
具体的封装实体类如下,为了纪念android,我叫他TextView,具体属性参考代码里面,应该都很简单易懂吧
import 'package:flutter/material.dart';

class TextView extends StatelessWidget {
  double? padding = 0;
  double? margin = 0;
  double? paddingLeft = 0;
  double? paddingRight = 0;
  double? paddingTop = 0;
  double? paddingBottom = 0;
  double? marginLeft = 0;
  double? marginRight = 0;
  double? marginTop = 0;
  double? marginBottom = 0;
  double? fontSize = 0;
  Color? textColor = Colors.black;
  Color? backgroundColor = Colors.white;
  AlignmentGeometry? alignment = Alignment.center;
  double? cornerRadius = 0;
  double? borderWidth = 0;
  Color? borderColor = Colors.white;
  String content = "";
  bool? singleLine = false;
  bool? isBold = false;

  TextView(this.content,
      {this.textColor,
      this.backgroundColor,
      this.padding,
      this.paddingTop,
      this.paddingBottom,
      this.paddingRight,
      this.paddingLeft,
      this.cornerRadius,
      this.borderColor,
      this.borderWidth,
      this.marginBottom,
      this.marginLeft,
      this.marginRight,
      this.marginTop,
      this.margin,
      this.fontSize,
      this.singleLine,
      this.isBold}) {
    if (padding != null) {
      if (padding != null && padding! > 0) {
        paddingLeft = padding;
        paddingRight = padding;
        paddingBottom = padding;
        paddingTop = padding;
      }
    }

    if (margin != null) {
      if (margin != null && margin! > 0) {
        marginLeft = margin;
        marginTop = margin;
        marginRight = margin;
        marginBottom = margin;
      }
    }
  }

  @override
  Widget build(BuildContext context) {
    return Container(
      margin: EdgeInsets.fromLTRB(this.marginLeft ?? 0, this.marginTop ?? 0,
          this.marginRight ?? 0, this.marginBottom ?? 0),
      decoration: new BoxDecoration(
        border: new Border.all(
            width: this.borderWidth ?? 0,
            color: this.borderColor ?? Colors.white),
        color: this.backgroundColor,
        borderRadius:
            new BorderRadius.all(new Radius.circular(this.cornerRadius ?? 0)),
      ),
      padding: EdgeInsets.fromLTRB(this.paddingLeft ?? 0, this.paddingTop ?? 0,
          this.paddingRight ?? 0, this.paddingBottom ?? 0),
      child: Text(
        content,
        style: TextStyle(
            color: this.textColor,
            fontSize: this.fontSize ?? 14,
            fontWeight:
                this.isBold ?? false ? FontWeight.bold : FontWeight.normal,
            overflow: this.singleLine ?? false
                ? TextOverflow.ellipsis
                : TextOverflow.clip),
      ),
    );
  }
}到此,关于“Flutter如何实现Text完美封装”的学习就结束了,希望能够解决大家的疑惑。理论与实践的搭配能更好的帮助大家学习,快去试试吧!若想继续学习更多相关知识,请继续关注亿速云网站,小编会继续努力为大家带来更多实用的文章!
亿速云「云服务器」,即开即用、新一代英特尔至强铂金CPU、三副本存储NVMe SSD云盘,价格低至29元/月。点击查看>>
免责声明:本站发布的内容(图片、视频和文字)以原创、转载和分享为主,文章观点不代表本网站立场,如果涉及侵权请联系站长邮箱:is@yisu.com进行举报,并提供相关证据,一经查实,将立刻删除涉嫌侵权内容。


 计算
计算 安全
安全 数据库
数据库 网络和加速
网络和加速 企业服务
企业服务


