这篇文章主要讲解了“C#怎么使用Task.ContinueWith组合任务”,文中的讲解内容简单清晰,易于学习与理解,下面请大家跟着小编的思路慢慢深入,一起来研究和学习“C#怎么使用Task.ContinueWith组合任务”吧!
代码:
        public static void Main()
        {
            //创建一个任务
            Task<int> task = new Task<int>(() =>
            {
                int sum = 0;
                Console.WriteLine("使用Task異步執行操作.");
                for (int i = 0; i <= 100; i++)
                {
                    sum += i;
                }
                return sum;
            });

            //启动任务,并安排到当前任务队列线程中执行任务(System.Threading.Tasks.TaskScheduler)
            task.Start();
            Console.WriteLine("主線程執行其他程序.");

            //任务完成时执行处理。
            Task cwt = task.ContinueWith(t =>
            {
                Console.WriteLine("任務完成後的結果是:{0}", t.Result.ToString());
            });
            task.Wait();
            cwt.Wait();
            Console.ReadLine();
            Console.ReadKey();
}结果:

代码:
        static void Main(string[] args)
        {
            ConcurrentStack<int> stack = new ConcurrentStack<int>();

            //t1先串行
            var t1 = Task.Factory.StartNew(() =>
            {
                //入棧
                stack.Push(1);
                stack.Push(2);
            });

            //t2,t3并行执行
            var t2 = t1.ContinueWith(t =>
            {
                int result;
                //出棧
                stack.TryPop(out result);
                Console.WriteLine("Task t2 result={0},Thread id {1}", result, Thread.CurrentThread.ManagedThreadId);
            });

            //t2,t3并行执行
            var t3 = t1.ContinueWith(t =>
            {
                int result;
                //出棧
                stack.TryPop(out result);
                Console.WriteLine("Task t3 result={0},Thread id {1}", result, Thread.CurrentThread.ManagedThreadId);
            });

            //等待t2和t3执行完
            Task.WaitAll(t2, t3);

            //t7串行执行
            var t4 = Task.Factory.StartNew(() =>
            {
                Console.WriteLine("當前的集合數目:{0},Thread id {1}", stack.Count, Thread.CurrentThread.ManagedThreadId);
            });
            t4.Wait();
            Console.ReadKey();
}结果:

代码:
        public static void Main()
        {
            Task<string[]> parent = new Task<string[]>(state =>
            {
                Console.WriteLine(state);
                string[] result = new string[2];
                //创建并启动子任务
                new Task(() => { result[0] = "我是子任務1。"; }, TaskCreationOptions.AttachedToParent).Start();
                new Task(() => { result[1] = "我是子任務2。"; }, TaskCreationOptions.AttachedToParent).Start();
                return result;
            }, "我是父任務,並在處理過程中創建多個子任務,所有的子任務完成以後我才會開始執行。");
            //任务处理完成后执行的操作
            parent.ContinueWith(t =>
            {
                Array.ForEach(t.Result, r => Console.WriteLine(r));
            });
            //启动父任务
            parent.Start();
            //等待任务结束 Wait只能等待父线程结束,没办法等到父线程的ContinueWith结束
            //parent.Wait();
            Console.ReadLine();
}结果:

代码:
    class Node
    {
        public Node Left { get; set; }
        public Node Right { get; set; }
        public string Text { get; set; }
    }
    class Program
    {
        static Node GetNode()
        {
            Node root = new Node
            {
                Left = new Node
                {
                    Left = new Node
                    {
                        Text = "L-L"
                    },
                    Right = new Node
                    {
                        Text = "L-R"
                    },
                    Text = "L"
                },
                Right = new Node
                {
                    Left = new Node
                    {
                        Text = "R-L"
                    },
                    Right = new Node
                    {
                        Text = "R-R"
                    },
                    Text = "R"
                },
                Text = "Root"
            };
            return root;
        }

        static void Main(string[] args)
        {
            Node root = GetNode();
            DisplayTree(root);
        }

        static void DisplayTree(Node root)
        {
            var task = Task.Factory.StartNew(() => DisplayNode(root),
                                            CancellationToken.None,
                                            TaskCreationOptions.None,
                                            TaskScheduler.Default);
            task.Wait();
        }

        static void DisplayNode(Node current)
        {

            if (current.Left != null)
                Task.Factory.StartNew(() => DisplayNode(current.Left),
                                            CancellationToken.None,
                                            TaskCreationOptions.AttachedToParent,
                                            TaskScheduler.Default);
            if (current.Right != null)
                Task.Factory.StartNew(() => DisplayNode(current.Right),
                                            CancellationToken.None,
                                            TaskCreationOptions.AttachedToParent,
                                            TaskScheduler.Default);
            Console.WriteLine("當前節點值:{0};處理的Thread ID ={1}", current.Text, Thread.CurrentThread.ManagedThreadId);
        }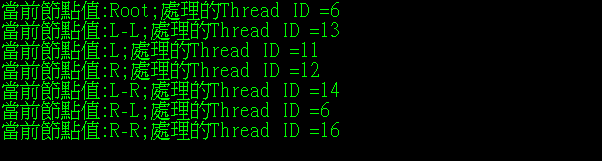
}结果:
感谢各位的阅读,以上就是“C#怎么使用Task.ContinueWith组合任务”的内容了,经过本文的学习后,相信大家对C#怎么使用Task.ContinueWith组合任务这一问题有了更深刻的体会,具体使用情况还需要大家实践验证。这里是亿速云,小编将为大家推送更多相关知识点的文章,欢迎关注!
亿速云「云服务器」,即开即用、新一代英特尔至强铂金CPU、三副本存储NVMe SSD云盘,价格低至29元/月。点击查看>>
免责声明:本站发布的内容(图片、视频和文字)以原创、转载和分享为主,文章观点不代表本网站立场,如果涉及侵权请联系站长邮箱:is@yisu.com进行举报,并提供相关证据,一经查实,将立刻删除涉嫌侵权内容。


 计算
计算 安全
安全 数据库
数据库 网络和加速
网络和加速 企业服务
企业服务


