GlusterFs是一个开源分布式文件系统
GlusterFs主要由存储服务器,客户端及NFS/samba存储网关组成,
GlusterFs特点:扩展性和高性能,高可用性,全局统一命名空间,弹性卷管理,基于标准协议
GlusterFs术语:Brick(存储块),Vlume(逻辑卷),FUSE(内核模块),VFS,Glusterd(后台管理进程)
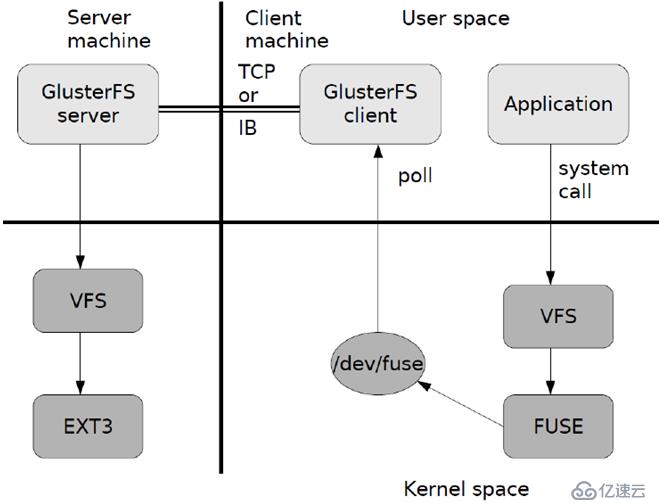
GlusterFs的工作原理:
弹性HASH算法的优点:1)保证数据平均分布在每个Brick中。
(2)解决了对元数据服务器的依赖,进而解决了单点故障及访问瓶颈。
GlusterFS七种卷:分布式卷,条带卷,复制卷,分布式条带卷,分布式复制卷,条带复制卷,分布式条带复制卷
GlusterFS七种卷中,具备冗余性的:复制卷,分布式复制卷,条带复制卷,分布式条带复制卷。
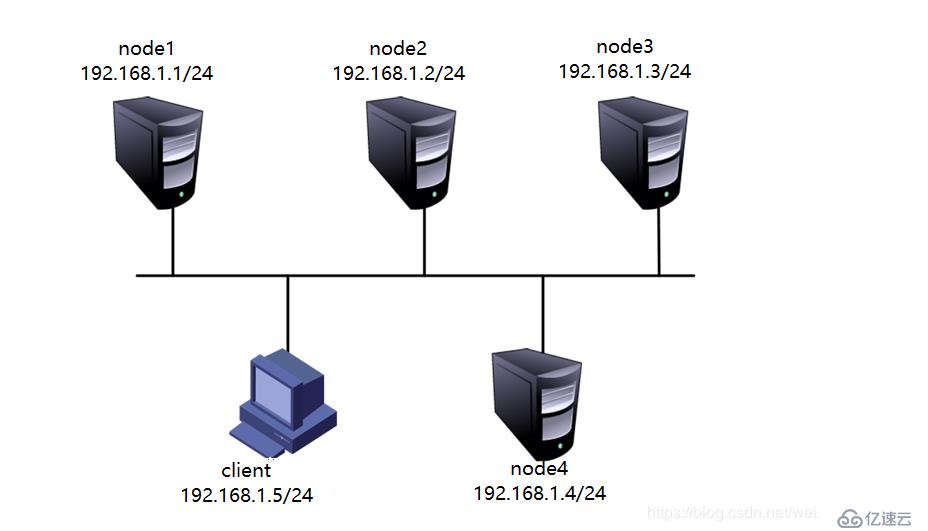
实验步骤如下:四台服务器,一台客户机
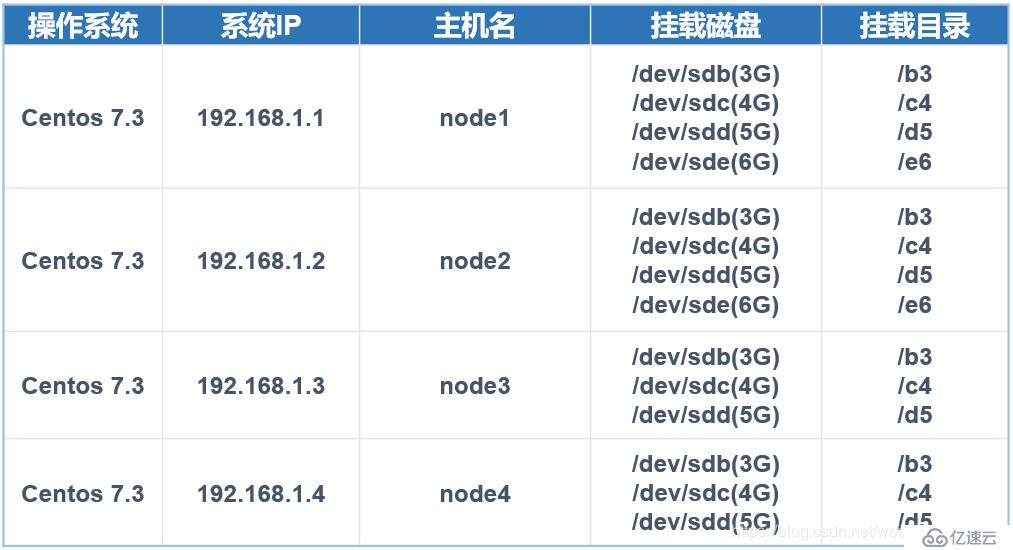
四台服务器的信息如下:
在所有节点上执行以下操作
开启4台虚拟机,根据上述表添加磁盘,通过fdisk分区,mkfs格式化,创建相应的挂载目录,并将格式化的磁盘挂载到相应的目录中,最后修改/etc/fstab配置文件,使其永久生效。
附上命令,以node1为例
(1)创建挂载目录:mkidr -p /b3 /c4 /d5 /e6
(2)分区所有硬盘以sdb为例:fdisk /dev/sdb
(3)格式化:#mkfs.ext4 /dev/sdb1
(4)挂载:#mount /dev/sdb1 /b3
(5)永久挂载
#vim /etc/fstab
/dev/sdb1 /b3 ext4 defaults 0 0
/dev/sdc1 /c4 ext4 defaults 0 0
/dev/sdd1 /d5 ext4 defaults 0 0
/dev/sde1 /e6 ext4 defaults 0 0
二,
1.关闭所有防火墙和SElinux
#systemctl stop firewalld
#systemctl disable firewalld
#setenforce 0
2.配置hosts文件(所有主机上都要配置)
vim /etc/hosts
192.168.1.1 node1
192.168.1.2 node2
192.168.1.3 node3
192.168.1.4 node4
3.安装软件,在所有的服务器上都要安装(GlusterFS)
#yum -y install glusterfs glusterfs-server glusterfs-fuse glusterfs-rdma
4.启动glusterfs(在所有节点上)
#systemctl start glusterd
#systemctl enable glusterd
5.添加节点(在node1上执行),添加node1—node4节点
[root@node1 ~]# gluster peer probe node1
peer probe: success. Probe on localhost not needed
[root@node1 ~]# gluster peer probe node2
peer probe: success.
[root@node1 ~]# gluster peer probe node3
peer probe: success.
[root@node1 ~]# gluster peer probe node4
peer probe: success.
6.创建卷(在node1上创建卷)(加粗的为命令)
(1)创建分布式卷:
[root@node1 ~]# gluster volume create dis-volume node1:/e6 node2:/e6 force
volume create: dis-volume: success: please start the volume to access data
启动卷:
[root@node1 ~]# gluster volume start dis-volume
volume start: dis-volume: success
没有指定类型默认创建的是分布式卷
(2)创建条带卷
[root@node1 ~]# gluster volume create stripe-volume stripe 2 node1:/d5 node2:/d5 force
volume create: stripe-volume: success: please start the volume to access data
启动卷:
[root@node1 ~]# gluster volume start stripe-volume
volume start: stripe-volume: success
(3)创建复制卷
[root@node1 ~]# gluster volume create rep-volume replica 2 node3:/d5 node4:/d5 force
volume create: rep-volume: success: please start the volume to access data
启动卷:
[root@node1 ~]# gluster volume start rep-volume
volume start: rep-volume: success
(4)创建分布式条带卷
[root@node1 ~]# gluster volume create dis-stripe stripe 2 node1:/b3 node2:/b3 node3:/b3 node4:/b3 force
volume create: dis-stripe: success: please start the volume to access data
启动:
[root@node1 ~]# gluster volume start dis-stripe
volume start: dis-stripe: success
(5)创建分布式复制卷
[root@node1 ~]# gluster volume create dis-rep replica 2 node1:/c4 node2:/c4 node3:/c4 node4:/c4 force
volume create: dis-rep: success: please start the volume to access data
启动卷:
[root@node1 ~]# gluster volume start dis-rep
volume start: dis-rep: success
三,客户端配置如下:
1.安装客户端软件
[root@node5 yum.repos.d]# yum -y install glusterfs glusterfs-fuse
2创建挂载目录
[root@node5 ~]# mkdir -p /test /{dis,stripe,rep,dis_and_stripe,dis_and_rep}
3.修改hosts文件
[root@node5 ~]# vim /etc/hosts
192.168.1.1 node1
192.168.1.2 node2
192.168.1.3 node3
192.168.1.6 node6
192.168.1.4 node4
192.168.1.5 node5
4.挂载gluster文件系统
[root@node5 test]# mount -t glusterfs node1:dis-volume /test/dis
[root@node5 test]# mount -t glusterfs node1:stripe-volume /test/stripe
[root@node5 test]# mount -t glusterfs node1:rep-volume /test/rep
[root@node5 test]# mount -t glusterfs node1:dis-volume /test/dis_and_stripe
[root@node5 test]# mount -t glusterfs node1:dis-rep /test/dis_and_rep
四、测试gluster文件系统
1.卷中写入文件(前5条生成一个43M的文件,后5条石复制文件到卷中)
[root@node5 ~]# dd if=/dev/zero of=demo1.log bs=43M count=1
[root@node5 ~]# dd if=/dev/zero of=demo2.log bs=43M count=1
[root@node5 ~]# dd if=/dev/zero of=demo3.log bs=43M count=1
[root@node5 ~]# dd if=/dev/zero of=demo4.log bs=43M count=1
[root@node5 ~]# dd if=/dev/zero of=demo5.log bs=43M count=1
[root@node5 ~]#cp demo /test/dis
[root@node5 ~]#cp demo /test/stripe
[root@node5 ~]#cp demo /test/rep
[root@node5 ~]#cp demo /test/dis_and_stripe
[root@node5 ~]#*cp demo /test/dis_and_rep
.查看文件分布
(1)查看分布式卷文件分布
[root@node1 ~]# ll -h /e6
总用量 130M
-rw-r--r-- 2 root root 43M 10月 25 19:35 demo1.log
-rw-r--r-- 2 root root 43M 10月 25 19:35 demo2.log
-rw-r--r-- 2 root root 43M 10月 25 19:35 demo3.log
drwx------ 2 root root 16K 9月 23 09:07 lost+found
[root@node2 ~]# ll -h /e6
总用量 86M
-rw-r--r-- 2 root root 43M 10月 25 19:35 demo4.log
-rw-r--r-- 2 root root 43M 10月 25 19:36 demo5.log
[root@node2 ~]#
(2)查看条带卷文件分布
[root@node1 ~]# ll -h /d5
总用量 108M
-rw-r--r-- 2 root root 22M 10月 25 19:34 demo1.log
-rw-r--r-- 2 root root 22M 10月 25 19:34 demo2.log
-rw-r--r-- 2 root root 22M 10月 25 19:34 demo3.log
-rw-r--r-- 2 root root 22M 10月 25 19:34 demo4.log
-rw-r--r-- 2 root root 22M 10月 25 19:36 demo5.log
drwx------ 2 root root 16K 9月 23 09:06 lost+found
[root@node2 ~]# ll -h /d5
总用量 108M
-rw-r--r-- 2 root root 22M 10月 25 19:34 demo1.log
-rw-r--r-- 2 root root 22M 10月 25 19:34 demo2.log
-rw-r--r-- 2 root root 22M 10月 25 19:34 demo3.log
-rw-r--r-- 2 root root 22M 10月 25 19:34 demo4.log
-rw-r--r-- 2 root root 22M 10月 25 19:36 demo5.log
drwx------ 2 root root 16K 9月 23 09:14 lost+found
(3)查看复制卷文件分布
[root@node3 ~]# ll -h /d5
总用量 216M
-rw-r--r-- 2 root root 43M 10月 25 19:34 demo1.log
-rw-r--r-- 2 root root 43M 10月 25 19:34 demo2.log
-rw-r--r-- 2 root root 43M 10月 25 19:34 demo3.log
-rw-r--r-- 2 root root 43M 10月 25 19:34 demo4.log
-rw-r--r-- 2 root root 43M 10月 25 19:36 demo5.log
drwx------ 2 root root 16K 9月 23 09:59 lost+found
[root@node4 ~]# ll -h /d5**
总用量 216M
-rw-r--r-- 2 root root 43M 10月 25 19:34 demo1.log
-rw-r--r-- 2 root root 43M 10月 25 19:34 demo2.log
-rw-r--r-- 2 root root 43M 10月 25 19:34 demo3.log
-rw-r--r-- 2 root root 43M 10月 25 19:34 demo4.log
-rw-r--r-- 2 root root 43M 10月 25 19:36 demo5.log
drwx------ 2 root root 16K 9月 23 10:08 lost+found
实验到此结束
其它的维护命令
(1)查看glusterfs卷
[root@node1 ~]# gluster volume list
dis-rep
dis-stripe
dis-volume
rep-volume
stripe-volume
(2)查看所有卷的状态
[root@node1 ~]# gluster volume status
(3)查看所有卷的信息
[root@node1 ~]# gluster volume info
(4)设置卷的访问控制
[root@node1 ~]# gluster volume set dis-rep auth.allow 192.168.1.*
volume set: success
免责声明:本站发布的内容(图片、视频和文字)以原创、转载和分享为主,文章观点不代表本网站立场,如果涉及侵权请联系站长邮箱:is@yisu.com进行举报,并提供相关证据,一经查实,将立刻删除涉嫌侵权内容。