这篇文章将为大家详细讲解有关基于ASP.NET+easyUI框架如何实现图片上传功能,小编觉得挺实用的,因此分享给大家做个参考,希望大家阅读完这篇文章后可以有所收获。
基于ASP.Net +easyUI框架上传图片,实现图片上传,提交表单:
<body>
 <link href="../../Easyui/themes/easyui.css" rel="stylesheet" type="text/css" />
 <script charset="utf-8" src="../../Easyui/jquery.easyui.min.js" type="text/javascript"></script>
 <script charset="utf-8" src="../../Easyui/easyui-lang-zh_CN.js" type="text/javascript"></script>
 <script charset="utf-8" src="../../Js/jquery.form.js" type="text/javascript"></script>
 <script type="text/javascript">
  //检查图片的格式是否正确,同时实现预览
  function setImagePreview(obj, localImagId, imgObjPreview) {
   var array = new Array('gif', 'jpeg', 'png', 'jpg', 'bmp'); //可以上传的文件类型
   if (obj.value == '') {
    $.messager.alert("让选择要上传的图片!");
    return false;
   }
   else {
    var fileContentType = obj.value.match(/^(.*)(\.)(.{1,8})$/)[3]; //这个文件类型正则很有用
    ////布尔型变量
    var isExists = false;
    //循环判断图片的格式是否正确
    for (var i in array) {
     if (fileContentType.toLowerCase() == array[i].toLowerCase()) {
      //图片格式正确之后,根据浏览器的不同设置图片的大小
      if (obj.files && obj.files[0]) {
       //火狐下,直接设img属性
       imgObjPreview.style.display = 'block';
       imgObjPreview.style.width = '200px';
       imgObjPreview.style.height = '150px';
       //火狐7以上版本不能用上面的getAsDataURL()方式获取,需要一下方式
       imgObjPreview.src = window.URL.createObjectURL(obj.files[0]);
      }
      else {
       //IE下,使用滤镜
       obj.select();
       var imgSrc = document.selection.createRange().text;
       //必须设置初始大小
       localImagId.style.width = "200px";
       localImagId.style.height = "150px";
       //图片异常的捕捉,防止用户修改后缀来伪造图片
       try {
        localImagId.style.filter = "progid:DXImageTransform.Microsoft.AlphaImageLoader(sizingMethod=scale)";
        localImagId.filters.item("DXImageTransform.Microsoft.AlphaImageLoader").src = imgSrc;
       }
       catch (e) {
        $.messager.alert("您上传的图片格式不正确,请重新选择!");
        return false;
       }
       imgObjPreview.style.display = 'none';
       document.selection.empty();
      }
      isExists = true;
      return true;
     }
    }

    if (isExists == false) {
     $.messager.alert("上传图片类型不正确!");
     return false;
    }
    return false;
   }
  }

  //显示图片
  function over(imgid, obj, imgbig) {
   //大图显示的最大尺寸 4比3的大小 400 300
   maxwidth = 400;
   maxheight = 300;

   //显示
   obj.style.display = "";
   imgbig.src = imgid.src;

   //1、宽和高都超过了,看谁超过的多,谁超的多就将谁设置为最大值,其余策略按照2、3
   //2、如果宽超过了并且高没有超,设置宽为最大值
   //3、如果宽没超过并且高超过了,设置高为最大值

   if (img.width > maxwidth && img.height > maxheight) {
    pare = (img.width - maxwidth) - (img.height - maxheight);
    if (pare >= 0)
     img.width = maxwidth;
    else
     img.height = maxheight;
   }
   else if (img.width > maxwidth && img.height <= maxheight) {
    img.width = maxwidth;
   }
   else if (img.width <= maxwidth && img.height > maxheight) {
    img.height = maxheight;
   }
  };
  //保存信息
  function submitForm() {
   //先上传图片后,再提交
   upLoadFile();
   var test = document.getElementById("test").value = "add";
   var tbName = document.getElementById("tbName").value;
   var idFile = document.getElementById("idFile").value;
   //先判断是否上传图片之后在提交
   $('#ff').form('submit', {
    url: "../../Handler/add.ashx?tbName=" + tbName + "&idFile=" + idFile + "&test=" + test,
    dataType: "json",
    onSubmit: function () {
     if ($(this).form('validate'))
      return true;
     else {
      return false;
     }
    },
    success: function (data) {
     var dataJson = $.parseJSON(data);
     if (dataJson.success) {
      $("#add_address").dialog('destroy'); //销毁dialog对象
      $.messager.alert("提示", dataJson.msg)
      $("#dateList").datagrid("reload").datagrid('clearSelections').datagrid('clearChecked');

     } else {
      $("#add_address").dialog('destroy'); //销毁dialog对象
      $.messager.alert("提示", dataJson.msg)
     }
    }
   });
  }


  //上传图片
  function upLoadFile() {
   var idFile = document.getElementById("idFile").value;
   //判断是否选择图片
   var options = {
    type: "POST",
    url: '../../Handler/InputImg.ashx'
    //success: showResponse
   };
   // 将options传给ajaxForm
   $('#ff').ajaxSubmit(options);
  }
 </script>
 <form id="ff" runat="server" method="post">
 <table >
  <tr>
   <th  class="style1">
    链接名称:
   </th>
   <td  class="style1">
    <asp:TextBox ID="tbID" runat="server" Style="display: none"></asp:TextBox>
    <asp:TextBox ID="tbName" runat="server" Width="274px" Height="20px" class="easyui-validatebox"
     data-options="required:true"></asp:TextBox>
   </td>
  </tr>
  <tr>
   <th  class="style2">
    链接logo:
   </th>
   <td class="style3">
    <div >
     选择图片:<input id="idFile"  runat="server" name="idFile" onchange="javascript:setImagePreview(this,localImag,preview);"
      type="file" />
    </div>
    <%--预 览:
    <div id="localImag">

     <img id="preview" onclick="over(preview,divImage,imgbig);" src="" style="width: 200px;
      height: 150px;" />
    </div>--%>
   </td>
  </tr>
 </table>
 <div >
  <input type="hidden" id="test" name="test" />
  <a id="btn_sc" href="javascript:void(0)" class="easyui-linkbutton" onclick="submitForm()">
   上传</a>
   <a href="Friendly.aspx" class="easyui-linkbutton">取消</a>
 </div>
 </form>
</body>
提交表单的一般处理程序:
BLL.J_Friendly frend = null;
  Model.J_Friendly fr = null;
  public void ProcessRequest(HttpContext context)
  {
   context.Response.ContentType = "text/plain";
   string command = context.Request["test"].ToString();//前台传的标示值
   if (command == "add")
   {
    AddFrend(context);
   }
   if (command == "update")
   {
    UpdateFrend(context);
   }
  }

public void AddFrend(HttpContext context)
  {
   frend = new BLL.J_Friendly();
   fr = new Model.J_Friendly();
   string tbName = context.Request.QueryString["tbName"].Trim();
   if (frend.Exists("F_Name='" + tbName + "'"))
   {
    context.Response.Write("{\"msg\":\"添加失败,链接名称与已有的链接名称重复!\",\"success\":false}");
    return;
   }
   else
   {

    try
    {
     fr.F_Name = context.Request.QueryString["tbName"].Trim();

    }
    catch
    {
     context.Response.Write("{\"msg\":\"添加失败,请核对信息!\",\"success\":false}");
     return;
    }
    try
    {
     string img = context.Request.QueryString["idFile"].Trim();
     if (img == "")
     {
      context.Response.Write("{\"msg\":\"添加失败,请核对图片信息!\",\"success\":false}");
      return;
     }
     else
     {
      string str = context.Request.QueryString["idFile"].Trim();
      string str1 = str.Remove(0, str.LastIndexOf("\\") + 1);
      fr.F_Img = "../../Upload/Images/" + str1;
     }

    }
    catch
    {
     context.Response.Write("{\"msg\":\"添加失败,请核对信息!\",\"success\":false}");
     return;
    }
   }
   if (frend.Add(fr) > 0)
   {
    context.Response.Write("{\"msg\":\"添加成功!\",\"success\":true}");
   }
   else
   {
    context.Response.Write("{\"msg\":\"添加失败,请核对信息!\",\"success\":false}");
   }
  }
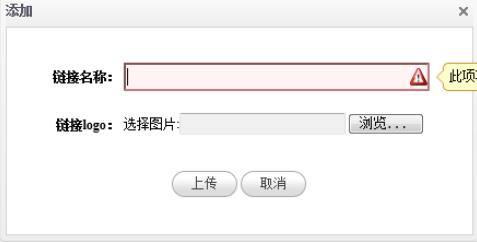
原型图:

关于“基于ASP.NET+easyUI框架如何实现图片上传功能”这篇文章就分享到这里了,希望以上内容可以对大家有一定的帮助,使各位可以学到更多知识,如果觉得文章不错,请把它分享出去让更多的人看到。
免责声明:本站发布的内容(图片、视频和文字)以原创、转载和分享为主,文章观点不代表本网站立场,如果涉及侵权请联系站长邮箱:is@yisu.com进行举报,并提供相关证据,一经查实,将立刻删除涉嫌侵权内容。