жӮЁеҘҪпјҢзҷ»еҪ•еҗҺжүҚиғҪдёӢи®ўеҚ•е“ҰпјҒ
жӮЁеҘҪпјҢзҷ»еҪ•еҗҺжүҚиғҪдёӢи®ўеҚ•е“ҰпјҒ
жң¬зҜҮеҶ…е®№д»Ӣз»ҚдәҶвҖңжҖҺд№Ҳз”ЁPythonз»ҳеҲ¶з®ҖеҚ•зҡ„жҠҳдёқеӣҫвҖқзҡ„жңүе…ізҹҘиҜҶпјҢеңЁе®һйҷ…жЎҲдҫӢзҡ„ж“ҚдҪңиҝҮзЁӢдёӯпјҢдёҚе°‘дәәйғҪдјҡйҒҮеҲ°иҝҷж ·зҡ„еӣ°еўғпјҢжҺҘдёӢжқҘе°ұи®©е°Ҹзј–еёҰйўҶеӨ§е®¶еӯҰд№ дёҖдёӢеҰӮдҪ•еӨ„зҗҶиҝҷдәӣжғ…еҶөеҗ§пјҒеёҢжңӣеӨ§е®¶д»”з»Ҷйҳ…иҜ»пјҢиғҪеӨҹеӯҰжңүжүҖжҲҗпјҒ
дёӘдәәеүҚйқўд№ҹиҜҙдәҶејәзғҲе»әи®®дҪҝз”ЁPycharmдҪңдёәPythonеҲқеӯҰиҖ…зҡ„йҰ–йҖүIDEпјҢдё»иҰҒиҝҳжҳҜеӣ дёәе…¶ејәеӨ§зҡ„жҸ’件еҠҹиғҪпјҢеҫҲеӨҡзҺҜеўғйғҪиғҪдёҖй”®е®үиЈ…е®ҢжҲҗпјҢеғҸжң¬ж–Үзҡ„matplotlibпјҢnumpy,requestsзӯүгҖӮ
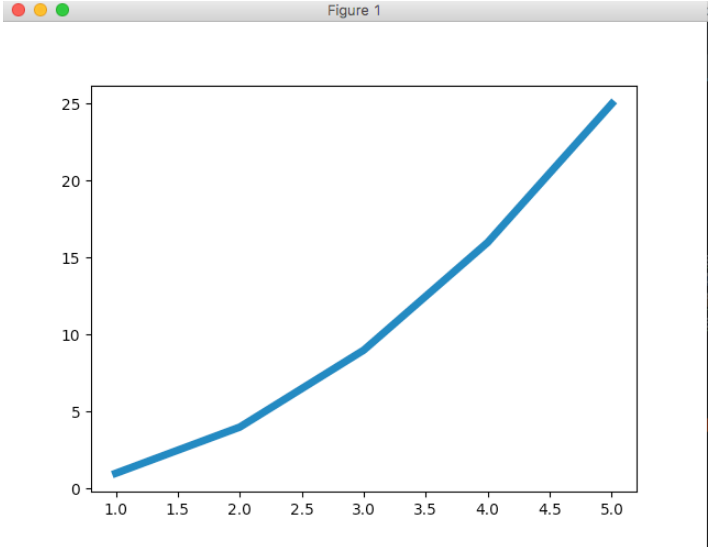
дёӢйқўзӣҙжҺҘдёҠж•Ҳжһңеӣҫпјҡ
import matplotlib.pyplot as plt
# з»ҳеҲ¶жҠҳзәҝеӣҫ
squares = [1, 4, 9, 16, 25]
# plt.plot(squares, linewidth=5) # жҢҮе®ҡжҠҳзәҝзІ—з»ҶпјҢ
# #plt.show();
#
# #дҝ®ж”№ж Үзӯҫж–Үеӯ—е’ҢзәҝжқЎзІ—з»Ҷ
# plt.title("squre number", fontsize=24)
# plt.xlabel("Value", fontsize=14)
# plt.ylabel("square of value", fontsize=14)
# plt.tick_params(axis='both', labelsize=14)
# plt.show()
# ж ЎжӯЈеӣҫеҪў
input_values = [1, 2, 3, 4, 5]
plt.plot(input_values, squares, linewidth=5)
plt.show()
з”ҹжҲҗзҡ„ж•Ҳжһңеӣҫпјҡ
import matplotlib.pyplot as plt
# з®ҖеҚ•зҡ„зӮ№
# plt.scatter(2, 4)
# plt.show()
#
# # дҝ®ж”№ж Үзӯҫж–Үеӯ—е’ҢзәҝжқЎзІ—з»Ҷ
plt.title("squre number", fontsize=24)
plt.xlabel("Value", fontsize=14)
plt.ylabel("square of value", fontsize=14)
#и®ҫзҪ®еҲ»еәҰж Үи®°еӨ§е°Ҹ
plt.tick_params(axis='both', which='major', labelsize=14)
# з»ҳеҲ¶ж•ЈзӮ№
x_values = [1, 2, 3, 4, 5]
y_values = [1, 4, 9, 16, 25]
plt.scatter(x_values, y_values, s=100)
plt.show()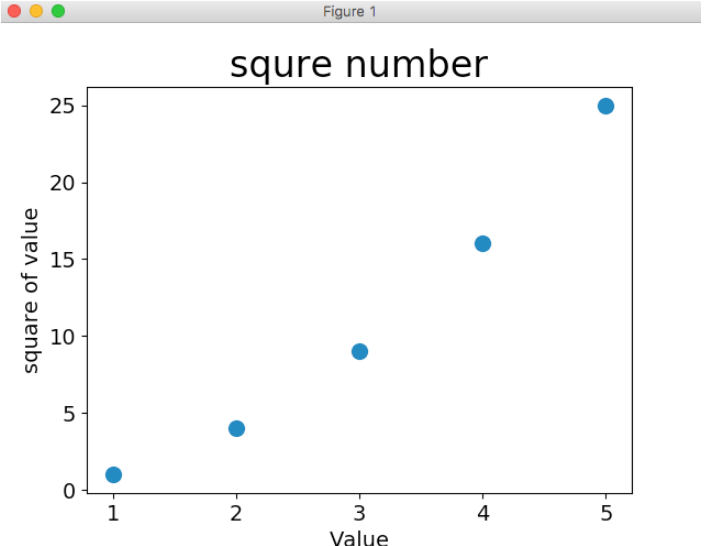
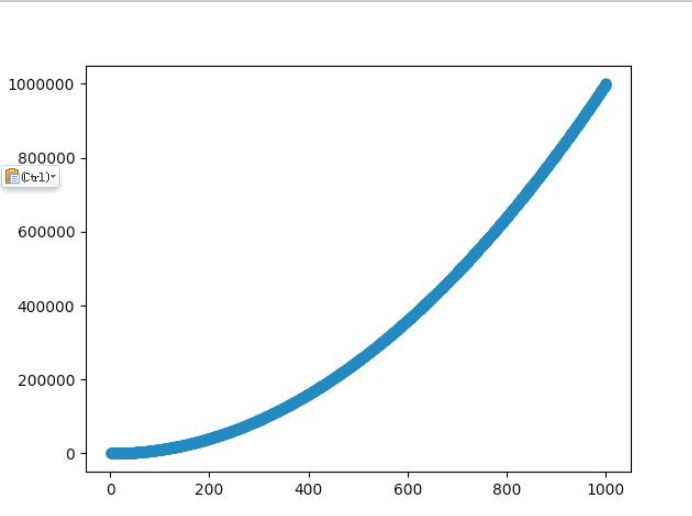
import matplotlib.pyplot as plt x_values = list(range(1, 1001)) y_values = [x ** 2 for x in x_values] # y_values = [x * x for x in x_values] # y_values = [x ^ 2 for x in x_values] plt.scatter(x_values, y_values, s=40) # еқҗж ҮиҪҙзҡ„еҸ–еҖјиҢғеӣҙ # plt.axis(0, 1100, 0, 1100000) # дҫқж¬ЎжҳҜxmin xmax,ymin,ymax plt.show()
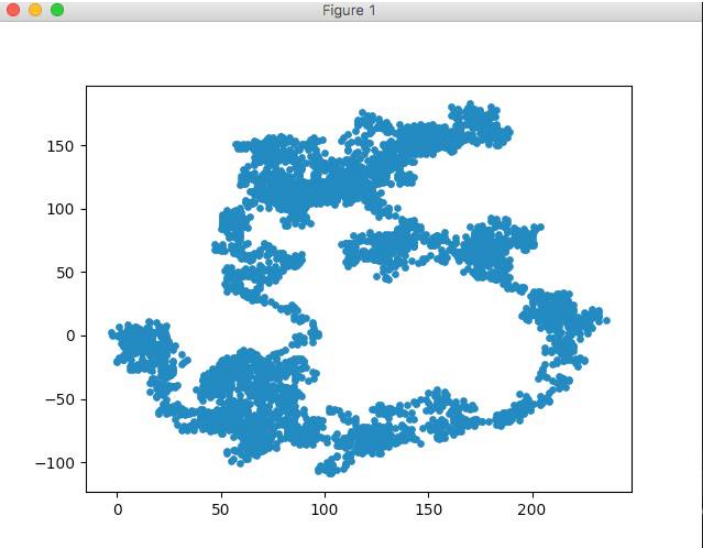
import matplotlib.pyplot as ply from random import choice class RandomWalk(): def __init__(self, num_points=5000): self.num_points = num_points self.x_values = [0] self.y_values = [0] def fill_walk(self): # дёҚж–ӯиө°пјҢзӣҙеҲ°иҫҫеҲ°жҢҮе®ҡжӯҘж•° while len(self.x_values) < self.num_points: # еҶіе®ҡеүҚиҝӣж–№еҗ‘д»ҘеҸҠжІҝиҝҷдёӘж–№еҗ‘еүҚиҝӣзҡ„и·қзҰ» x_direction = choice([1, -1]) x_distance = choice([0, 1, 2, 3, 4, 5, 6, 7, 8, 9]) x_step = x_direction * x_distance y_direction = choice([1, -1]) y_distance = choice([0, 1, 2, 3, 4, 5, 6, 7, 8, 9]) y_step = y_direction * y_distance # дёҚиғҪеҺҹең°иёҸжӯҘ if x_step == 0 and y_step == 0: continue next_x = self.x_values[-1] + x_step next_y = self.y_values[-1] + y_step self.x_values.append(next_x) self.y_values.append(next_y) rw = RandomWalk() rw.fill_walk() ply.scatter(rw.x_values, rw.y_values, s=15) ply.show()
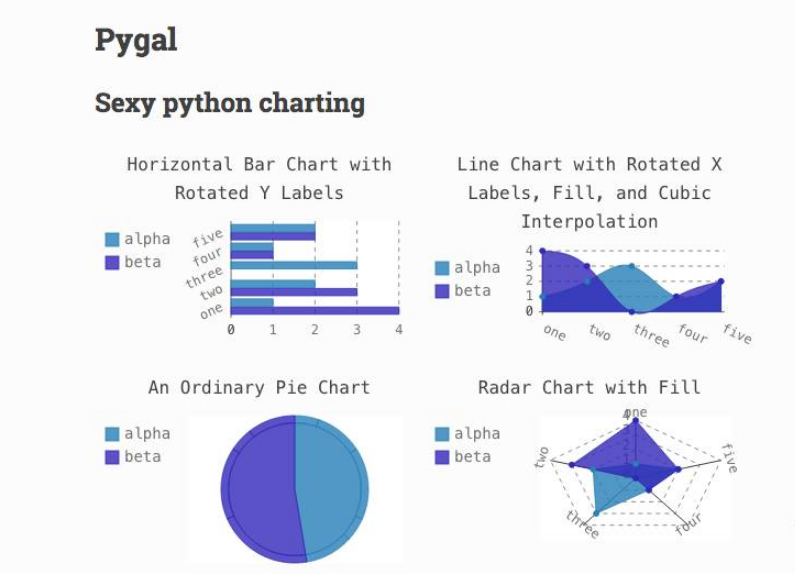
pygalиғҪеӨҹз»ҳеҲ¶зҡ„еӣҫеҪўеҸҜд»Ҙи®ҝй—®pygalд»Ӣз»Қ
зҺҜеўғе®үиЈ…пјҢзӣҙжҺҘеңЁPycharmдёҠе®үиЈ…жҸ’件гҖӮ
import pygal
from random import randint
class Die():
def __init__(self, num_sides=6):
self.num_sides = num_sides;
def roll(self):
# иҝ”еӣһдёҖдёӘдҪҚдәҺ1е’ҢйӘ°еӯҗйқўж•°д№Ӣй—ҙзҡ„йҡҸжңәеҖј
return randint(1, self.num_sides)
die = Die()
results = []
# жҺ·100ж¬ЎйӘ°еӯҗпјҢ并е°Ҷз»“жһңж”ҫеңЁеҲ—иЎЁдёӯгҖӮ
for roll_num in range(10):
result = die.roll()
results.append(str(result))
print(results)
# еҲҶжһҗз»“жһң
frequencies = []
for value in range(1, die.num_sides + 1):
frequency = results.count(value)
frequencies.append(frequency)
print(frequencies)
# еҜ№з»“жһңиҝӣиЎҢеҸҜи§ҶеҢ–
hist = pygal.Box()
hist.title = "result of rolling one D6 1000 times"
hist.x_labels = ['1', '2', '3', '4', '5', '6']
hist.x_title = "Result"
hist.y_title = "frequency of result"
hist.add('D6', frequencies)
hist.render_to_file('die_visual.svg')иҝҷдёӘеҸҜд»ҘзӣҙжҺҘеңЁPycharmдёӯе®үиЈ…жҸ’件пјҢйқһеёёж–№дҫҝгҖӮ
import requests
# жү§иЎҢapiи°ғ用并еӯҳеӮЁе“Қеә”
url = 'https://api.github.com/search/repositories?q=language:python&sort=stars'
r = requests.get(url)
print("Status code:", r.status_code)
# е°Ҷapiе“Қеә”еӯҳеӮЁеңЁдёҖдёӘеҸҳйҮҸдёӯ
response_dic = r.json()
# еӨ„зҗҶз»“жһң
print(response_dic.keys())
еҫ—еҲ°з»“жһңпјҡ
Status code: 200
dict_keys(['total_count', 'incomplete_results', 'items'])# е°Ҷapiе“Қеә”еӯҳеӮЁеңЁдёҖдёӘеҸҳйҮҸдёӯ
response_dic = r.json()
# еӨ„зҗҶз»“жһң
print(response_dic.keys())
print("Total repositories:", response_dic['total_count'])
repo_dics = response_dic['items']
print("repositories returned:" + str(len(repo_dics)))
# з ”з©¶дёҖдёӘд»“еә“
repo_dic = repo_dics[0]
print("\nKeys:", str(len(repo_dic)))
# for key in sorted(repo_dic.keys()):
# print(key)
print("Name:", repo_dic['name'])
print("Owner:", repo_dic['owner']['login'])
print("Starts:", repo_dic['stargazers_count'])
print("Repository:", repo_dic['html_url'])
print("Created:", repo_dic['created_at'])
print("Updated:", repo_dic['updated_at'])
print("Description:", repo_dic['description'])
еҫ—еҲ°з»“жһңпјҡ
Total repositories: 2061622
repositories returned:30
Keys: 71
Name: awesome-python
Owner: vinta
Starts: 40294
Repository: https://github.com/vinta/awesome-python
Created: 2014-06-27T21:00:06Z
Updated: 2017-10-29T00:50:49Z
Description: A curated list of awesome Python frameworks, libraries, software and resourcesвҖңжҖҺд№Ҳз”ЁPythonз»ҳеҲ¶з®ҖеҚ•зҡ„жҠҳдёқеӣҫвҖқзҡ„еҶ…е®№е°ұд»Ӣз»ҚеҲ°иҝҷйҮҢдәҶпјҢж„ҹи°ўеӨ§е®¶зҡ„йҳ…иҜ»гҖӮеҰӮжһңжғідәҶи§ЈжӣҙеӨҡиЎҢдёҡзӣёе…ізҡ„зҹҘиҜҶеҸҜд»Ҙе…іжіЁдәҝйҖҹдә‘зҪ‘з«ҷпјҢе°Ҹзј–е°ҶдёәеӨ§е®¶иҫ“еҮәжӣҙеӨҡй«ҳиҙЁйҮҸзҡ„е®һз”Ёж–Үз« пјҒ
е…ҚиҙЈеЈ°жҳҺпјҡжң¬з«ҷеҸ‘еёғзҡ„еҶ…е®№пјҲеӣҫзүҮгҖҒи§Ҷйў‘е’Ңж–Үеӯ—пјүд»ҘеҺҹеҲӣгҖҒиҪ¬иҪҪе’ҢеҲҶдә«дёәдё»пјҢж–Үз« и§ӮзӮ№дёҚд»ЈиЎЁжң¬зҪ‘з«ҷз«ӢеңәпјҢеҰӮжһңж¶үеҸҠдҫөжқғиҜ·иҒ”зі»з«ҷй•ҝйӮ®з®ұпјҡis@yisu.comиҝӣиЎҢдёҫжҠҘпјҢ并жҸҗдҫӣзӣёе…іиҜҒжҚ®пјҢдёҖз»ҸжҹҘе®һпјҢе°Ҷз«ӢеҲ»еҲ йҷӨж¶үе«ҢдҫөжқғеҶ…е®№гҖӮ